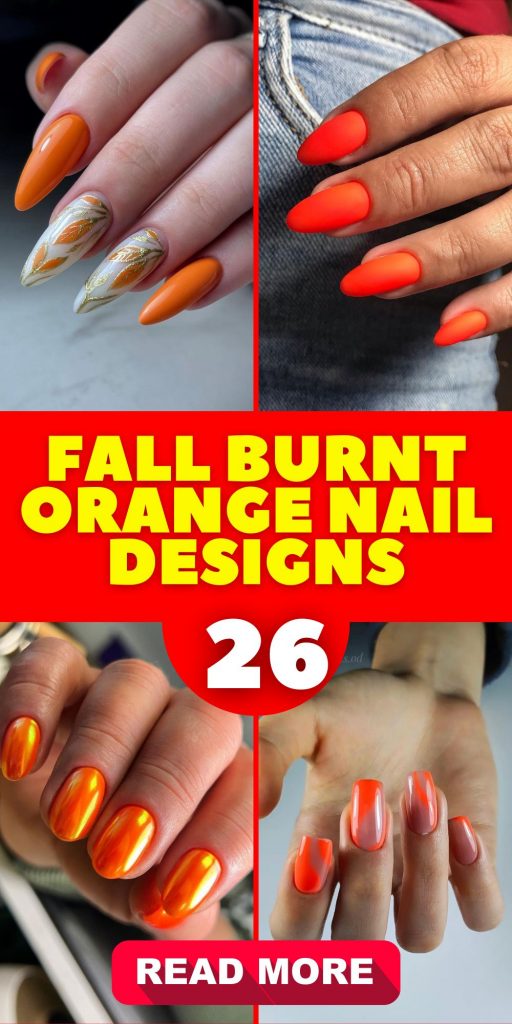
Fall Burnt Orange Nail Designs 26 Ideas: A Seasonal Delight
Autumn is the perfect time to experiment with warm, earthy tones, and fall burnt orange nail designs are a fantastic way to capture the essence of the season. Whether you’re prepping for Thanksgiving, looking forward to October festivities, or just want a touch of pumpkin spice on your nails, burnt orange is a versatile and trendy choice. Let’s explore some stunning ideas that will make your nails the highlight of the season.
Matte Burnt Orange Elegance
When it comes to fall burnt orange nail designs, nothing speaks elegance like a matte finish. This look is sophisticated, simple, and absolutely perfect for the Autumn season. The matte texture gives a modern twist to the traditional glossy manicure, making it a standout choice for any occasion.
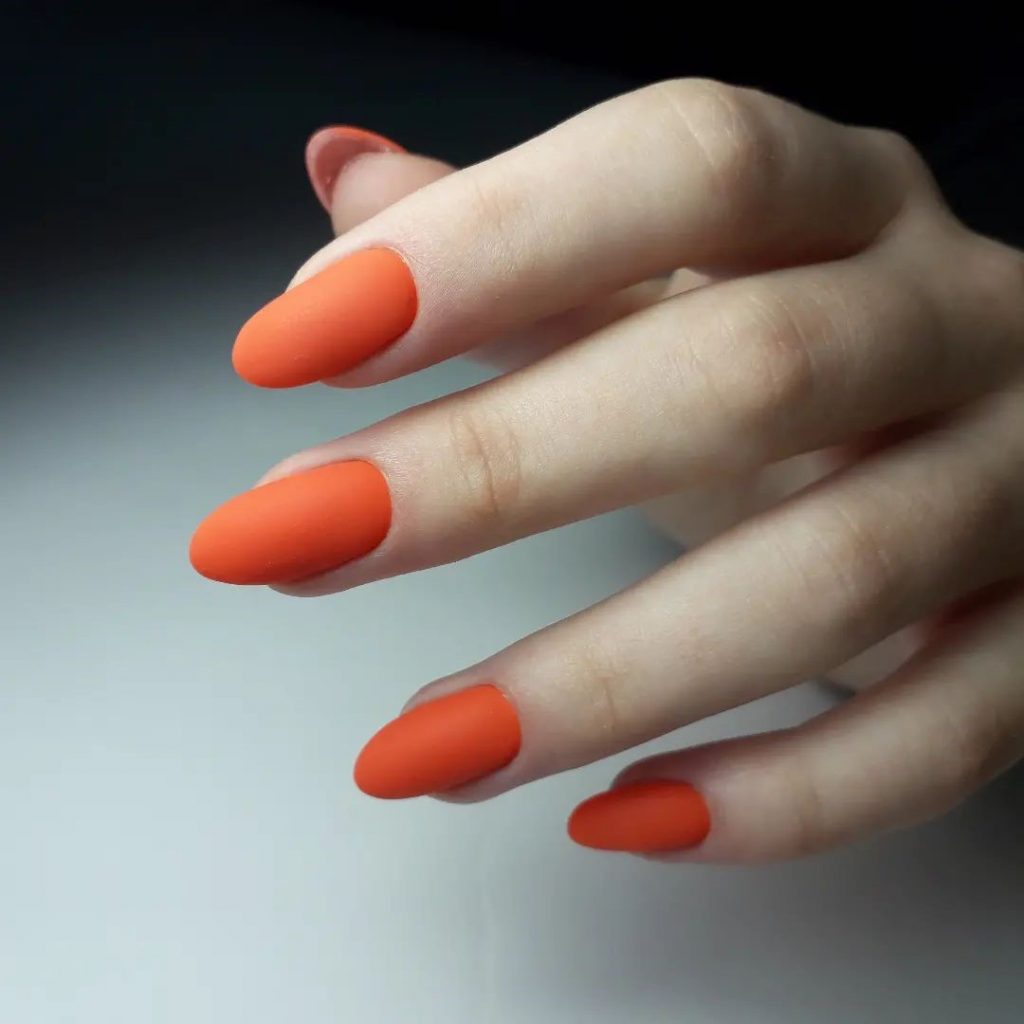
This design exudes sophistication and warmth, perfect for the cozy vibe of November. The velvety finish adds depth and creates a polished yet understated look that transitions seamlessly from casual outings to formal events. The burnt orange shade embodies the essence of fall, reminiscent of falling leaves and pumpkin patches, making it a must-have for the season.
Consumables Needed
- Matte top coat: Essie Matte About You
- Burnt orange polish: OPI A Good Man-darin is Hard to Find
- Base coat: Sally Hansen Double Duty Base & Top Coat
DIY Instructions
- Prep your nails by filing and shaping them into your desired length and style. Almond and square shapes work particularly well with this design.
- Apply a base coat to protect your natural nails and ensure the polish adheres smoothly.
- Apply two coats of burnt orange polish, allowing each coat to dry completely.
- Finish with a matte top coat to achieve that sophisticated velvety look.
- Let your nails dry completely, and voilà! Your matte burnt orange nails are ready to dazzle.
Burnt Orange French Tips
French tip designs are timeless, but adding a burnt orange twist gives them a fresh, seasonal update. This look is perfect for those who love the classic elegance of French tips but want to incorporate the rich hues of Autumn into their manicure.
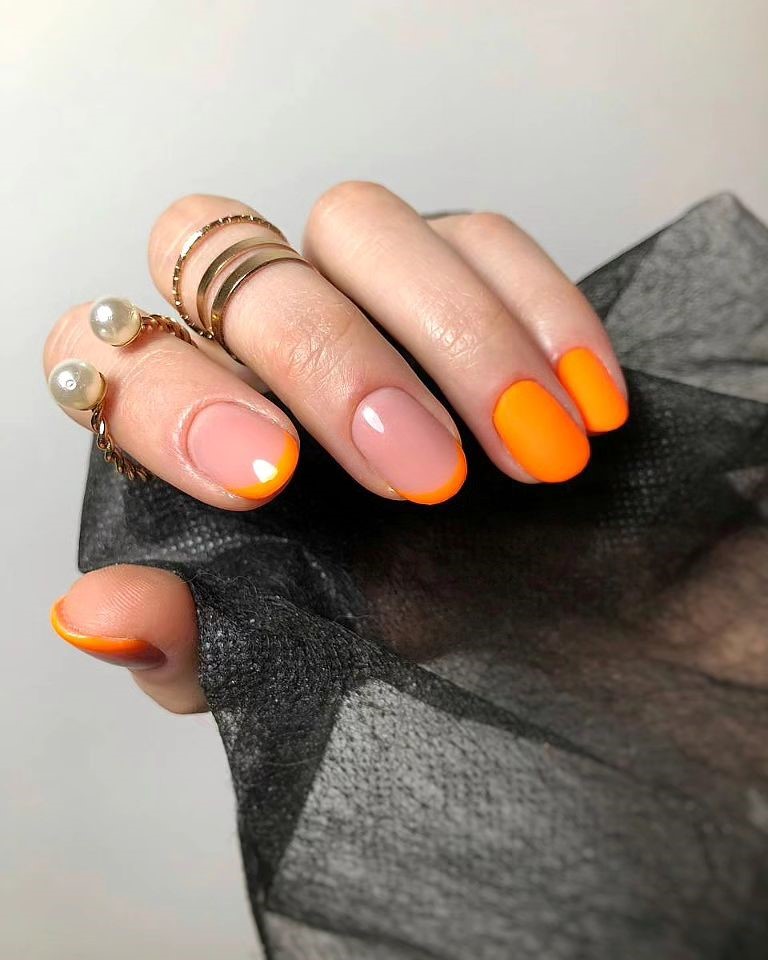
The burnt orange tips stand out beautifully against a neutral base, creating a modern and stylish contrast. This design is versatile, making it suitable for both everyday wear and special occasions like Thanksgiving dinners or October festivities. The touch of burnt orange adds a playful yet sophisticated vibe to the traditional French manicure.
Consumables Needed
- Neutral base polish: Essie Ballet Slippers
- Burnt orange polish: OPI A Good Man-darin is Hard to Find
- French tip guides: Sally Hansen French Manicure Tip Guides
- Top coat: Seche Vite Dry Fast Top Nail Coat
DIY Instructions
- Start with clean, shaped nails and apply a base coat.
- Apply the neutral base polish and let it dry completely.
- Place the French tip guides on your nails to ensure a clean line.
- Paint the tips with the burnt orange polish, then carefully remove the guides.
- Finish with a top coat to seal and protect your manicure.
Vibrant Burnt Orange and Blue Combo
Combining burnt orange with a bold color like blue creates a striking and unique nail design. This vibrant duo is perfect for those who love to experiment with bold color combos and aren’t afraid to make a statement with their nails.
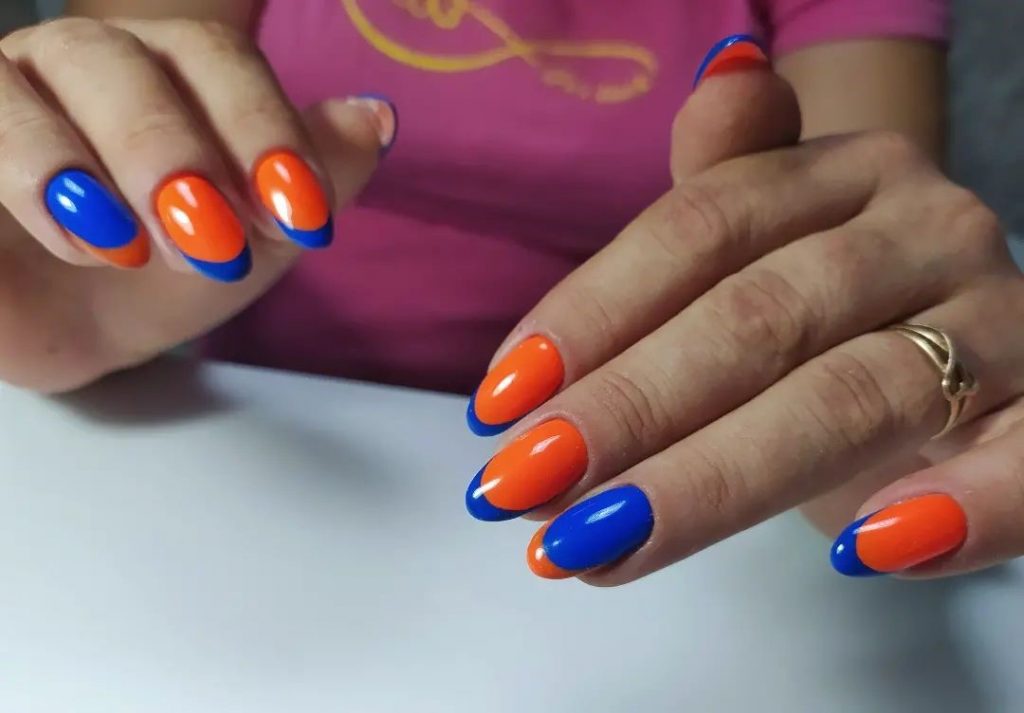
The burnt orange and blue combination is eye-catching and playful, making it a great choice for casual outings or fun events. The contrasting colors complement each other beautifully, adding a dynamic and energetic feel to your manicure. This design is ideal for those looking to break away from traditional fall colors and try something new and exciting.
Consumables Needed
- Burnt orange polish: Essie Playing Koi
- Blue polish: OPI My Pal Joey
- Base coat: Orly Bonder Base Coat
- Top coat: Seche Vite Dry Fast Top Nail Coat
DIY Instructions
- Prep your nails with a base coat.
- Apply two coats of burnt orange polish on all nails except the accent nails, allowing each coat to dry.
- Paint the accent nails with the blue polish, applying two coats for full opacity.
- For a unique twist, create a French tip or half-moon design with the contrasting colors on selected nails.
- Seal the look with a top coat to ensure longevity and shine.
Glossy Burnt Orange Perfection
A glossy burnt orange manicure is a classic yet trendy choice for the Fall season. The high-shine finish enhances the rich hue of the polish, making your nails look vibrant and full of life. This look is versatile and easy to achieve, perfect for both beginners and experienced nail enthusiasts.
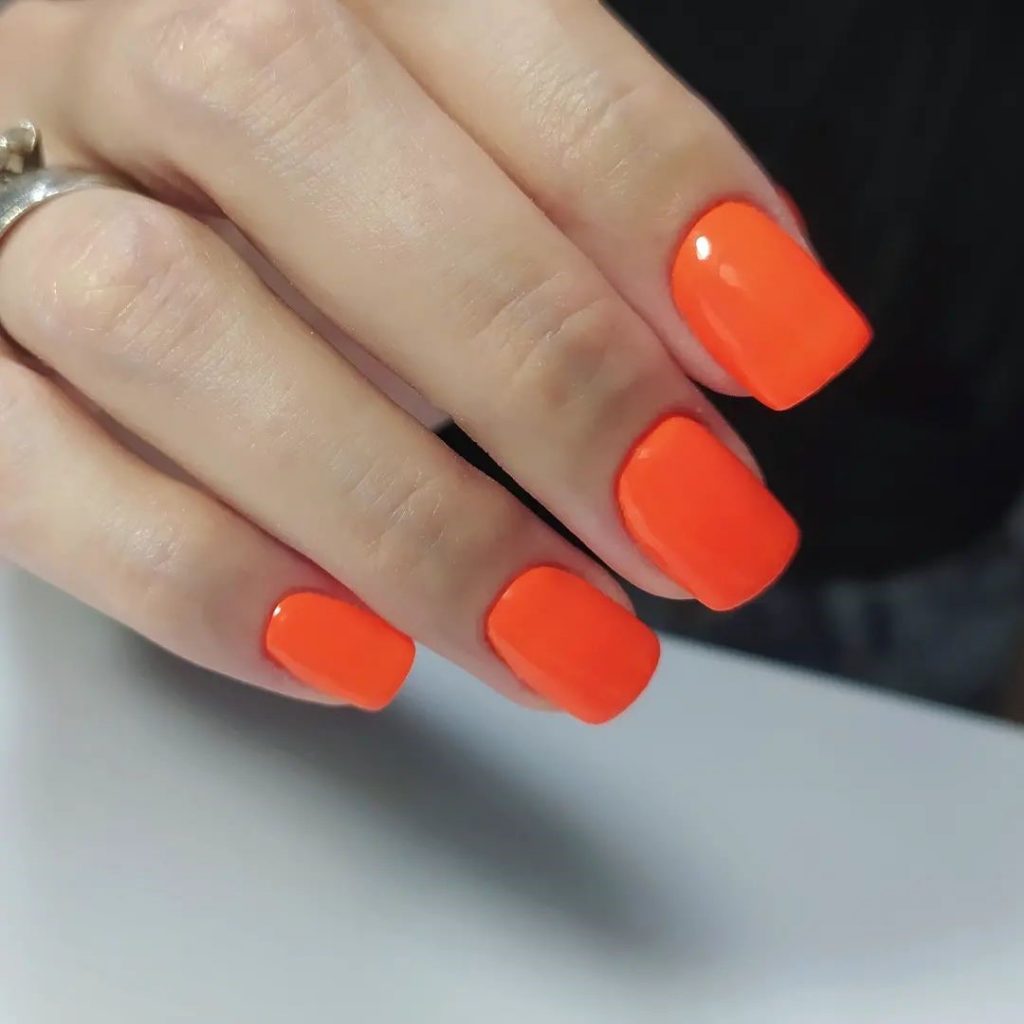
This design brings out the depth and warmth of the burnt orange shade, making it a standout choice for September and October. The glossy finish adds a polished and professional touch, suitable for any occasion, from casual day outings to formal events. This simple yet striking look will undoubtedly turn heads and garner compliments.
Consumables Needed
- Burnt orange polish: OPI A Good Man-darin is Hard to Find
- Glossy top coat: Seche Vite Dry Fast Top Nail Coat
- Base coat: Sally Hansen Double Duty Base & Top Coat
DIY Instructions
- Start with clean, prepped nails and apply a base coat.
- Apply two coats of burnt orange polish, allowing each coat to dry completely.
- Finish with a glossy top coat to enhance the shine and protect your manicure.
- Allow your nails to dry thoroughly, and enjoy your vibrant, glossy nails.
Chrome Burnt Orange Shine
For a futuristic and dazzling look, try a chrome burnt orange manicure. This design combines the warm hues of burnt orange with the eye-catching shine of chrome, creating a unique and glamorous effect. Perfect for those who love to stand out and experiment with new trends.
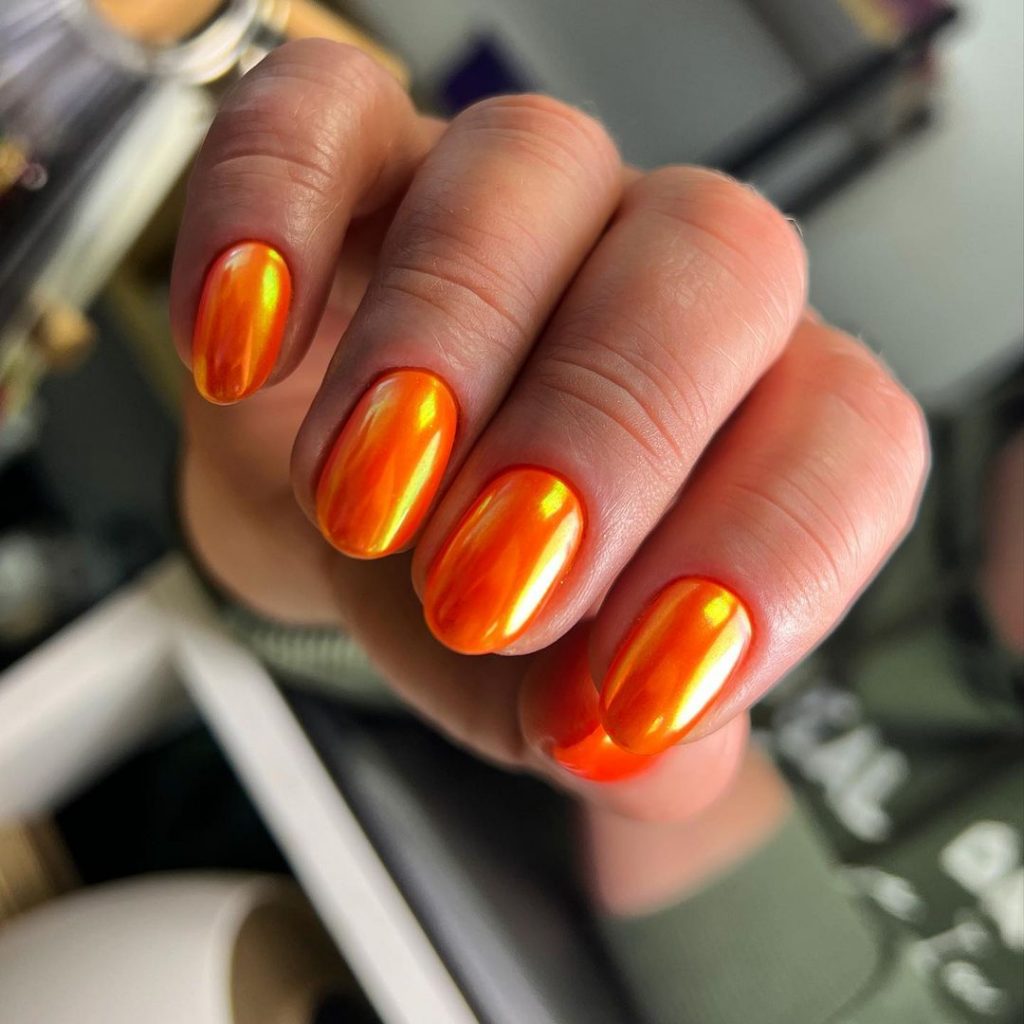
The chrome finish gives the burnt orange color a metallic, reflective quality, adding an extra dimension to your nails. This design is perfect for special occasions, night outs, or when you simply want to add a touch of glamour to your everyday look. The combination of burnt orange and chrome creates a mesmerizing effect that will make your nails the center of attention.
Consumables Needed
- Chrome powder: Whats Up Nails Magic Mirror Powder
- Burnt orange gel polish: Gelish Good Gossip
- No-wipe top coat: Gelish Top It Off
- Base coat: Gelish Foundation
DIY Instructions
- Prep your nails with a base coat.
- Apply two coats of burnt orange gel polish, curing each coat under a UV/LED lamp.
- Apply a no-wipe top coat and cure it under the lamp.
- Using an applicator, rub the chrome powder onto your nails until you achieve the desired shine.
- Finish with another layer of top coat to seal in the chrome powder and protect your manicure.
Burnt Orange French Tips with Gems
Burnt orange French tips add a fresh twist to the classic French manicure. The bright, vibrant tips are complemented by an accent nail adorned with orange gems, creating a stunning and sophisticated look that’s perfect for the fall season.
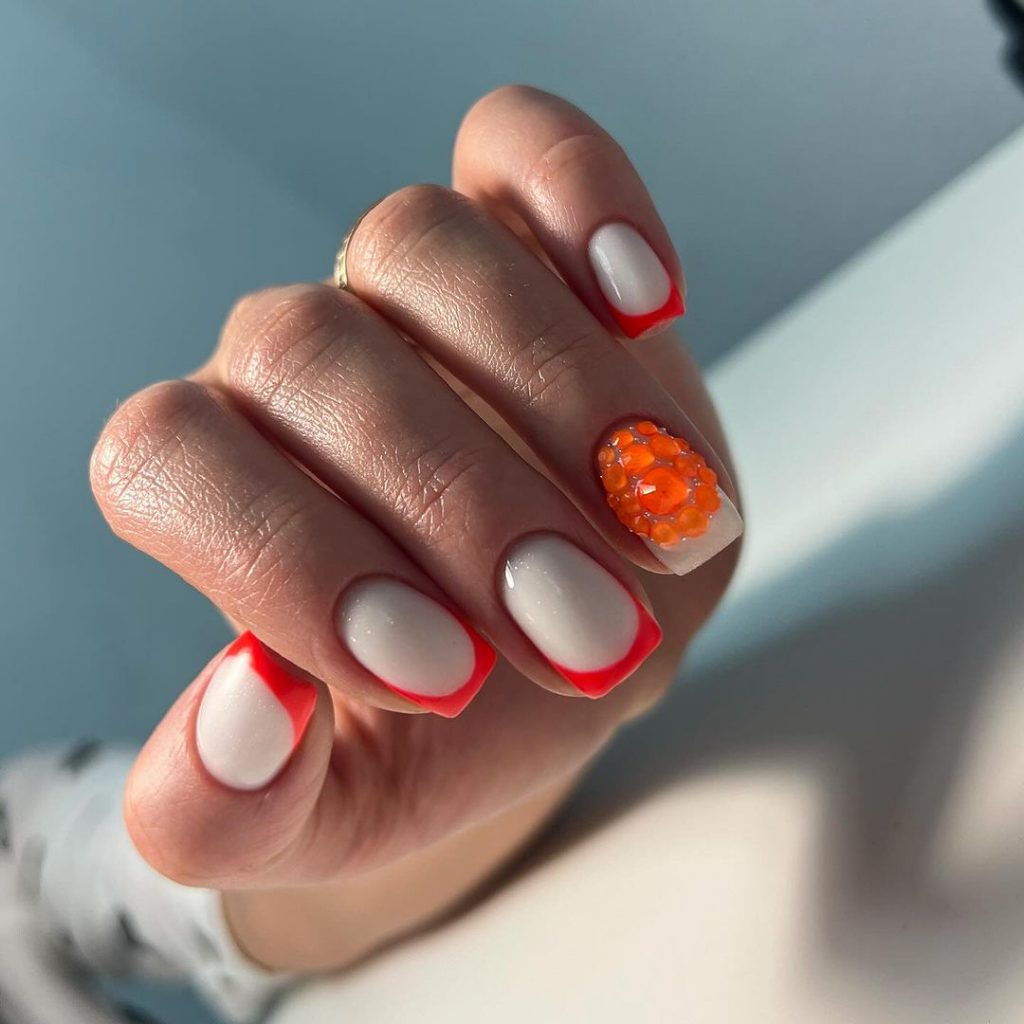
This design combines elegance and fun, making it perfect for both casual and formal occasions. The contrast between the neutral base and the burnt orange tips is striking, while the gem embellishments on the accent nail add a touch of glamour and uniqueness. It’s a great choice for those who want to stand out with a refined yet bold manicure.
Consumables Needed
- Neutral base polish: Essie Ballet Slippers
- Burnt orange polish: OPI A Good Man-darin is Hard to Find
- French tip guides: Sally Hansen French Manicure Tip Guides
- Orange gems: Swarovski Flat Back Crystals
- Top coat: Seche Vite Dry Fast Top Nail Coat
DIY Instructions
- Prep your nails with a base coat.
- Apply the neutral base polish and let it dry completely.
- Place the French tip guides on your nails to ensure a clean line.
- Paint the tips with the burnt orange polish, then carefully remove the guides.
- Apply a small amount of top coat to the accent nail and place the orange gems carefully.
- Finish with a top coat to seal and protect your manicure.
Pumpkin Patch Nail Art
Celebrate the harvest season with a playful pumpkin-themed nail design. This manicure features a mix of burnt orange, plaid patterns, and adorable pumpkin art, making it perfect for fall festivities.
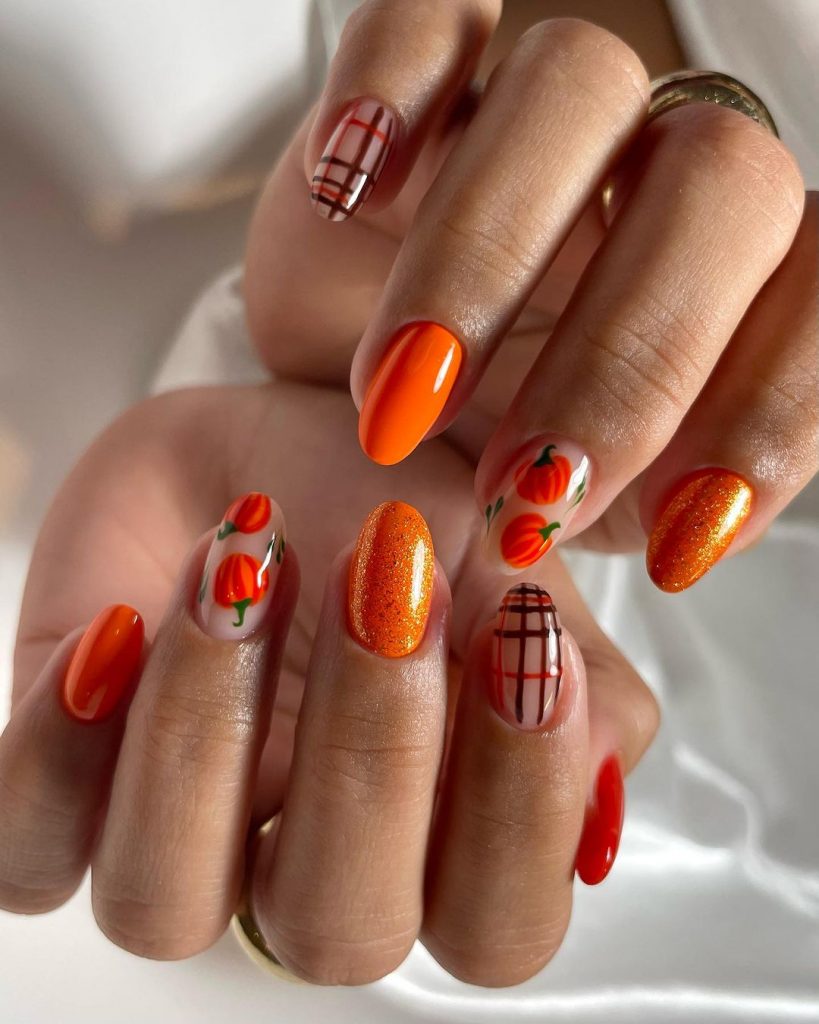
This design captures the essence of October and Thanksgiving, blending fun and creativity. The pumpkin accents are charming and festive, while the plaid patterns add a touch of rustic charm. It’s an excellent choice for those who love intricate nail art and seasonal themes.
Consumables Needed
- Burnt orange polish: Essie Playing Koi
- White polish: OPI Alpine Snow
- Black polish: Essie Licorice
- Green polish: OPI Stay Off the Lawn!
- Detail brushes: Winstonia Fine Line Nail Art Brush Set
- Top coat: Seche Vite Dry Fast Top Nail Coat
DIY Instructions
- Prep your nails with a base coat.
- Apply the burnt orange polish on selected nails.
- Use detail brushes to paint the pumpkins and plaid patterns with white, black, and green polishes.
- Apply a top coat to seal and protect your design.
Autumn Leaf Accents
Incorporate the beauty of fall foliage into your manicure with autumn leaf accents. This design features a mix of burnt orange and neutral tones, adorned with delicate leaf patterns.
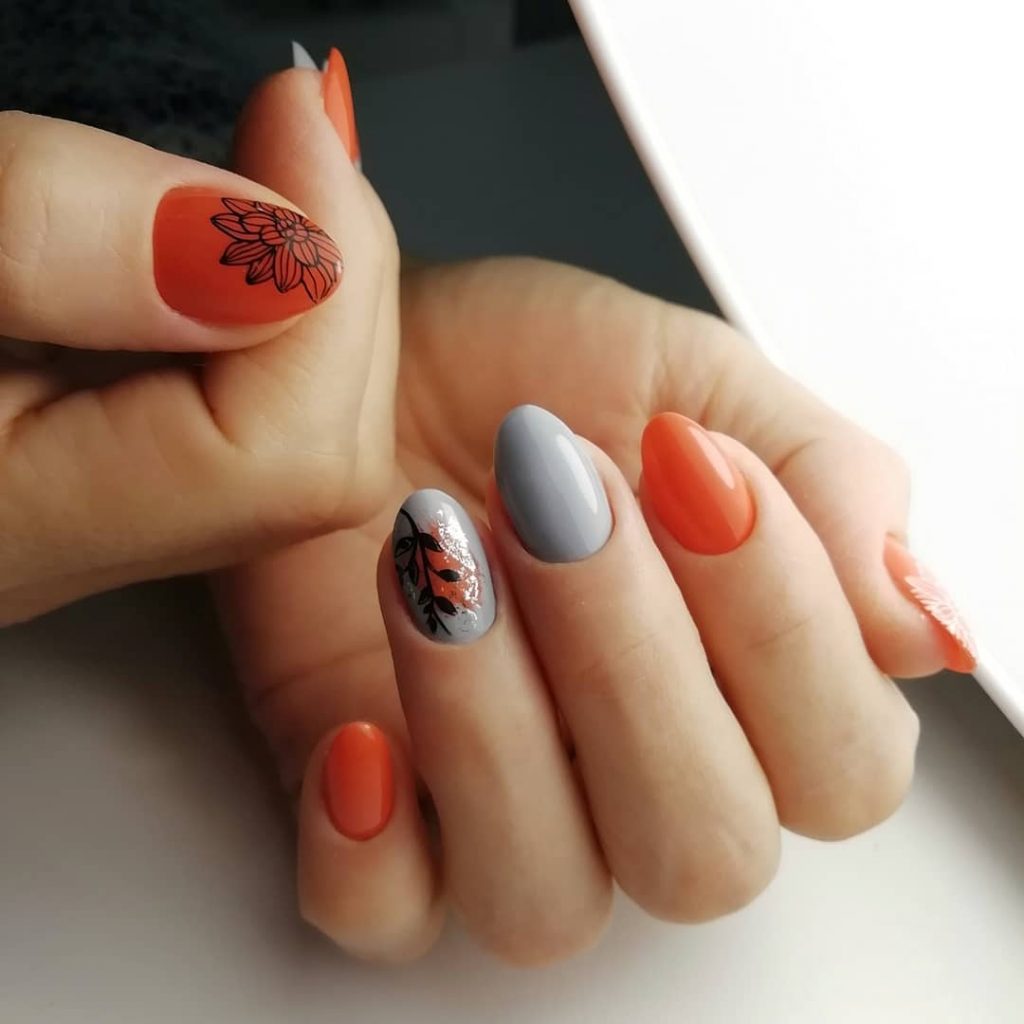
This look is perfect for the Autumn season, capturing the essence of falling leaves and crisp air. The combination of burnt orange and neutral tones creates a balanced and sophisticated look, while the leaf accents add a touch of nature-inspired elegance.
Consumables Needed
- Burnt orange polish: OPI A Good Man-darin is Hard to Find
- Neutral base polish: Essie Ballet Slippers
- Black polish: Essie Licorice
- Leaf nail stickers: Born Pretty Autumn Leaf Nail Stickers
- Top coat: Seche Vite Dry Fast Top Nail Coat
DIY Instructions
- Prep your nails with a base coat.
- Apply the neutral base polish and let it dry completely.
- Apply the burnt orange polish on selected nails.
- Use the leaf nail stickers to add delicate leaf patterns.
- Finish with a top coat to seal and protect your design.
Sparkling Burnt Orange Nails
Add a touch of sparkle to your fall manicure with this stunning burnt orange design. The glittery accents make this look perfect for special occasions and festive gatherings.
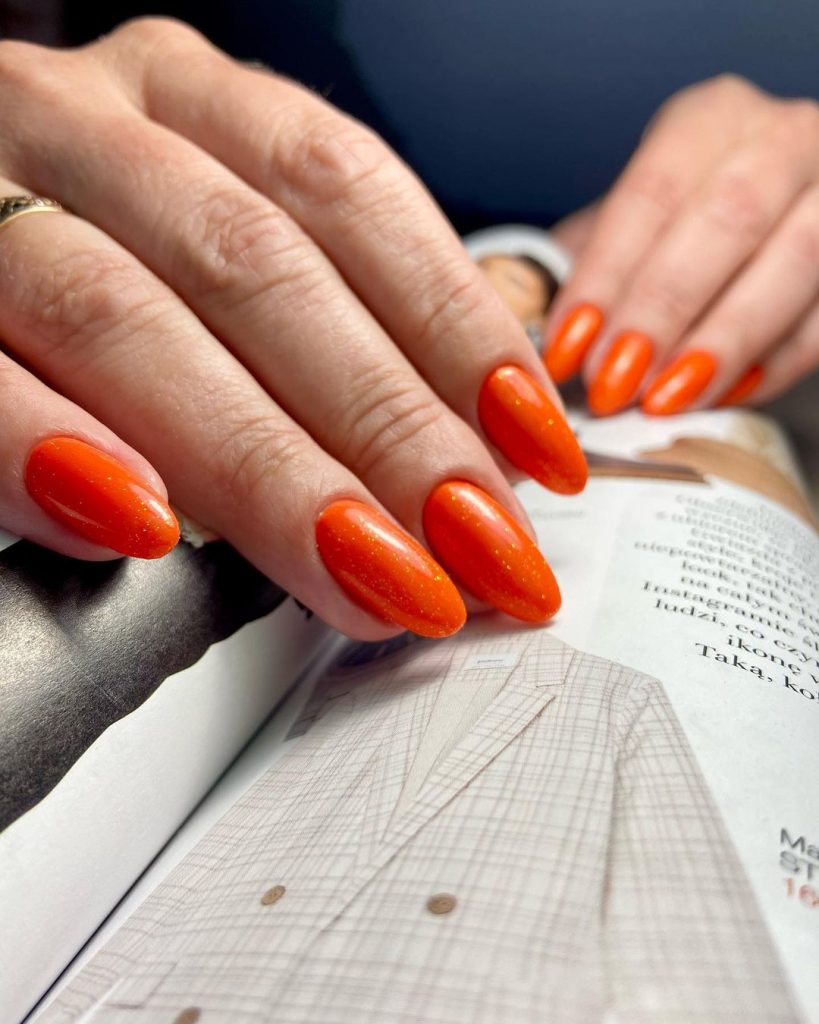
The glitter adds a festive and fun element to the rich burnt orange color, making it ideal for November and Thanksgiving celebrations. This design is both glamorous and seasonal, perfect for adding a bit of sparkle to your fall look.
Consumables Needed
- Burnt orange polish: Essie Playing Koi
- Orange glitter polish: China Glaze I Herd That
- Base coat: Orly Bonder Base Coat
- Top coat: Seche Vite Dry Fast Top Nail Coat
DIY Instructions
- Prep your nails with a base coat.
- Apply two coats of burnt orange polish, allowing each coat to dry.
- Apply the orange glitter polish on accent nails or as a top coat on all nails.
- Finish with a top coat to ensure longevity and shine.
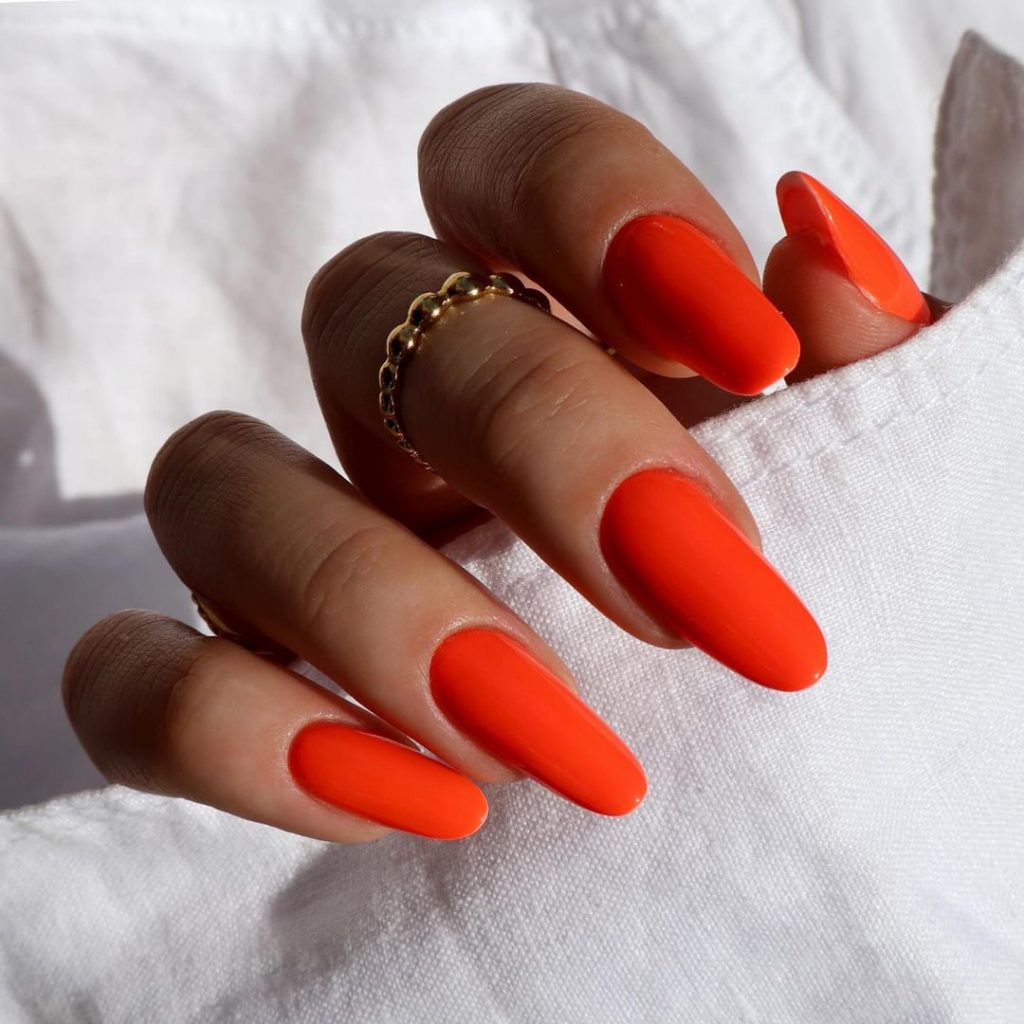
Classic Burnt Orange Nails
A classic burnt orange manicure is a timeless choice for the fall season. The rich, warm hue is perfect for September and October, capturing the essence of autumn.
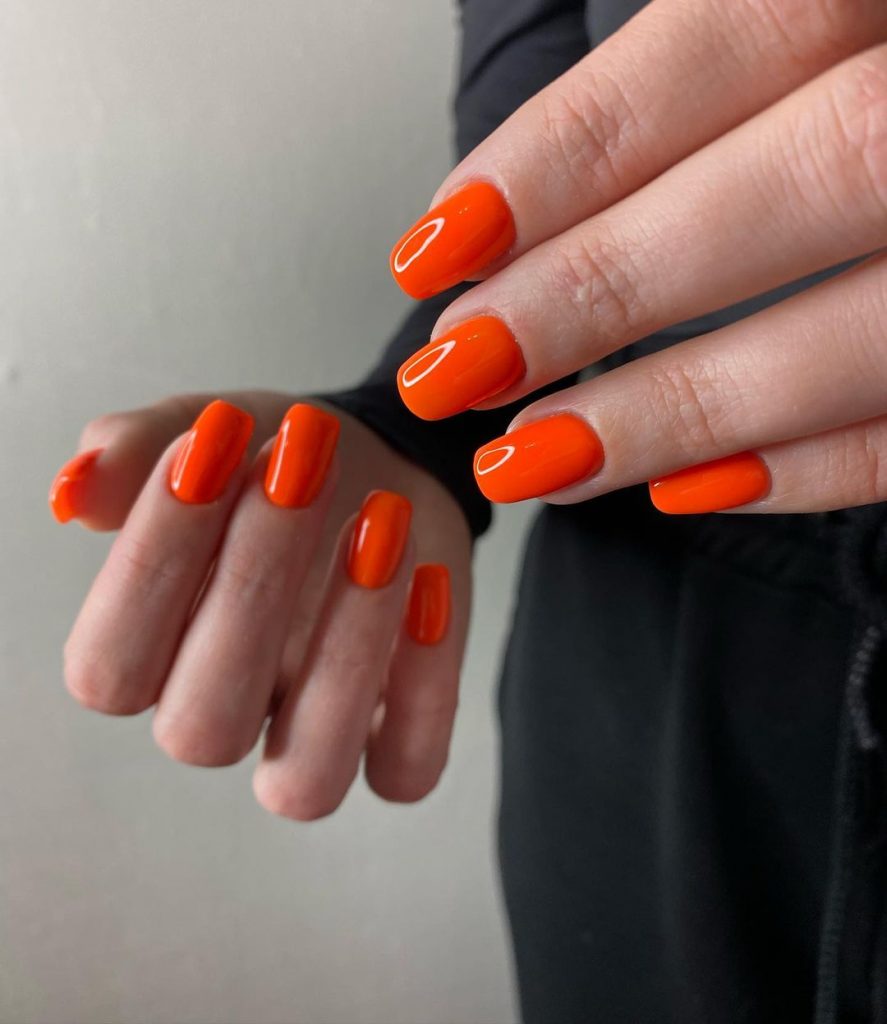
This look is simple yet striking, making it ideal for those who prefer a minimalist approach to their manicures. The vibrant burnt orange color stands out beautifully on its own, making a bold statement without the need for additional accents.
Consumables Needed
- Burnt orange polish: OPI A Good Man-darin is Hard to Find
- Base coat: Sally Hansen Double Duty Base & Top Coat
- Top coat: Seche Vite Dry Fast Top Nail Coat
DIY Instructions
- Start with clean, prepped nails and apply a base coat.
- Apply two coats of burnt orange polish, allowing each coat to dry completely.
- Finish with a top coat to enhance the shine and protect your manicure.
Glittery Burnt Orange Ombre
This glittery burnt orange ombre design is perfect for adding a touch of sparkle to your fall manicure. The gradient effect transitions from a solid burnt orange to a glittery finish, creating a dynamic and eye-catching look.
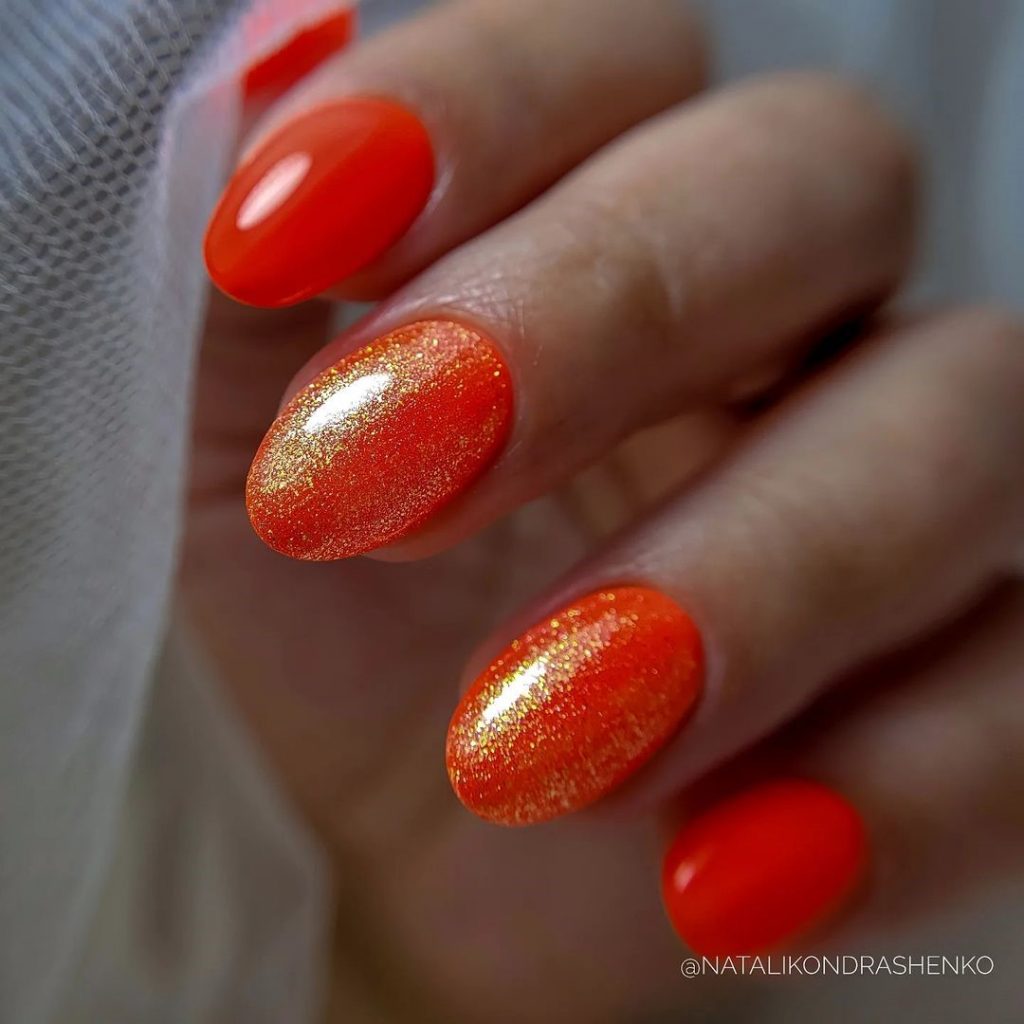
The ombre effect is perfect for those who love a bit of glamour. The combination of burnt orange and gold glitter captures the essence of autumn leaves shimmering in the sunlight, making it ideal for festive occasions and holiday gatherings. This design is sure to make your nails stand out with its vibrant and sparkling finish.
Consumables Needed
- Burnt orange polish: OPI A Good Man-darin is Hard to Find
- Gold glitter polish: China Glaze I Herd That
- Sponge: Wedge makeup sponge
- Base coat: Orly Bonder Base Coat
- Top coat: Seche Vite Dry Fast Top Nail Coat
DIY Instructions
- Prep your nails with a base coat.
- Apply a base layer of burnt orange polish and let it dry completely.
- Using a sponge, apply the gold glitter polish to the tips of your nails, blending it towards the middle for an ombre effect.
- Repeat until the desired gradient is achieved.
- Finish with a top coat to seal the design and add shine.
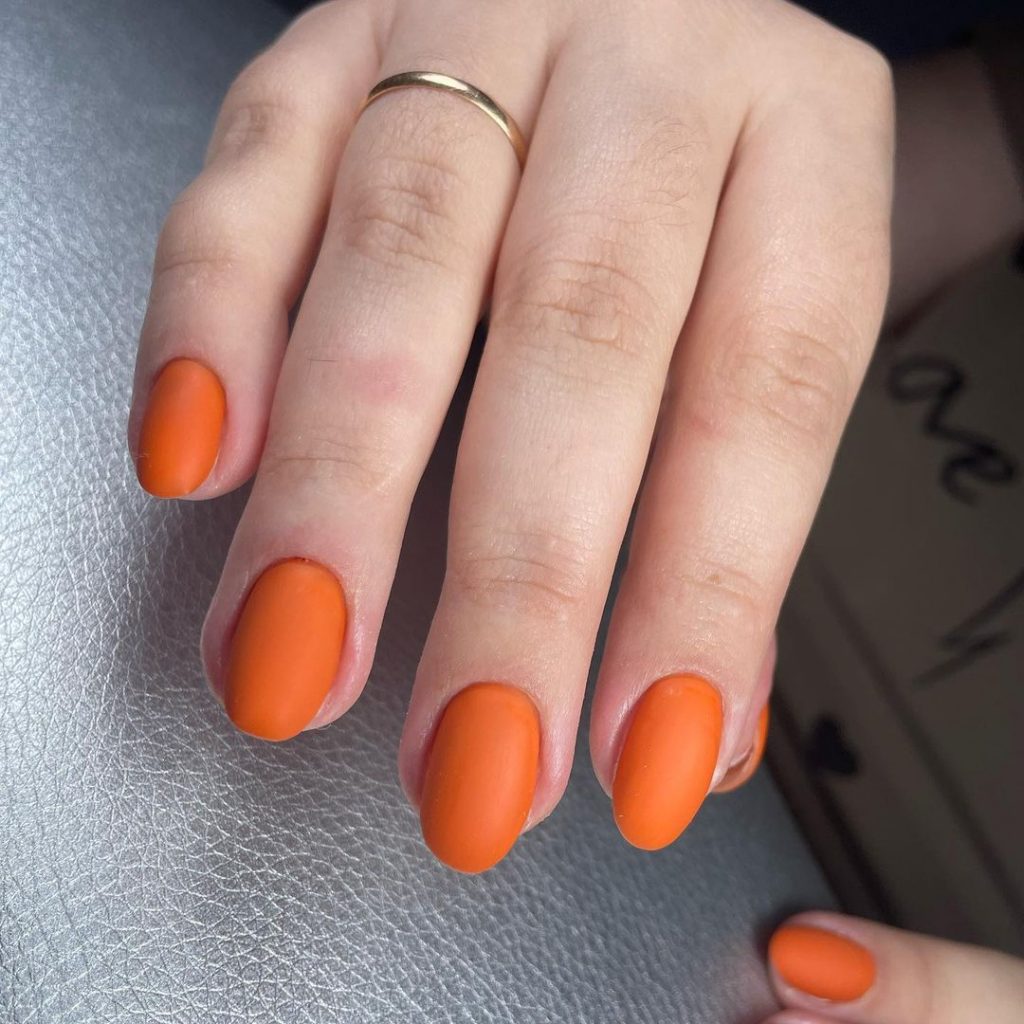
Matte Burnt Orange Nails
Matte nails are a great way to switch up your typical glossy manicure, and this matte burnt orange design is both bold and sophisticated. The matte finish adds a modern twist to the classic burnt orange color, making it perfect for everyday wear and special occasions alike.

This look is versatile and chic, providing a clean and elegant appearance that is ideal for the fall season. The matte texture enhances the rich, warm hue of the burnt orange, giving it a more subdued yet stylish vibe. It’s a perfect choice for those who prefer a more understated and contemporary manicure.
Consumables Needed
- Matte top coat: Essie Matte About You
- Burnt orange polish: OPI A Good Man-darin is Hard to Find
- Base coat: Sally Hansen Double Duty Base & Top Coat
DIY Instructions
- Prep your nails with a base coat.
- Apply two coats of burnt orange polish, allowing each coat to dry completely.
- Finish with a matte top coat to achieve the velvety matte finish.
- Let your nails dry thoroughly to ensure the matte effect sets perfectly.
Abstract Burnt Orange Design
This abstract burnt orange design combines vibrant color with artistic flair. Featuring a mix of solid burnt orange nails and abstract swirls on a neutral base, this look is both playful and sophisticated.
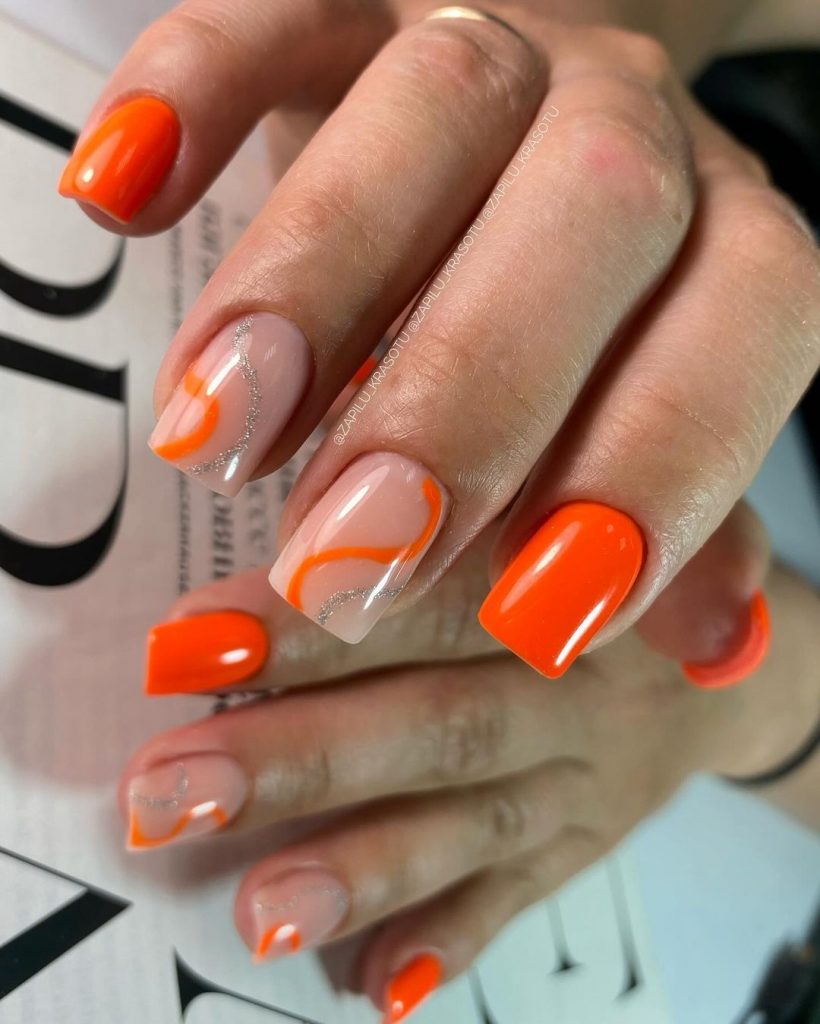
The abstract swirls add a touch of creativity and uniqueness to the manicure, making it perfect for those who love to experiment with nail art. The combination of burnt orange and neutral tones creates a balanced and visually appealing look that is perfect for any occasion.
Consumables Needed
- Burnt orange polish: Essie Playing Koi
- Neutral base polish: Essie Ballet Slippers
- Detail brushes: Winstonia Fine Line Nail Art Brush Set
- Top coat: Seche Vite Dry Fast Top Nail Coat
DIY Instructions
- Prep your nails with a base coat.
- Apply the neutral base polish on selected nails.
- Use detail brushes to create abstract swirls with the burnt orange polish.
- Apply the burnt orange polish on the remaining nails.
- Finish with a top coat to seal and protect your design.
Classic Burnt Orange Nails
A classic burnt orange manicure is a timeless choice for the fall season. The rich, warm hue is perfect for September and October, capturing the essence of autumn.

This look is simple yet striking, making it ideal for those who prefer a minimalist approach to their manicures. The vibrant burnt orange color stands out beautifully on its own, making a bold statement without the need for additional accents.
Consumables Needed
- Burnt orange polish: OPI A Good Man-darin is Hard to Find
- Base coat: Sally Hansen Double Duty Base & Top Coat
- Top coat: Seche Vite Dry Fast Top Nail Coat
DIY Instructions
- Start with clean, prepped nails and apply a base coat.
- Apply two coats of burnt orange polish, allowing each coat to dry completely.
- Finish with a top coat to enhance the shine and protect your manicure.
Matte Burnt Orange Nails
Matte nails are a great way to switch up your typical glossy manicure, and this matte burnt orange design is both bold and sophisticated. The matte finish adds a modern twist to the classic burnt orange color, making it perfect for everyday wear and special occasions alike.
This look is versatile and chic, providing a clean and elegant appearance that is ideal for the fall season. The matte texture enhances the rich, warm hue of the burnt orange, giving it a more subdued yet stylish vibe. It’s a perfect choice for those who prefer a more understated and contemporary manicure.
Consumables Needed
- Matte top coat: Essie Matte About You
- Burnt orange polish: OPI A Good Man-darin is Hard to Find
- Base coat: Sally Hansen Double Duty Base & Top Coat
DIY Instructions
- Prep your nails with a base coat.
- Apply two coats of burnt orange polish, allowing each coat to dry completely.
- Finish with a matte top coat to achieve the velvety matte finish.
- Let your nails dry thoroughly to ensure the matte effect sets perfectly.
Autumn Leaf Nail Art
This design features a stunning combination of burnt orange and deep burgundy, accentuated with delicate leaf patterns. The mix of solid colors and intricate leaf details creates a manicure that’s perfect for the fall season.
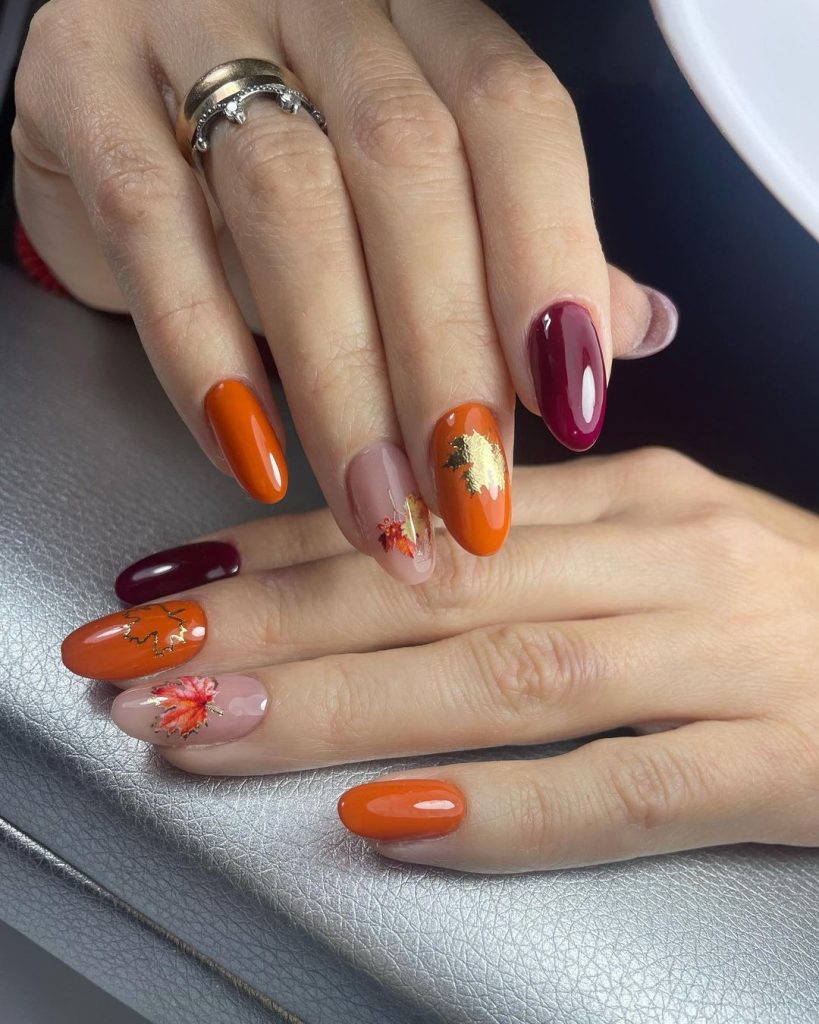
The rich tones of burnt orange and burgundy are reminiscent of falling leaves, making this design ideal for November and Thanksgiving gatherings. The leaf accents add a touch of nature-inspired beauty, making this manicure both elegant and seasonal.
Consumables Needed
- Burnt orange polish: Essie Playing Koi
- Burgundy polish: OPI Malaga Wine
- Neutral base polish: Essie Ballet Slippers
- Leaf nail stickers: Born Pretty Autumn Leaf Nail Stickers
- Top coat: Seche Vite Dry Fast Top Nail Coat
DIY Instructions
- Prep your nails with a base coat.
- Apply the burnt orange polish and burgundy polish on alternating nails.
- Use the leaf nail stickers on selected nails to add intricate leaf patterns.
- Finish with a top coat to seal and protect your design.
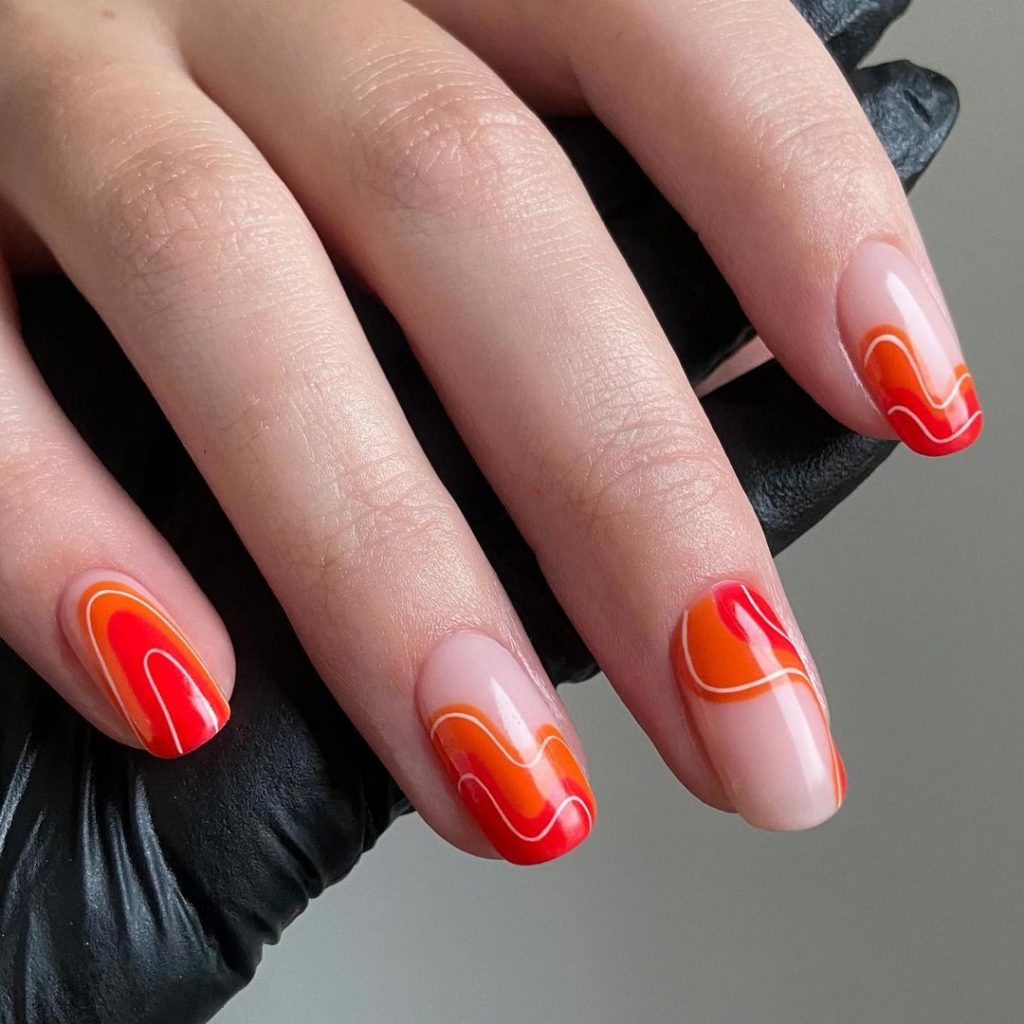
Swirled Burnt Orange and Nude Nails
This design combines the warmth of burnt orange with a nude base, creating a sophisticated swirl effect. The fluid lines and contrasting colors make this manicure both modern and elegant.
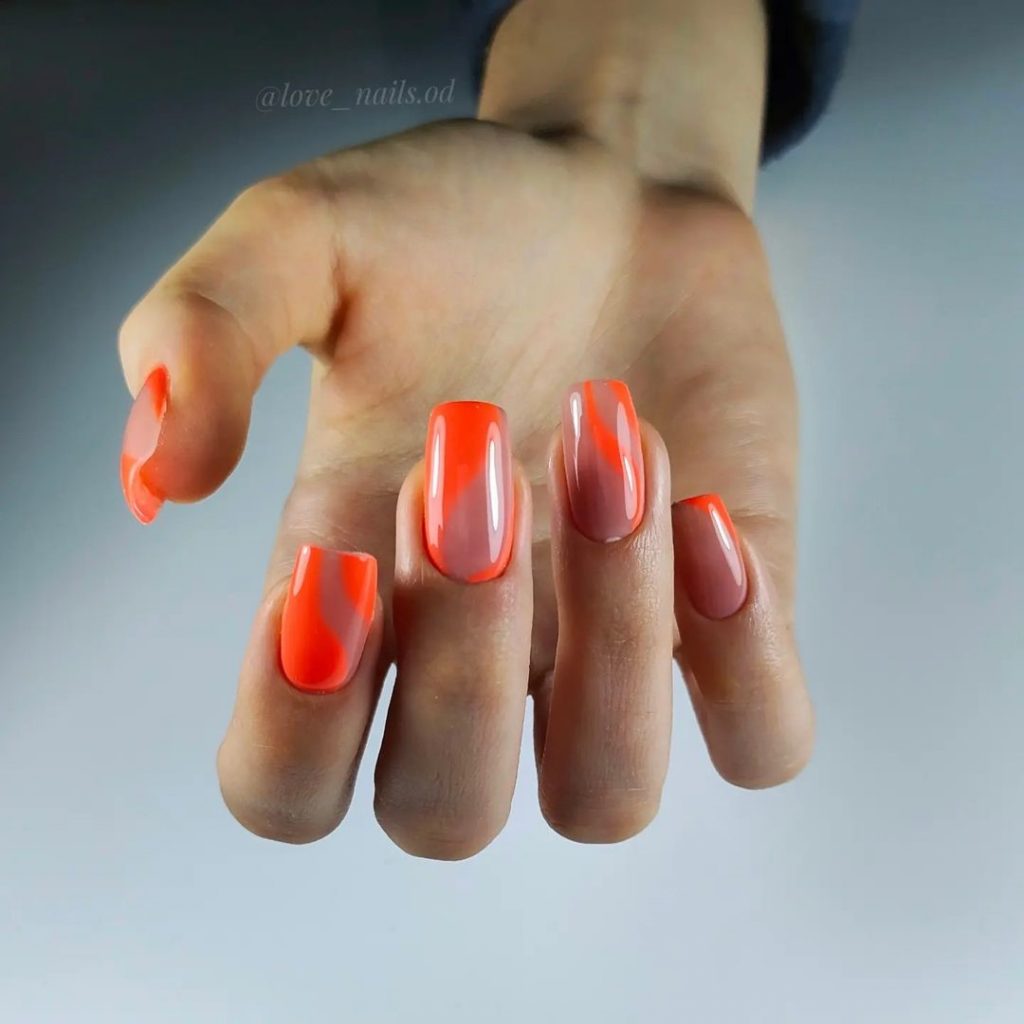
The swirled pattern adds a dynamic and artistic touch to the manicure, making it perfect for any occasion. The combination of burnt orange and nude is versatile and chic, suitable for both casual and formal settings.
Consumables Needed
- Burnt orange polish: OPI A Good Man-darin is Hard to Find
- Nude polish: Essie Ballet Slippers
- Detail brushes: Winstonia Fine Line Nail Art Brush Set
- Top coat: Seche Vite Dry Fast Top Nail Coat
DIY Instructions
- Prep your nails with a base coat.
- Apply the nude polish as the base color.
- Use the detail brushes to create swirls with the burnt orange polish.
- Finish with a top coat to seal and protect your design.
Geometric Burnt Orange Nails
This design features a bold geometric pattern in burnt orange and white, with gold accents. The sharp lines and contrasting colors create a striking and modern look.
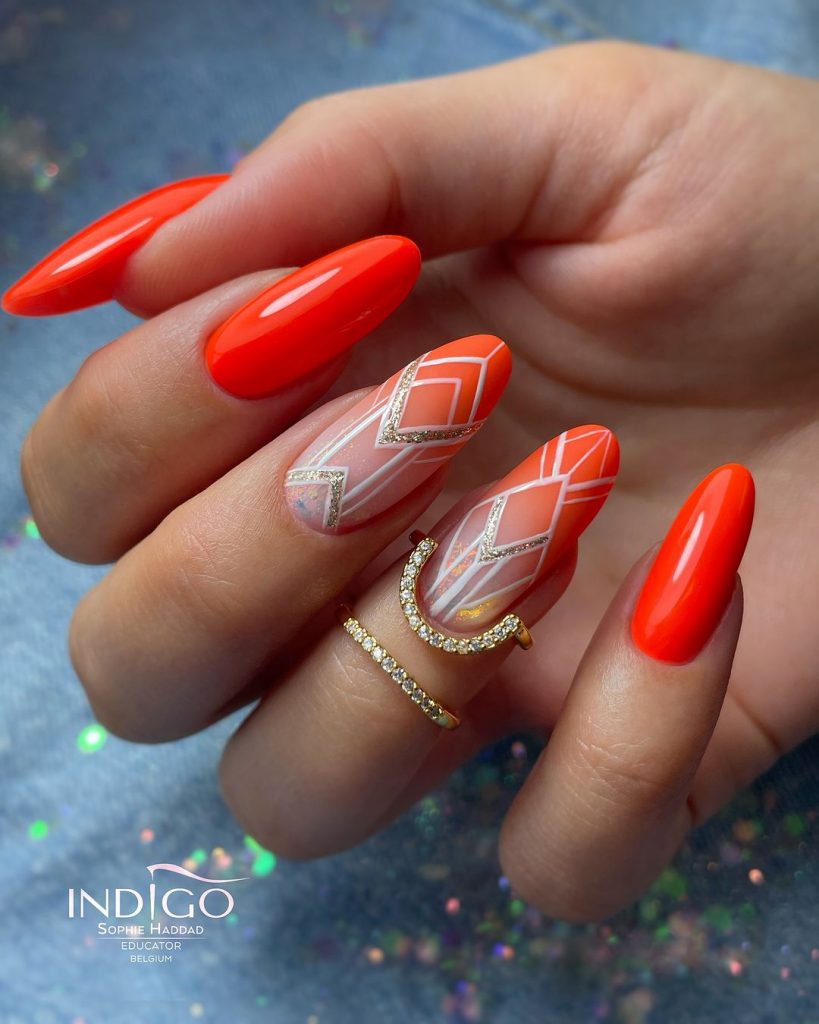
The geometric pattern adds a unique and contemporary touch to the manicure, making it perfect for those who love bold and creative designs. The combination of burnt orange, white, and gold is eye-catching and stylish, suitable for various occasions.
Consumables Needed
- Burnt orange polish: Essie Playing Koi
- White polish: OPI Alpine Snow
- Gold polish: Sally Hansen Insta-Dri Go for Gold
- Detail brushes: Winstonia Fine Line Nail Art Brush Set
- Top coat: Seche Vite Dry Fast Top Nail Coat
DIY Instructions
- Prep your nails with a base coat.
- Apply the burnt orange polish on selected nails.
- Use detail brushes to create geometric patterns with white and gold polishes.
- Finish with a top coat to seal and protect your design.
Burnt Orange Zebra Print Nails
This design combines the vibrant hue of burnt orange with bold zebra print accents. The contrast between the bright orange and black patterns creates a striking and adventurous look.
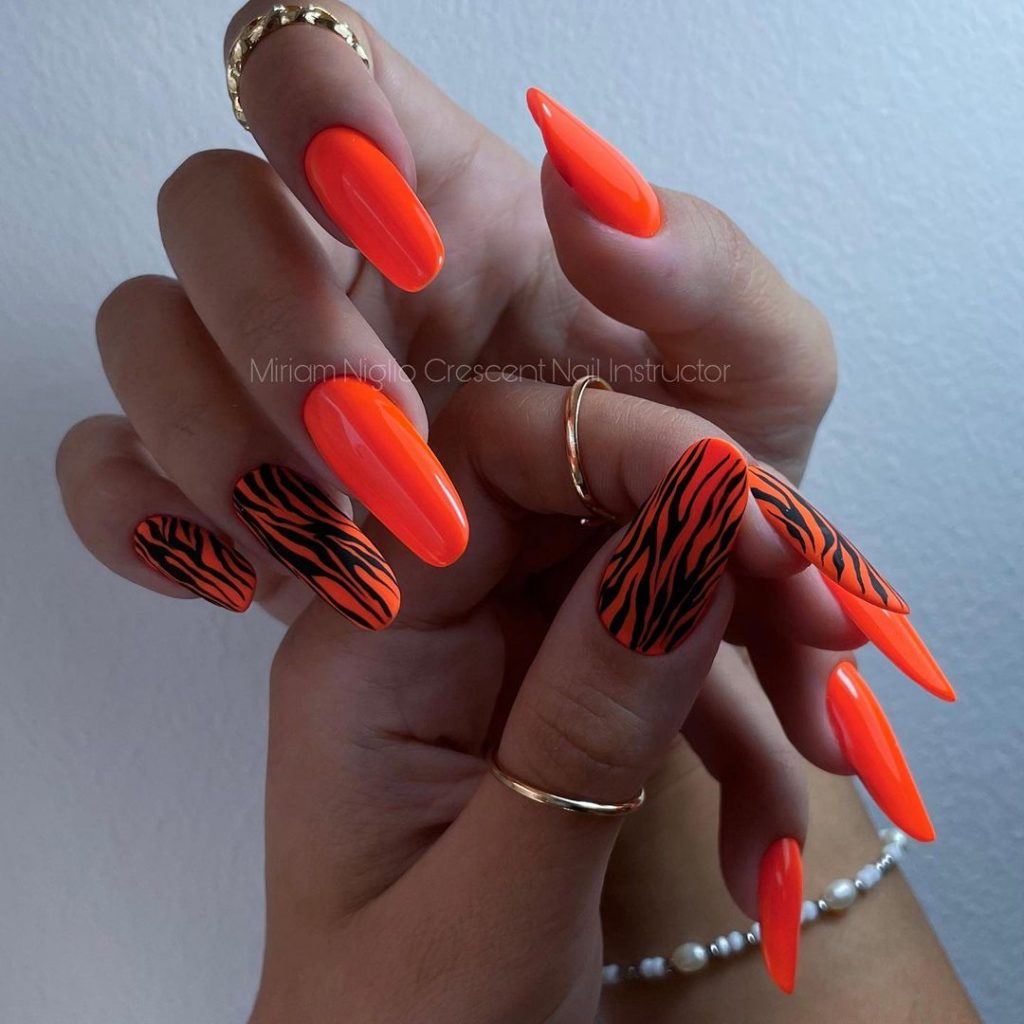
The zebra print adds a wild and edgy touch to the manicure, making it perfect for those who love to experiment with animal prints. The burnt orange base color enhances the overall boldness of the design, making it a great choice for a night out or a special event.
Consumables Needed
- Burnt orange polish: OPI A Good Man-darin is Hard to Find
- Black polish: Essie Licorice
- Detail brushes: Winstonia Fine Line Nail Art Brush Set
- Top coat: Seche Vite Dry Fast Top Nail Coat
DIY Instructions
- Prep your nails with a base coat.
- Apply the burnt orange polish on all nails.
- Use detail brushes to create zebra print patterns with the black polish on accent nails.
- Finish with a top coat to seal and protect your design.
Retro Burnt Orange Swirls
This design features retro-inspired swirls in burnt orange, red, and white on a nude base. The flowing lines and vibrant colors create a playful and nostalgic look.
The retro swirls add a fun and lively touch to the manicure, making it perfect for those who love vintage-inspired designs. The combination of burnt orange, red, and white creates a visually appealing contrast that is both eye-catching and stylish.
Consumables Needed
- Burnt orange polish: Essie Playing Koi
- Red polish: OPI Big Apple Red
- White polish: Essie Blanc
- Nude polish: Essie Ballet Slippers
- Detail brushes: Winstonia Fine Line Nail Art Brush Set
- Top coat: Seche Vite Dry Fast Top Nail Coat
DIY Instructions
- Prep your nails with a base coat.
- Apply the nude polish as the base color.
- Use detail brushes to create retro swirls with burnt orange, red, and white polishes.
- Finish with a top coat to seal and protect your design.
Burnt Orange and White Marble Nails
This design features a striking combination of solid burnt orange nails and white marble accents. The smooth, glossy finish and the sophisticated marble effect make this manicure perfect for those who love a mix of bold and elegant.
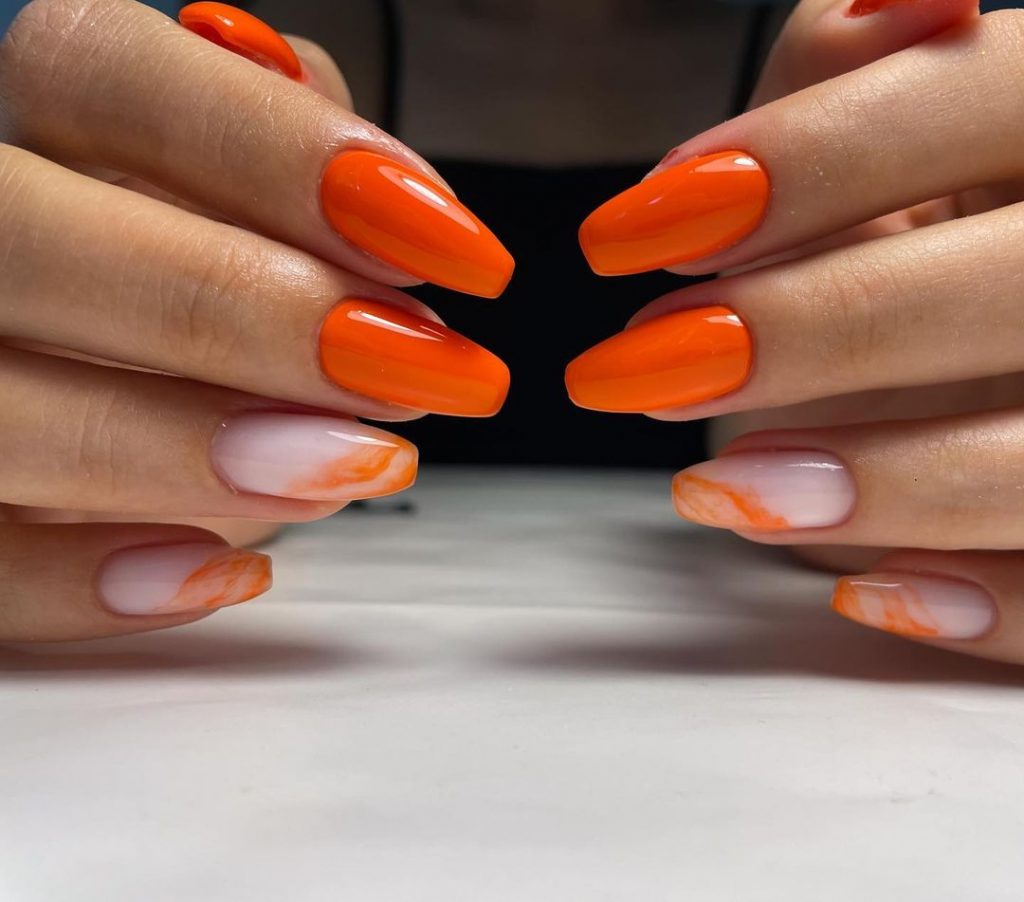
The marble accents provide a unique twist to the classic burnt orange look, adding depth and intrigue to the design. This manicure is ideal for both everyday wear and special occasions, offering a balance of simplicity and style.
Consumables Needed
- Burnt orange polish: OPI A Good Man-darin is Hard to Find
- White polish: OPI Alpine Snow
- Marble nail art tools: Born Pretty Marble Nail Art Brushes
- Top coat: Seche Vite Dry Fast Top Nail Coat
DIY Instructions
- Prep your nails with a base coat.
- Apply the burnt orange polish on all nails except for the accent nails.
- Create the marble effect on the accent nails using the white polish and marble nail art tools.
- Finish with a top coat to seal and protect your design.
Glossy Burnt Orange Nails
A classic, glossy burnt orange manicure is always a great choice for the fall season. The vibrant color and shiny finish make your nails stand out beautifully, capturing the essence of autumn.
This look is simple yet eye-catching, perfect for those who prefer a minimalist yet bold style. The glossy finish enhances the rich hue of the burnt orange polish, making it a timeless and versatile choice for any occasion.
Consumables Needed
- Burnt orange polish: Essie Playing Koi
- Base coat: Sally Hansen Double Duty Base & Top Coat
- Top coat: Seche Vite Dry Fast Top Nail Coat
DIY Instructions
- Start with clean, prepped nails and apply a base coat.
- Apply two coats of burnt orange polish, allowing each coat to dry completely.
- Finish with a top coat to enhance the shine and protect your manicure.
Gradient Burnt Orange Nails
This design features a stunning gradient effect that transitions from a vibrant burnt orange to a soft, translucent tip. The subtle shift in color adds a touch of elegance and sophistication to the manicure.
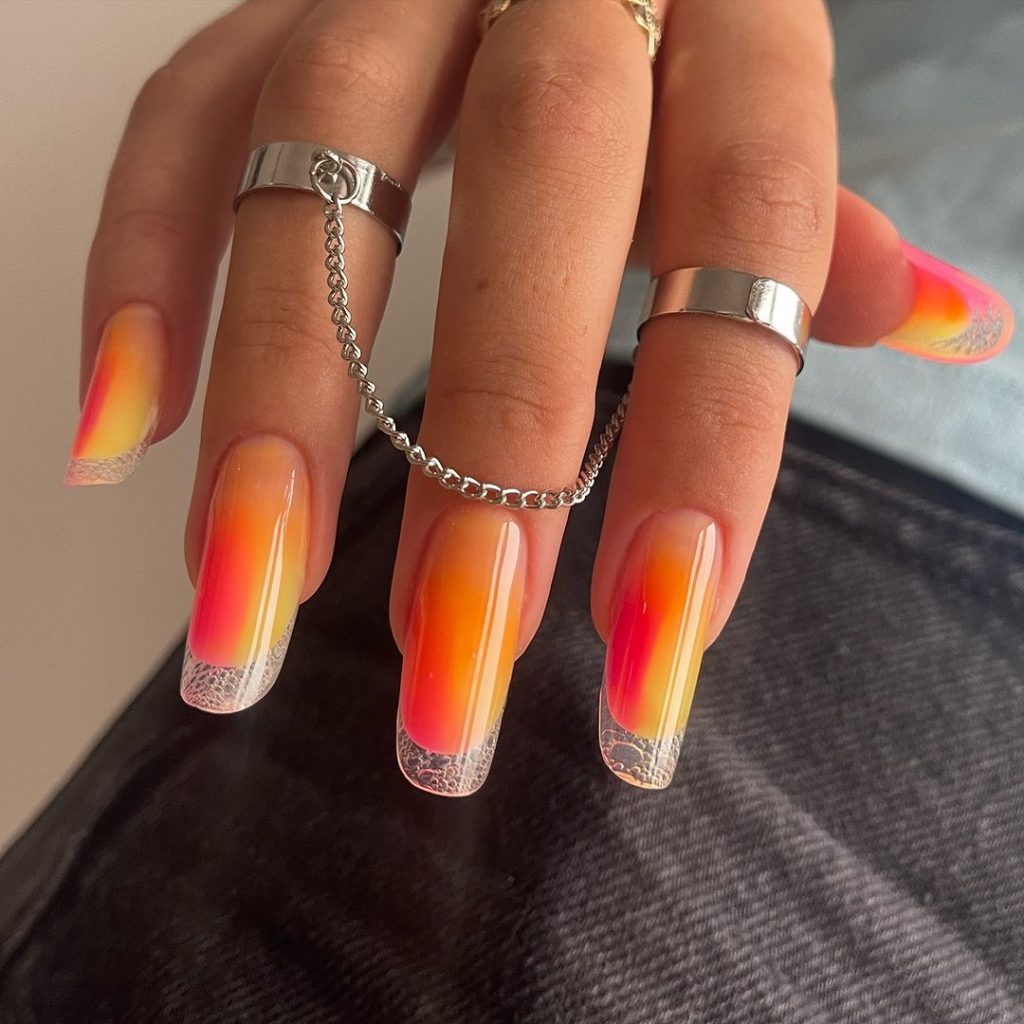
The gradient effect is perfect for those who want a unique and stylish look without being too bold. The smooth transition from orange to translucent creates a soft and delicate appearance, making it ideal for both casual and formal events.
Consumables Needed
- Burnt orange polish: OPI A Good Man-darin is Hard to Find
- Clear polish: OPI Top Coat
- Sponge: Wedge makeup sponge
- Base coat: Orly Bonder Base Coat
- Top coat: Seche Vite Dry Fast Top Nail Coat
DIY Instructions
- Prep your nails with a base coat.
- Apply a base layer of burnt orange polish and let it dry completely.
- Using a sponge, apply the clear polish to the tips of your nails, blending it towards the middle for a gradient effect.
- Repeat until the desired gradient is achieved.
- Finish with a top coat to seal the design and add shine.
Fall Leaves Nail Art
This design incorporates the beauty of fall leaves with a mix of burnt orange, green, and mustard yellow. The detailed leaf patterns on a neutral base create a manicure that’s perfect for the autumn season.
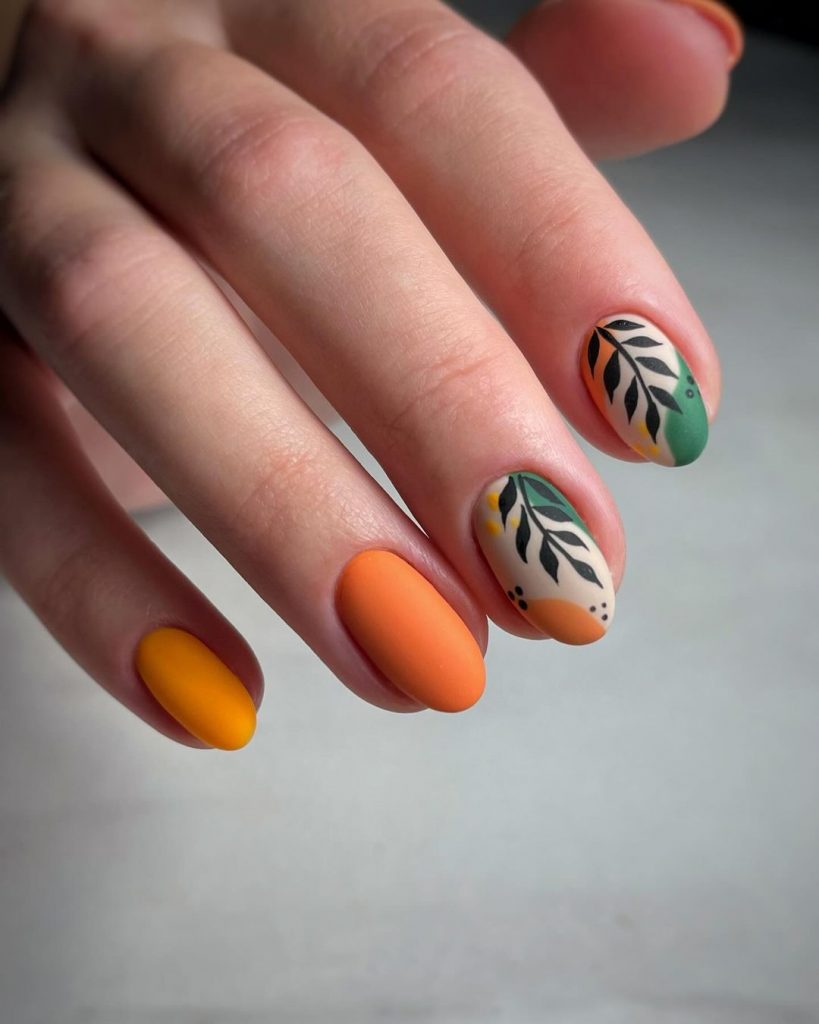
The leaf accents add a touch of nature to the design, making it ideal for September and October. The combination of earthy tones and detailed art makes this manicure both stylish and seasonally appropriate.
Consumables Needed
- Burnt orange polish: Essie Playing Koi
- Green polish: OPI Stay Off the Lawn!
- Mustard yellow polish: Essie Hay There
- Neutral base polish: Essie Ballet Slippers
- Detail brushes: Winstonia Fine Line Nail Art Brush Set
- Top coat: Seche Vite Dry Fast Top Nail Coat
DIY Instructions
- Prep your nails with a base coat.
- Apply the neutral base polish on all nails.
- Use detail brushes to create leaf patterns with burnt orange, green, and mustard yellow polishes.
- Finish with a top coat to seal and protect your design.
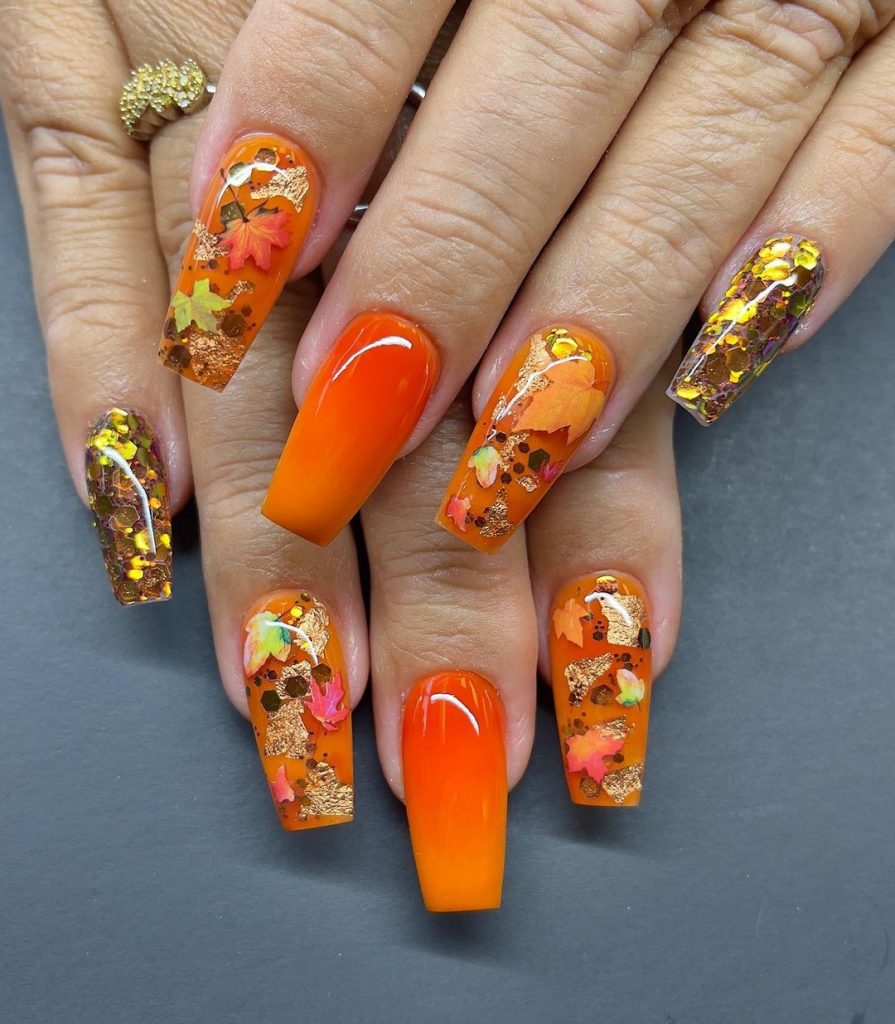
Golden Leaf Accents
This design features burnt orange nails with golden leaf accents, creating a luxurious and elegant look. The combination of rich orange and shimmering gold is perfect for the fall season, adding a touch of glamour to your nails.
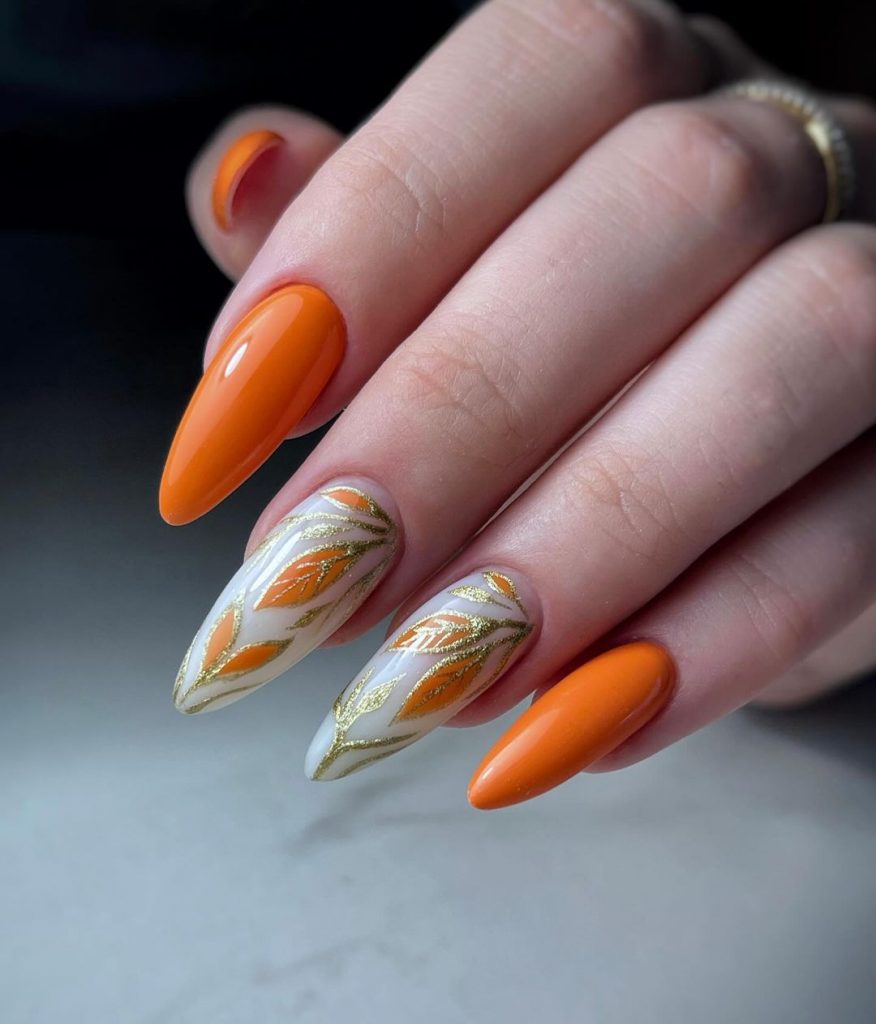
The golden leaf accents provide a sophisticated and festive touch, making this manicure ideal for special occasions and holiday gatherings. The burnt orange base color enhances the overall elegance of the design.
Consumables Needed
- Burnt orange polish: OPI A Good Man-darin is Hard to Find
- Gold polish: Sally Hansen Insta-Dri Go for Gold
- Detail brushes: Winstonia Fine Line Nail Art Brush Set
- Top coat: Seche Vite Dry Fast Top Nail Coat
DIY Instructions
- Prep your nails with a base coat.
- Apply the burnt orange polish on all nails.
- Use detail brushes to create golden leaf patterns with the gold polish on accent nails.
- Finish with a top coat to seal and protect your design.
Autumn Glitter Ombre
This design features a glittery ombre effect with burnt orange and golden glitters, capturing the essence of falling leaves and autumn festivities. The glittery accents make this look perfect for special occasions and festive gatherings.
The ombre effect combined with glitter adds a festive and fun element to the manicure, making it ideal for November and Thanksgiving celebrations. This design is both glamorous and seasonal, perfect for adding a bit of sparkle to your fall look.
Consumables Needed
- Burnt orange polish: Essie Playing Koi
- Gold glitter polish: China Glaze I Herd That
- Sponge: Wedge makeup sponge
- Base coat: Orly Bonder Base Coat
- Top coat: Seche Vite Dry Fast Top Nail Coat
DIY Instructions
- Prep your nails with a base coat.
- Apply a base layer of burnt orange polish and let it dry completely.
- Using a sponge, apply the gold glitter polish to the tips of your nails, blending it towards the middle for an ombre effect.
- Repeat until the desired gradient is achieved.
- Finish with a top coat to seal the design and add shine.
Save Pin