Fall Marble Nails 2024: Trendy Designs and Inspiration for the Season 24 Ideas
When it comes to fall nail trends, marble designs are undeniably the talk of the town for 2024. Whether you’re drawn to subtle nudes or vibrant colors, marble nails offer a chic and versatile look that can suit any style. The beauty of marble nail art lies in its ability to combine elegance with creativity, making your nails a true canvas of expression. In this article, we’ll dive into some of the most stunning fall marble nail designs of 2024. Each style is unique, detailed, and perfect for the season. Let’s explore these gorgeous nail ideas and discover how you can recreate them at home.
Elegant Nude Marble with Gold Accents
This nude marble design exudes understated elegance. The neutral base color allows the white marble veins and delicate gold leaf accents to truly shine. The almond shape of the nails adds a touch of sophistication, making this design perfect for both casual and formal settings. The subtle interplay of the nude and white hues, punctuated by the shimmer of gold, makes these nails a refined choice for fall.
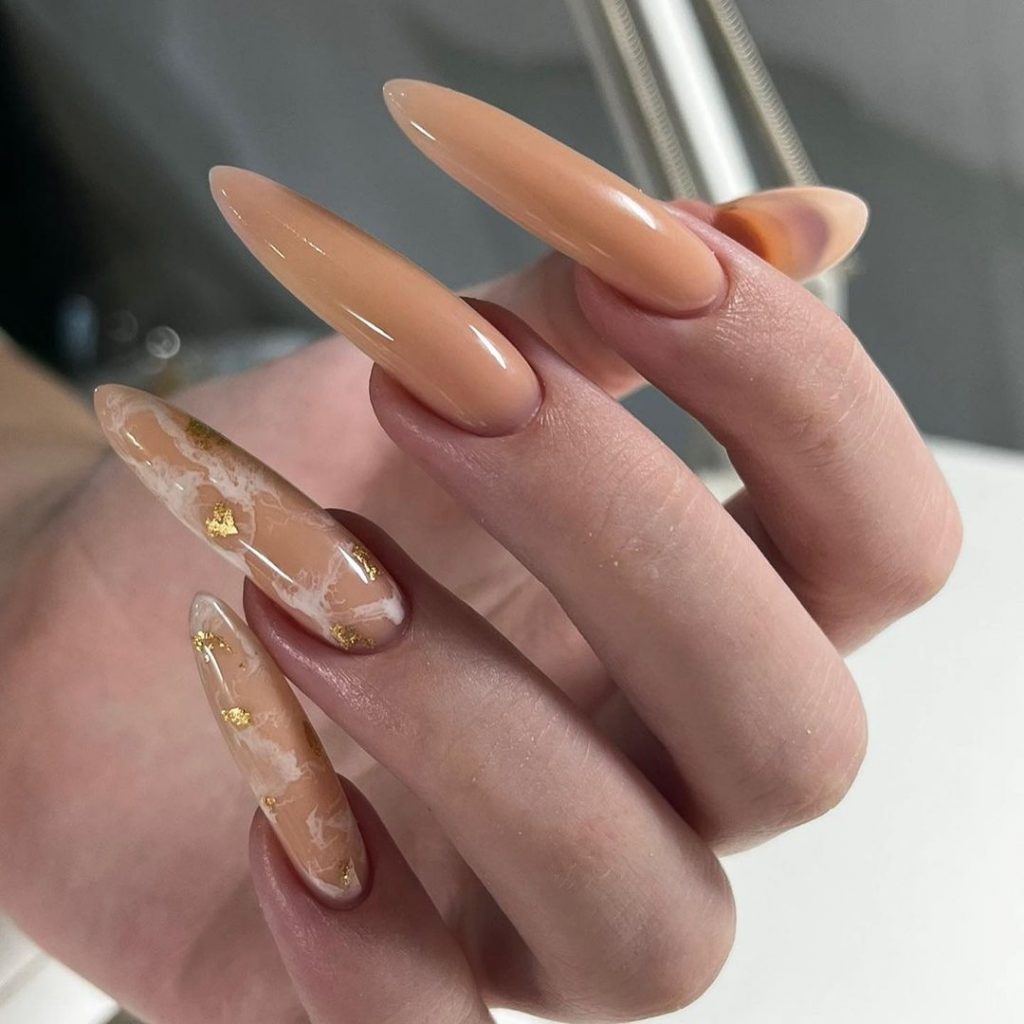
Consumables Needed
- Nude base polish: OPI’s Pale to the Chief
- White marble veining polish: Essie’s Blanc
- Gold leaf flakes: Born Pretty Gold Leaf Foil
- Topcoat: Seche Vite Dry Fast Top Coat
Professional Recommendations
- Use a fine detail brush for the marble veining to create thin, natural-looking lines
- When applying the gold leaf, use tweezers for precise placement to keep the design balanced and elegant
DIY Tutorial
- Start with a base coat, followed by two coats of nude polish
- Using a fine brush, lightly draw white veins across the nail, mimicking the natural marble pattern
- Carefully place gold leaf flakes onto the nail while the polish is still slightly tacky
- Finish with a topcoat to seal the design and add a glossy finish
Vibrant Pink Marble with Gold Outline
Pink marble nails bring a bold, feminine touch to your fall look. This design features a vibrant pink marble pattern outlined with a thin, gold border, creating a striking contrast that’s perfect for making a statement. The almond shape enhances the boldness of this design, making it ideal for those who want to showcase their nails as a piece of art.
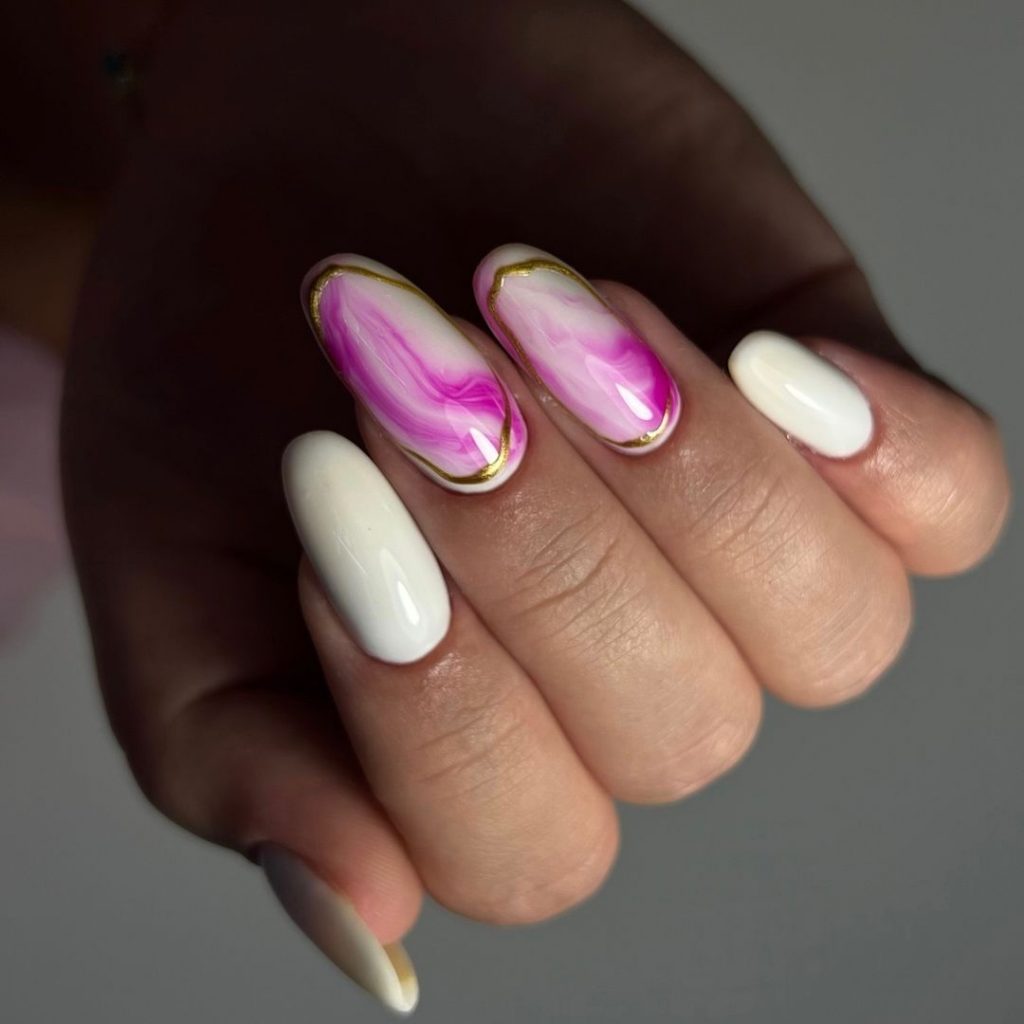
Consumables Needed
- Pink base polish: China Glaze’s Dance Baby
- White marble veining polish: Essie’s Blanc
- Gold polish for outline: Sally Hansen’s Golden-I
- Fine detail brush
- Topcoat: OPI’s Top Coat
Professional Recommendations
- Start with a white marble base before adding the pink over it to achieve a multi-dimensional effect
- Ensure the gold outline is applied with a steady hand for a clean, sharp finish
DIY Tutorial
- Apply a base coat followed by two coats of pink polish
- Create marble veins using a fine brush and white polish, allowing some pink to show through for depth
- Carefully outline the marble design with gold polish using a detail brush
- Seal with a topcoat for durability and shine
Soft Brown Marble with Gold Studs
For those who prefer warm, earthy tones, this brown marble design is the perfect choice. The subtle blend of brown shades with white veins creates a cozy, autumnal look. Adding small gold studs as accents gives the design a touch of elegance without overpowering the simplicity of the marble pattern. The square shape of the nails keeps the look modern and chic.
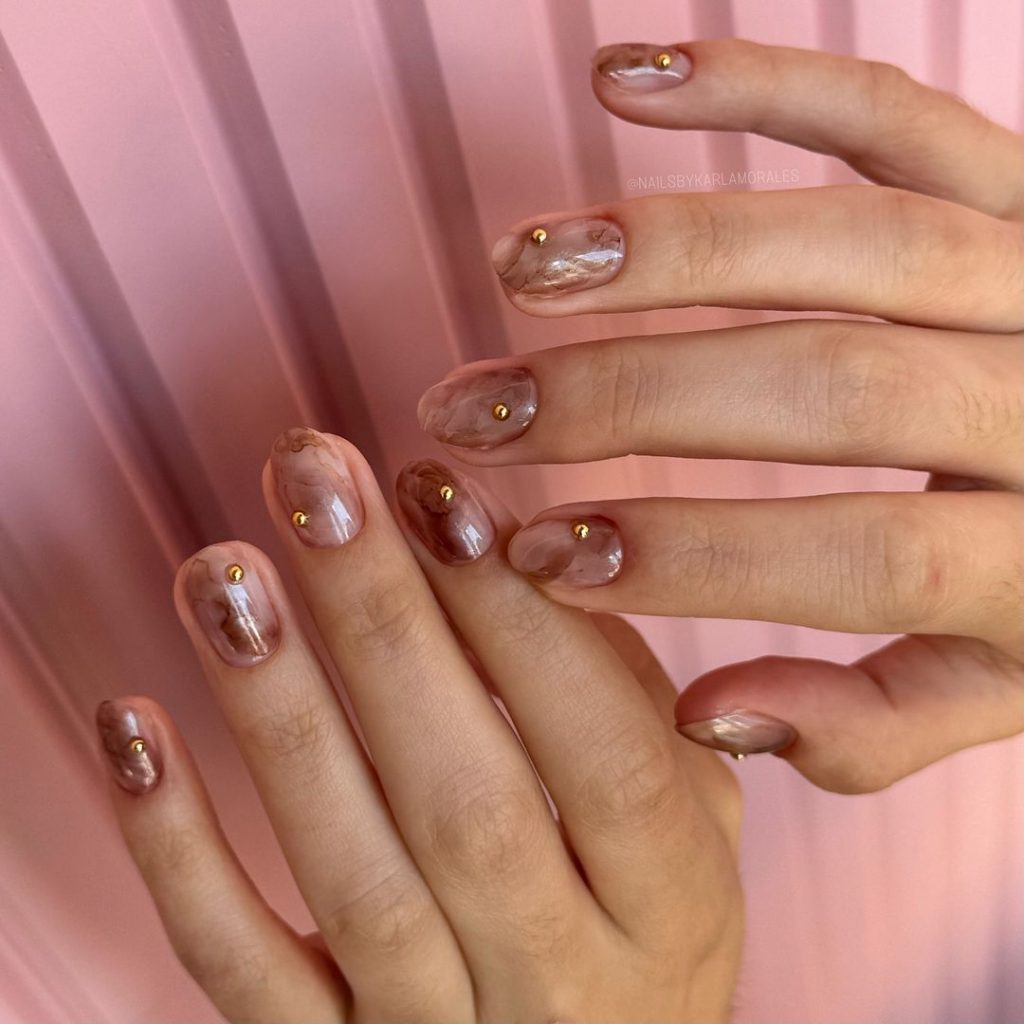
Consumables Needed
- Brown base polish: Essie’s Glamour Purse
- White marble veining polish: Sally Hansen’s White On
- Gold studs: Kiss Gold Studs
- Nail glue for studs
- Topcoat: Essie’s Gel Couture Top Coat
Professional Recommendations
- Use a sponge to create a gradient effect with the brown polish for added depth
- Apply the studs while the polish is still tacky to ensure they adhere well
DIY Tutorial
- Start with a base coat, then apply two coats of your brown polish
- Create subtle marble veins using a fine brush and white polish
- Place gold studs on the nails, securing them with a drop of nail glue
- Apply a topcoat to seal the design and keep the studs in place
Aqua and Gold Marble with Geometric Accents
This aqua and gold marble design is perfect for those who love a fresh, eye-catching look. The cool aqua tones are beautifully complemented by swirls of white and gold, giving the nails a luxurious yet playful vibe. The geometric accents add an artistic flair, making these nails a standout choice for fall. The almond shape enhances the overall elegance of the design, making it suitable for both casual and formal occasions.
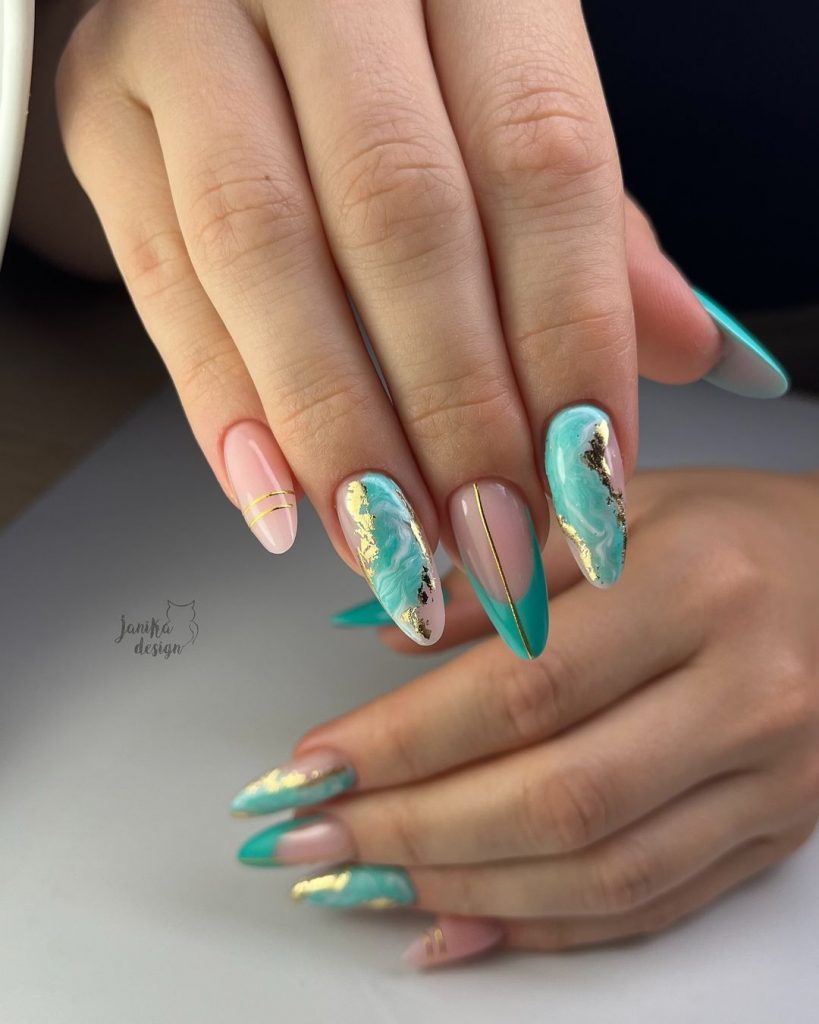
Consumables Needed
- Aqua base polish: Zoya’s Blu
- White marble veining polish: China Glaze’s White on White
- Gold foil: Nail Art Gold Foil Flakes
- Fine detail brush
- Topcoat: Orly’s Glosser
Professional Recommendations
- To achieve the perfect marble effect, use a fine brush to blend the aqua and white polishes while they’re still wet
- The geometric accents should be carefully drawn to maintain symmetry across all nails
DIY Tutorial
- Apply a base coat, followed by two coats of aqua polish
- While the polish is still wet, use a fine brush to create marble veins with white polish
- Add gold foil accents where desired, pressing gently into the wet polish
- Finish with a topcoat to seal the design and add shine
Deep Green Marble with Gold and Glitter Accents
Deep green nails are perfect for fall, and when combined with marble, gold, and glitter accents, they become a true showstopper. The rich green base is highlighted with swirling marble patterns, a touch of gold foil, and a pop of glitter. This design is ideal for those who want a luxurious, bold look that still feels grounded and earthy. The almond shape further enhances the elegance and elongates the fingers.
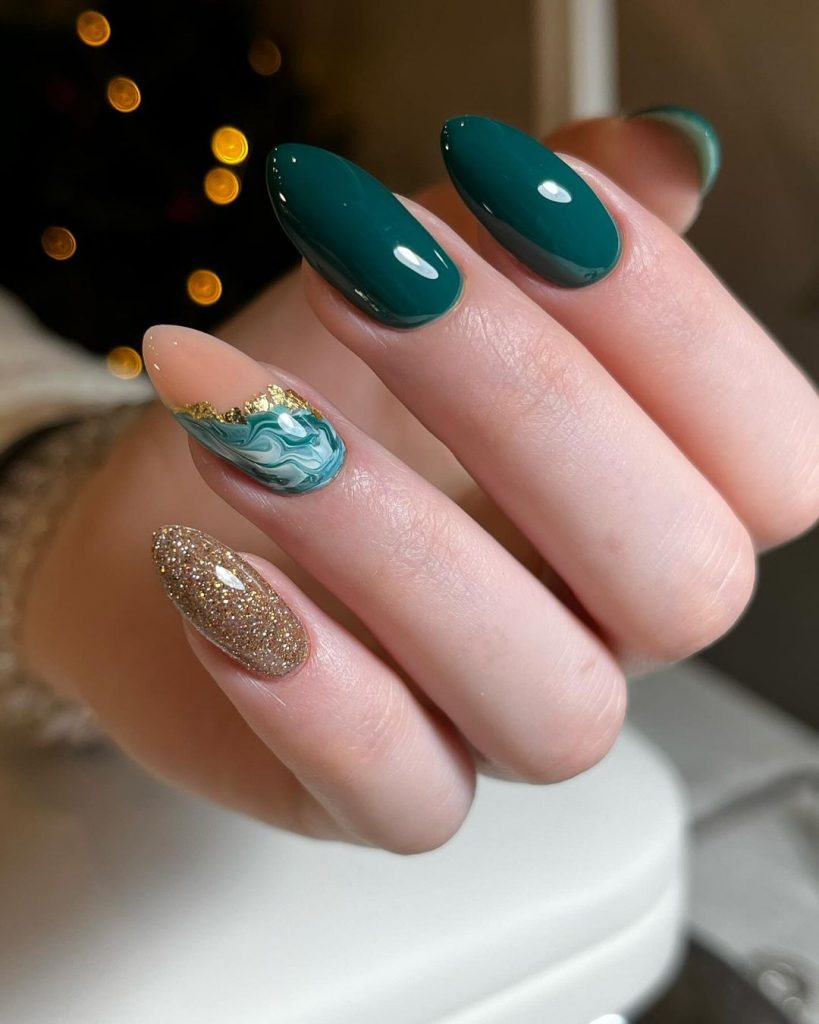
Consumables Needed
- Deep green base polish: OPI’s Stay Off the Lawn
- White marble veining polish: OPI’s Alpine Snow
- Gold foil: Gershion Gold Nail Foil
- Gold glitter polish: China Glaze’s Electrify
- Topcoat: Seche Vite Dry Fast Top Coat
Professional Recommendations
- Use a sponge to apply the glitter polish for a more diffused, less concentrated look
- When applying gold foil, use a small brush to press it into the polish for a smoother finish
DIY Tutorial
- Start with a base coat, then apply two coats of deep green polish
- Create marble veins using white polish and a fine detail brush
- Add gold foil and glitter accents where desired, pressing them gently into the tacky polish
- Finish with a topcoat to seal the design and add extra shine
Soft Nude Marble on Short Nails
This soft nude marble design is perfect for those who prefer a subtle, minimalist look. The short square shape nails are enhanced with delicate white marble veining, creating a sophisticated and chic appearance. This design is ideal for everyday wear, offering a touch of elegance without overpowering your overall style. The simplicity of the nude base combined with the intricate marble details makes this a timeless choice for fall.
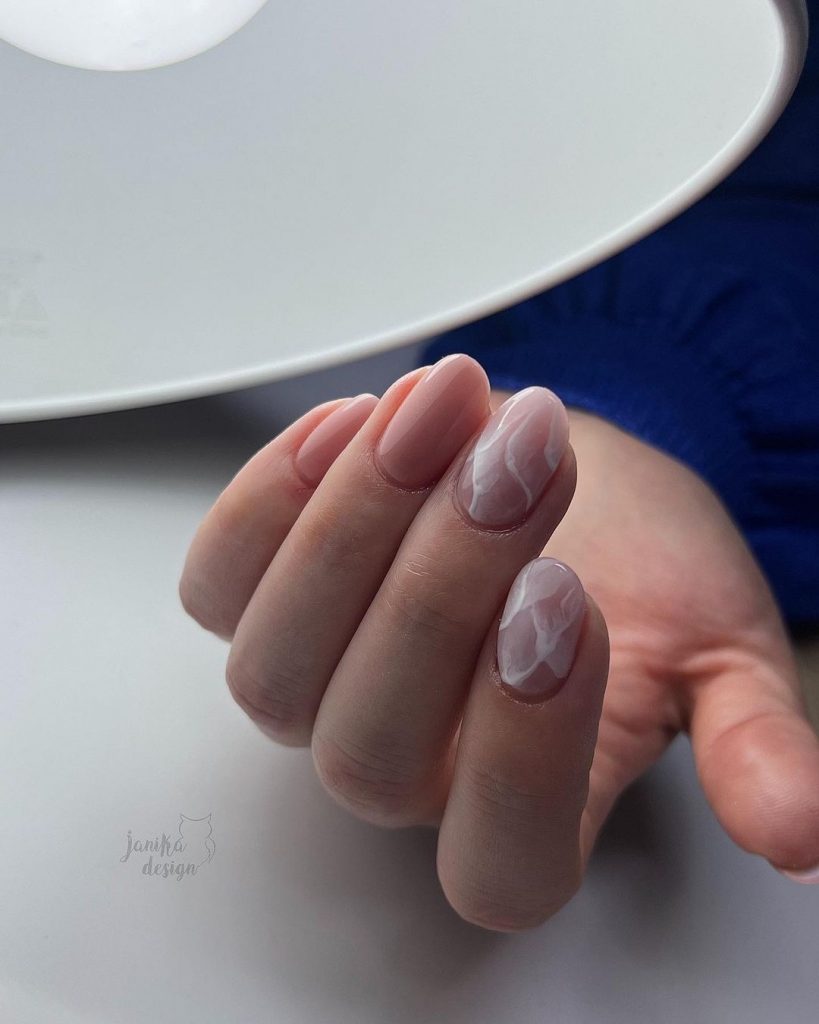
Consumables Needed
- Nude base polish: Essie’s Ballet Slippers
- White marble veining polish: OPI’s Alpine Snow
- Fine detail brush
- Topcoat: Seche Vite Dry Fast Top Coat
Professional Recommendations
- To achieve a smooth finish, apply the nude polish in thin layers and allow each to dry completely before adding the marble effect
- Use a fine detail brush to carefully create thin, natural-looking veins with the white polish
DIY Tutorial
- Begin with a base coat to protect your nails, followed by two coats of nude polish
- Use a fine brush to create subtle white veins, mimicking the natural patterns of marble
- Allow the design to dry completely before finishing with a topcoat to add shine and durability
Cool Aqua Marble with Silver Accents
For a fresh, vibrant look, this aqua marble design is the perfect choice. The almond-shaped nails feature a striking blend of aqua and white, with silver accents that add a touch of shimmer. This design is ideal for those who want to make a statement, combining bold color with intricate detailing. The silver accents add a modern twist to the traditional marble design, making it perfect for both casual and formal occasions.
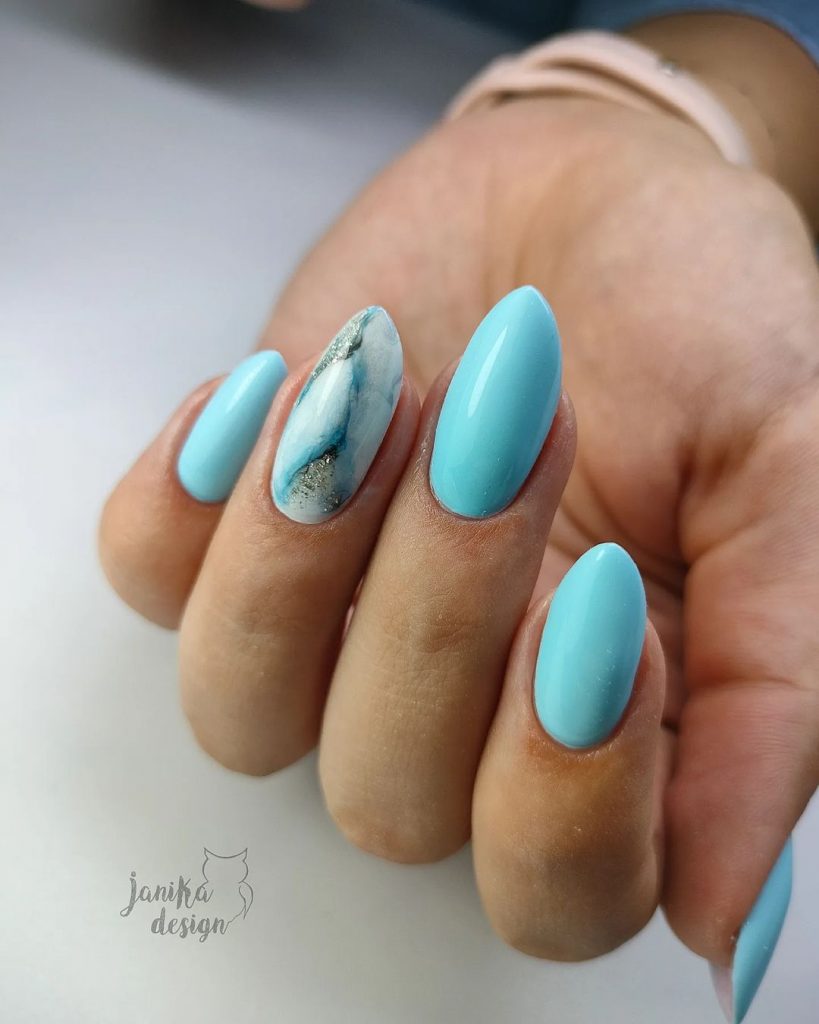
Consumables Needed
- Aqua base polish: Zoya’s Blu
- White marble veining polish: China Glaze’s White on White
- Silver foil or glitter: Gershion Silver Nail Foil
- Fine detail brush
- Topcoat: Orly’s Glosser
Professional Recommendations
- Apply the silver accents sparingly to avoid overwhelming the design; focus on enhancing the natural flow of the marble pattern
- Use a topcoat with a high gloss finish to bring out the vibrancy of the aqua polish
DIY Tutorial
- Start with a base coat, then apply two coats of aqua polish
- Create the marble effect using a fine brush and white polish, blending the colors while still wet
- Add silver accents where desired, using foil or glitter for a touch of sparkle
- Seal the design with a topcoat to ensure long-lasting wear
Vibrant Coral and Blue Marble
This vibrant coral and blue marble design is perfect for those who love bold, eye-catching colors. The long almond-shaped nails feature a stunning contrast between the bright coral and deep blue, with marble detailing that adds depth and texture. This design is perfect for making a statement, whether you’re attending a special event or simply want your nails to stand out. The combination of matte and glossy finishes adds an extra layer of sophistication.
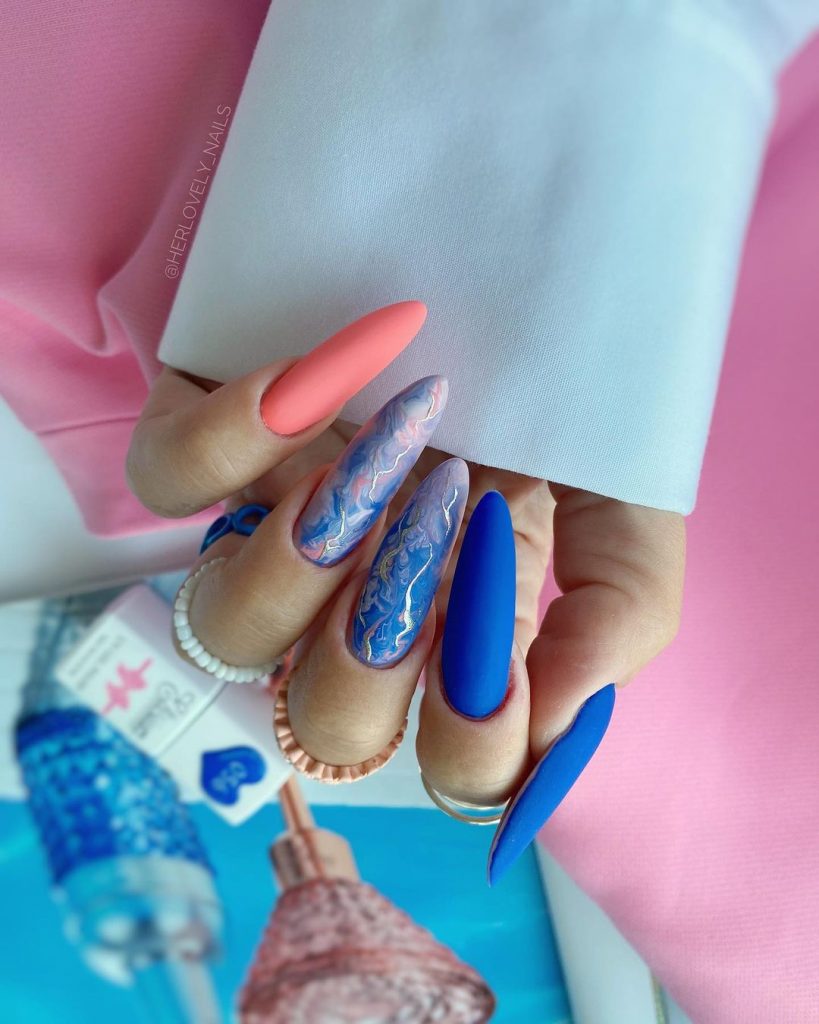
Consumables Needed
- Coral base polish: OPI’s Aloha from OPI
- Blue base polish: China Glaze’s I Sea the Point
- White marble veining polish: Essie’s Blanc
- Matte topcoat: OPI Matte Top Coat
- Glossy topcoat: Seche Vite Dry Fast Top Coat
Professional Recommendations
- Use a matte topcoat on the coral nails and a glossy finish on the blue nails for a dynamic contrast
- When creating the marble effect, allow the colors to blend naturally for a more organic look
DIY Tutorial
- Apply a base coat, followed by two coats of coral polish on some nails and blue on others
- Use a fine brush to create marble veins with white polish, focusing on the blue nails for contrast
- Apply a matte topcoat to the coral nails and a glossy topcoat to the blue nails to finish the look
- Allow the nails to dry completely before adding any additional accents, such as stones or glitter
Deep Green and Gold Marble
This deep green and gold marble design is perfect for the fall season, combining rich, earthy tones with luxurious gold accents. The almond-shaped nails are beautifully enhanced with deep green polish, accented with marble detailing in white and gold. The gold foil adds a touch of opulence, making this design ideal for those who want to elevate their autumn style. The balance between the deep green and the shimmer of gold creates a sophisticated, elegant look.
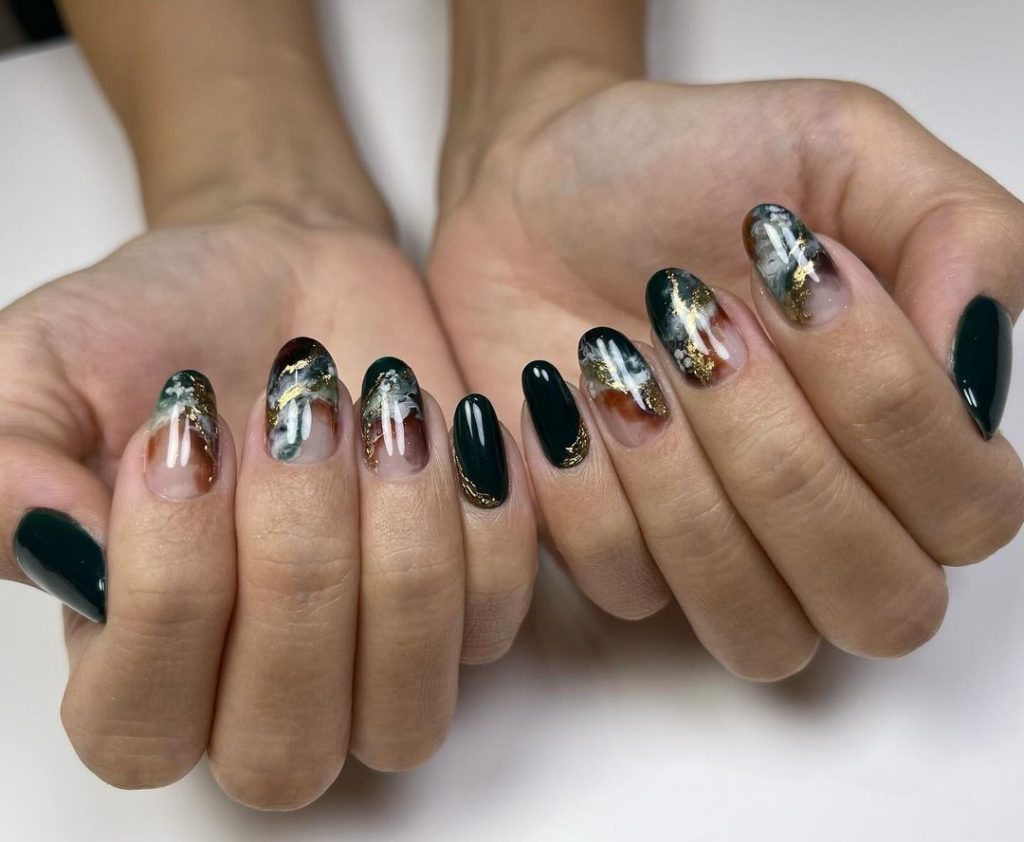
Consumables Needed
- Deep green base polish: OPI’s Stay Off the Lawn
- White marble veining polish: China Glaze’s White on White
- Gold foil: Born Pretty Gold Leaf Foil
- Fine detail brush
- Topcoat: Essie Gel Couture Top Coat
Professional Recommendations
- Apply the gold foil with precision to ensure it complements rather than overpowers the marble design
- Use a high-shine topcoat to enhance the depth and richness of the green polish
DIY Tutorial
- Start with a base coat, then apply two coats of deep green polish
- Create marble veins using white polish and a fine detail brush
- Carefully apply gold foil accents to the nails, pressing them into the still-tacky polish
- Seal the design with a topcoat to add a glossy finish and protect the foil
Burgundy and White Marble Elegance
For a more sophisticated and elegant look, this burgundy and white marble design is an excellent choice. The stiletto-shaped nails feature a rich burgundy base, with white marble veining that adds a touch of luxury. The design is further enhanced with subtle brown undertones, creating a warm, inviting look that’s perfect for fall. This design is ideal for those who want to combine bold color with intricate detailing, making a statement with their nails.
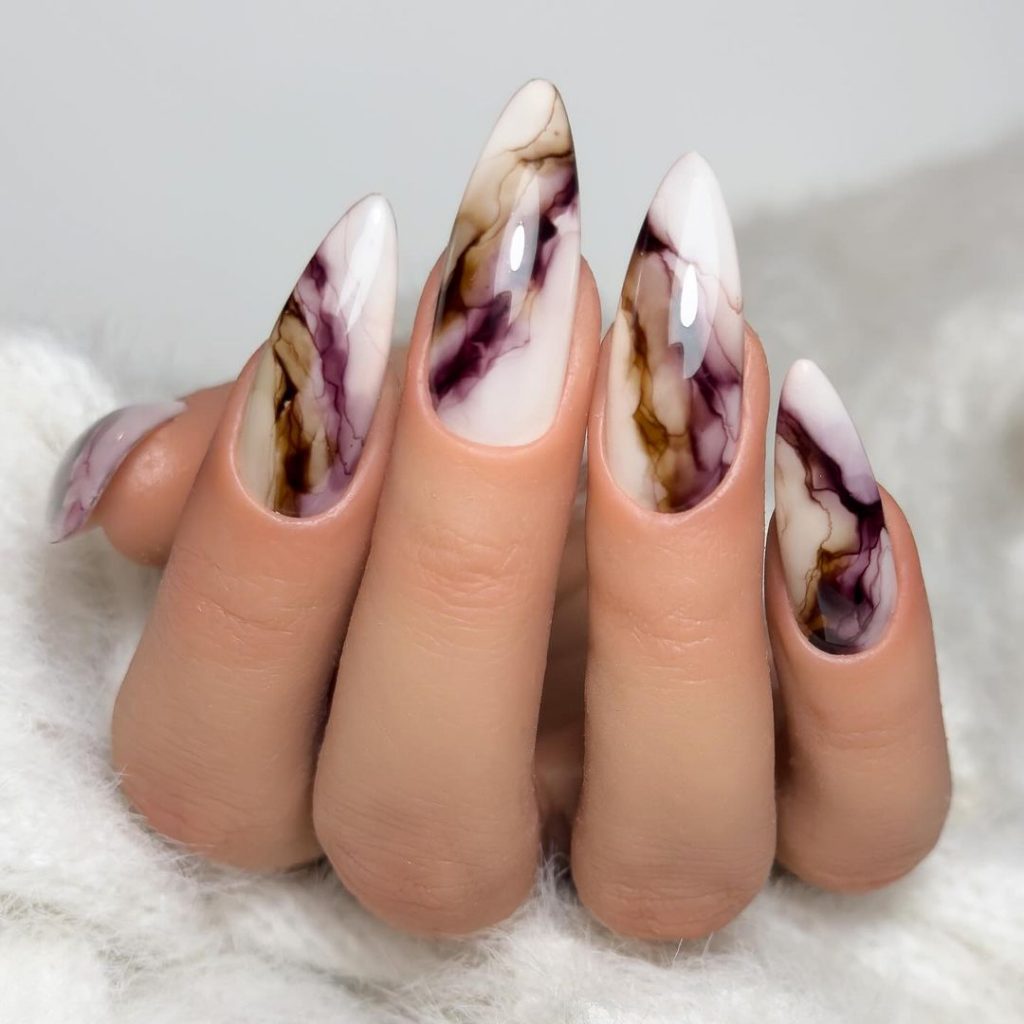
Consumables Needed
- Burgundy base polish: Essie’s Bahama Mama
- White marble veining polish: OPI’s Alpine Snow
- Brown undertone polish: Zoya’s Spencer
- Fine detail brush
- Topcoat: Orly’s Glosser
Professional Recommendations
- Blend the brown undertones with the white marble veins for a seamless, natural look
- Use a glossy topcoat to bring out the depth of the burgundy polish and the intricacy of the marble design
DIY Tutorial
- Apply a base coat, followed by two coats of burgundy polish
- Use a fine brush to create white marble veins, blending in brown undertones for added depth
- Allow the design to dry completely before finishing with a topcoat to add shine and durability
- For added impact, consider adding a subtle gold accent to the tips or edges of the nails
Bold Burgundy Marble on Coffin Nails
This striking burgundy marble design is perfect for those who want to make a statement. The coffin-shaped nails feature a deep burgundy hue blended with white marble accents, creating a bold and eye-catching look. The length and shape of the nails add to the drama, making this design ideal for special occasions or when you want to turn heads.
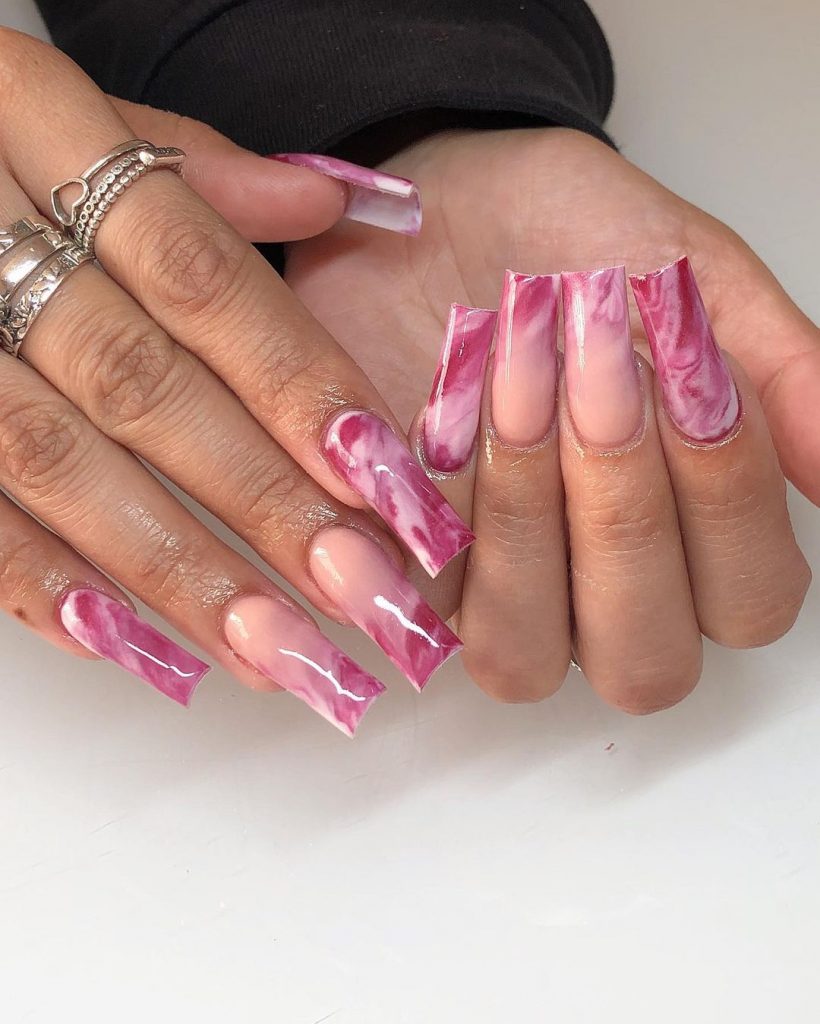
Consumables Needed
- Burgundy base polish: OPI’s Malaga Wine
- White marble veining polish: Essie’s Blanc
- Fine detail brush
- Topcoat: Seche Vite Dry Fast Top Coat
Professional Recommendations
- For a seamless marble effect, apply the white polish in thin, wispy strokes and blend it slightly with the burgundy base while still wet
- A glossy topcoat will enhance the richness of the burgundy color and add a smooth finish
DIY Tutorial
- Start with a base coat, followed by two coats of burgundy polish
- Use a fine brush to create white marble veins, blending them into the burgundy for a natural look
- Allow the design to dry completely before applying a topcoat for a long-lasting finish
Cool Blue Marble on Short Oval Nails
For a fresh and modern take on marble nails, this cool blue design is perfect. The short oval-shaped nails feature a soft nude base with striking blue marble accents, creating a cool and serene look. This design is ideal for everyday wear, offering a pop of color without being too overpowering. The marble effect is concentrated at the tips, creating a gradient effect that elongates the nails.
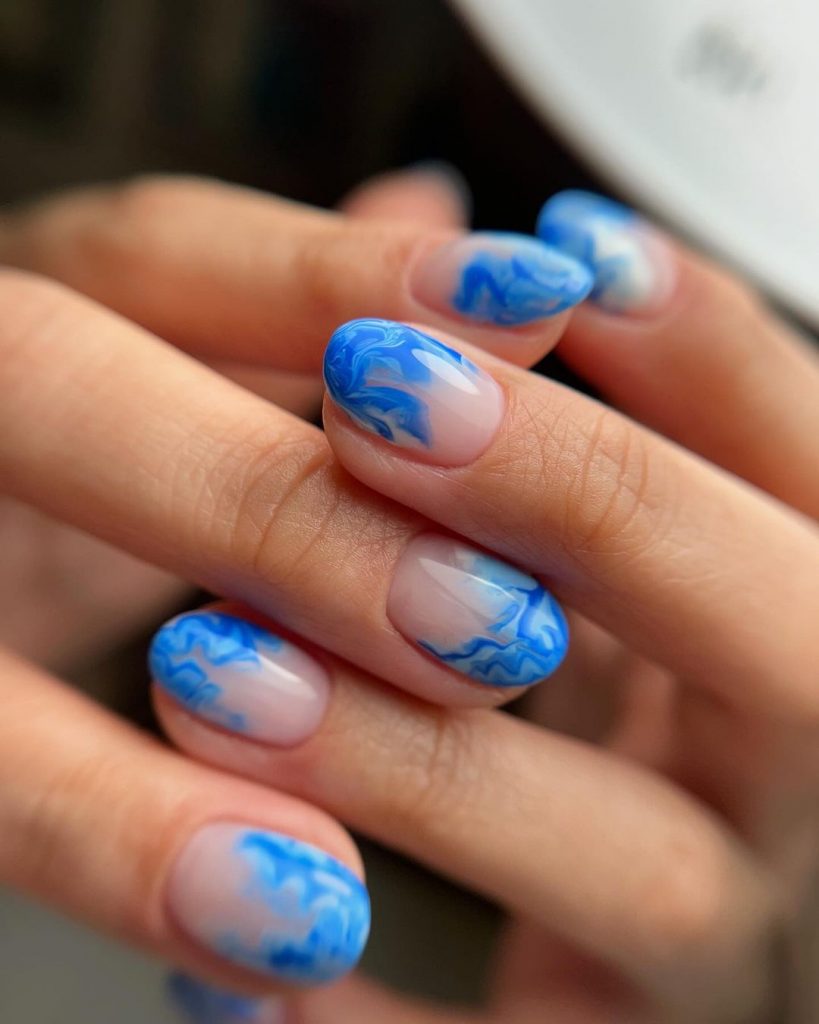
Consumables Needed
- Nude base polish: Essie’s Topless & Barefoot
- Blue marble veining polish: China Glaze’s I Sea the Point
- Fine detail brush
- Topcoat: Orly’s Glosser
Professional Recommendations
- Concentrate the marble effect on the tips for a gradient look that enhances the length of the nails
- Use a sheer nude polish as the base to allow the blue marble to stand out without overwhelming the design
DIY Tutorial
- Apply a base coat, followed by two coats of nude polish
- Using a fine brush, create marble veins with blue polish, focusing on the tips of the nails for a gradient effect
- Finish with a topcoat to seal the design and add a glossy shine
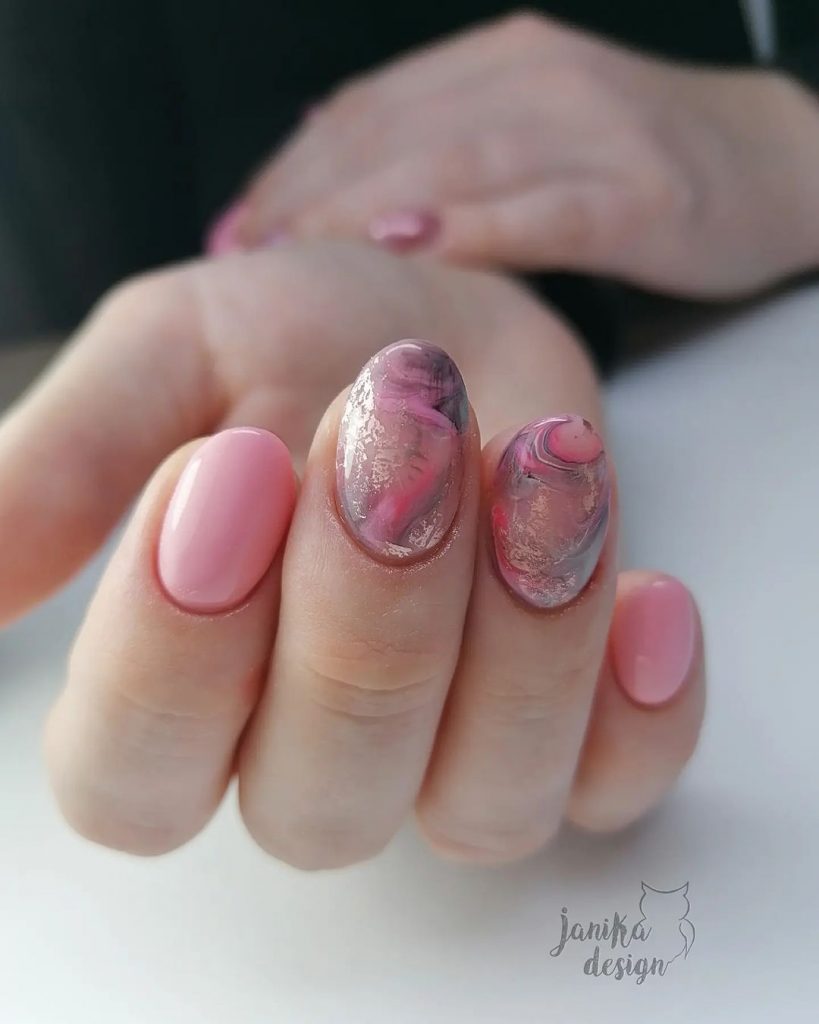
Soft Pink and Marble Mix on Short Oval Nails
This soft pink marble design is a delicate and feminine choice for fall. The short oval-shaped nails feature a pale pink base with subtle marble accents in darker pink and hints of metallic gold. The result is a chic and sophisticated look that’s perfect for any occasion, from a casual day out to a formal event. The gold accents add a touch of luxury, making this design stand out.
Consumables Needed
- Pale pink base polish: Essie’s Fiji
- Darker pink marble veining polish: OPI’s Pink Flamenco
- Gold foil or polish: Sally Hansen’s Golden-I
- Fine detail brush
- Topcoat: Seche Vite Dry Fast Top Coat
Professional Recommendations
- Blend the darker pink marble veins with the pale pink base for a seamless, soft look
- Apply gold accents sparingly to add a touch of luxury without overpowering the delicate design
DIY Tutorial
- Begin with a base coat, followed by two coats of pale pink polish
- Use a fine brush to create subtle marble veins in darker pink, blending them gently into the base color
- Add small touches of gold foil or polish for a hint of sparkle
- Seal with a topcoat to add shine and protect the design
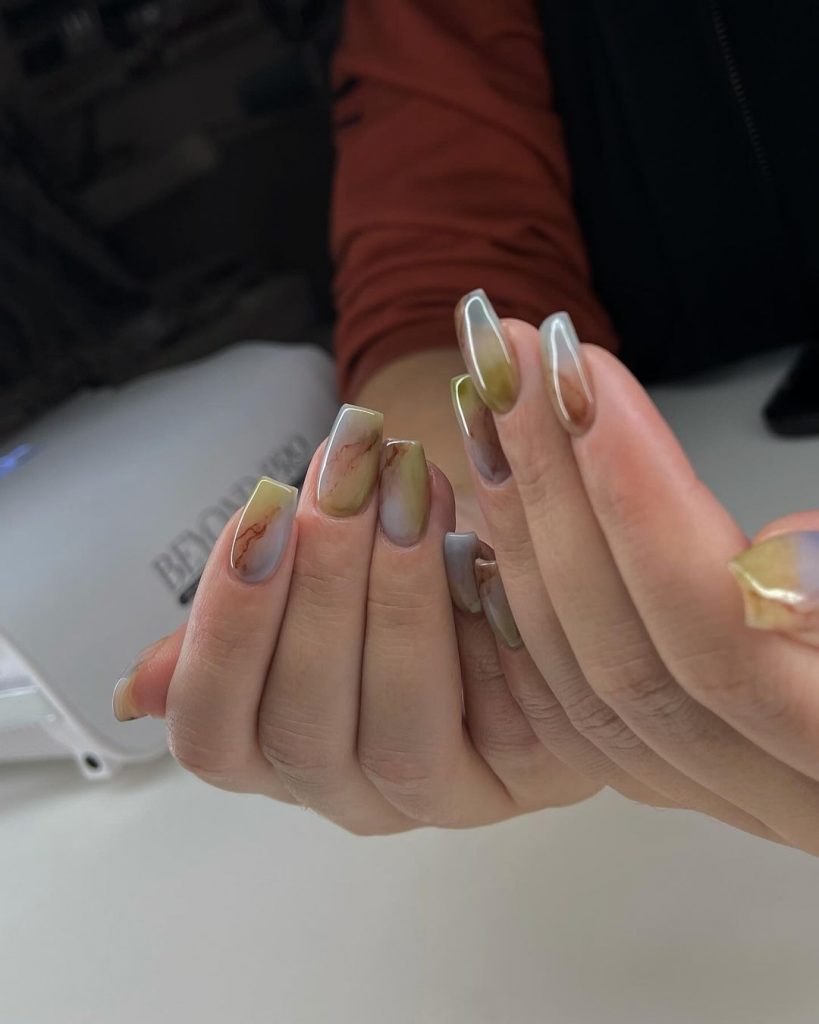
Earthy Green and Brown Marble on Square Nails
This earthy green and brown marble design is a perfect embodiment of fall. The square-shaped nails feature a natural palette of greens and browns, with marble detailing that mimics the textures and colors of nature. This design is both unique and versatile, making it suitable for everyday wear or special occasions. The combination of earthy tones and marble patterns gives the nails a warm, inviting look.
Consumables Needed
- Green base polish: Zoya’s Hunter
- Brown marble veining polish: OPI’s Suzi Loves Cowboys
- Fine detail brush
- Topcoat: Essie Gel Couture Top Coat
Professional Recommendations
- Blend the green and brown shades carefully to mimic natural stone patterns, using a fine brush for detail work
- A high-shine topcoat will enhance the depth and richness of the colors
DIY Tutorial
- Apply a base coat, followed by two coats of green polish
- Use a fine brush to create marble veins with brown polish, blending the colors for a natural stone effect
- Allow the design to dry completely before finishing with a topcoat to add shine and durability
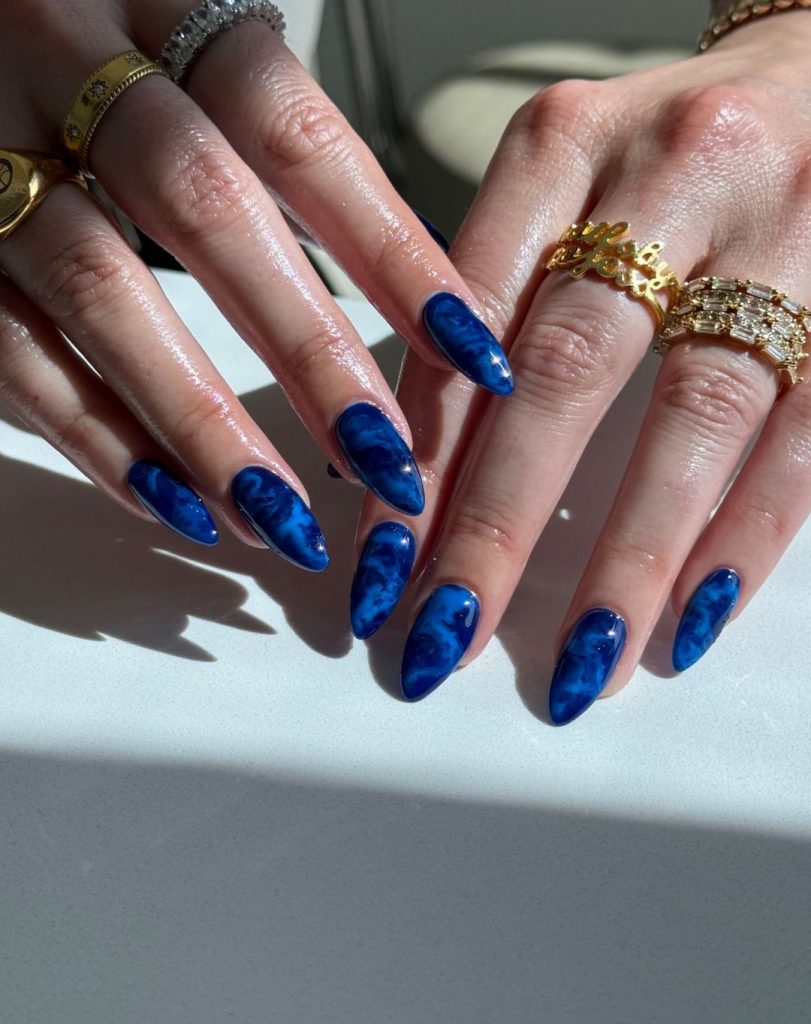
Rich Blue Marble on Almond Nails
For a bold and sophisticated look, this rich blue marble design is a showstopper. The almond-shaped nails feature a deep blue base with swirling marble patterns in lighter blue, creating a stunning contrast. This design is perfect for those who want to make a statement, whether at a formal event or as a part of your everyday style. The depth of the blue color adds an element of luxury, making this a standout choice for fall.
Consumables Needed
- Deep blue base polish: OPI’s Russian Navy
- Light blue marble veining polish: China Glaze’s Boho Blues
- Fine detail brush
- Topcoat: Orly’s Glosser
Professional Recommendations
- Use a fine brush to carefully blend the light blue marble veins into the deep blue base for a smooth, cohesive look
- A glossy topcoat will enhance the richness of the blue and add a polished finish
DIY Tutorial
- Begin with a base coat, followed by two coats of deep blue polish
- Use a fine brush to create marble veins in lighter blue, blending them into the base color for a natural effect
- Finish with a topcoat to seal the design and add a glossy shine
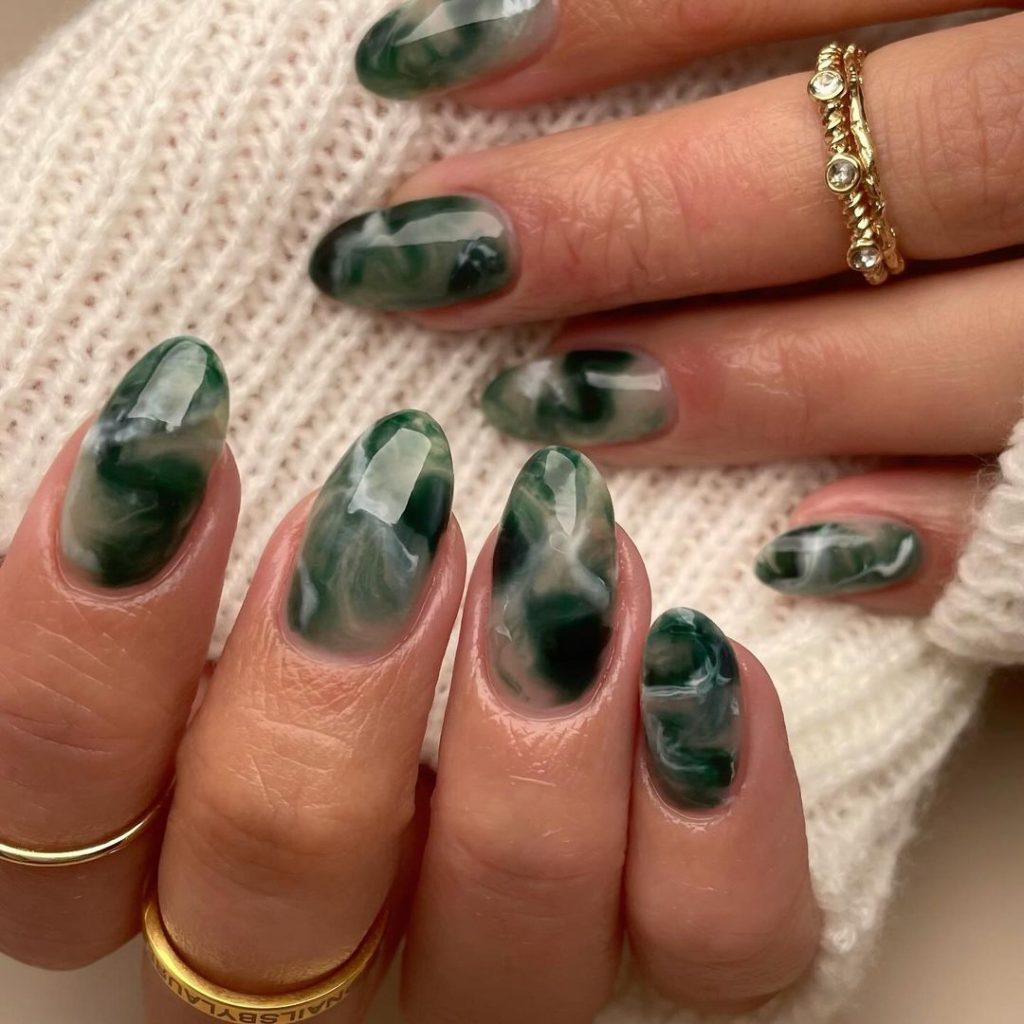
Deep Green Marble on Almond Nails
This deep green marble design exudes a sense of mystery and sophistication, making it perfect for fall. The almond-shaped nails are covered in a rich, forest green polish, accented with subtle white marble veining. The result is a look that is both bold and elegant, ideal for those who want to embrace the natural, earthy tones of the season. The marble effect gives these nails a unique, organic feel, reminiscent of precious jade stone.
Consumables Needed
- Deep green base polish: Essie’s Off Tropic
- White marble veining polish: China Glaze’s White on White
- Fine detail brush
- Topcoat: Seche Vite Dry Fast Top Coat
Professional Recommendations
- Blend the white marble veins delicately with the green base to achieve a natural stone effect
- Use a glossy topcoat to enhance the depth and shine of the green polish, making the marble details pop
DIY Tutorial
- Start with a base coat, followed by two coats of deep green polish
- Use a fine brush to create subtle white veins across the nails, mimicking natural marble patterns
- Finish with a topcoat to seal the design and add a high-gloss shine
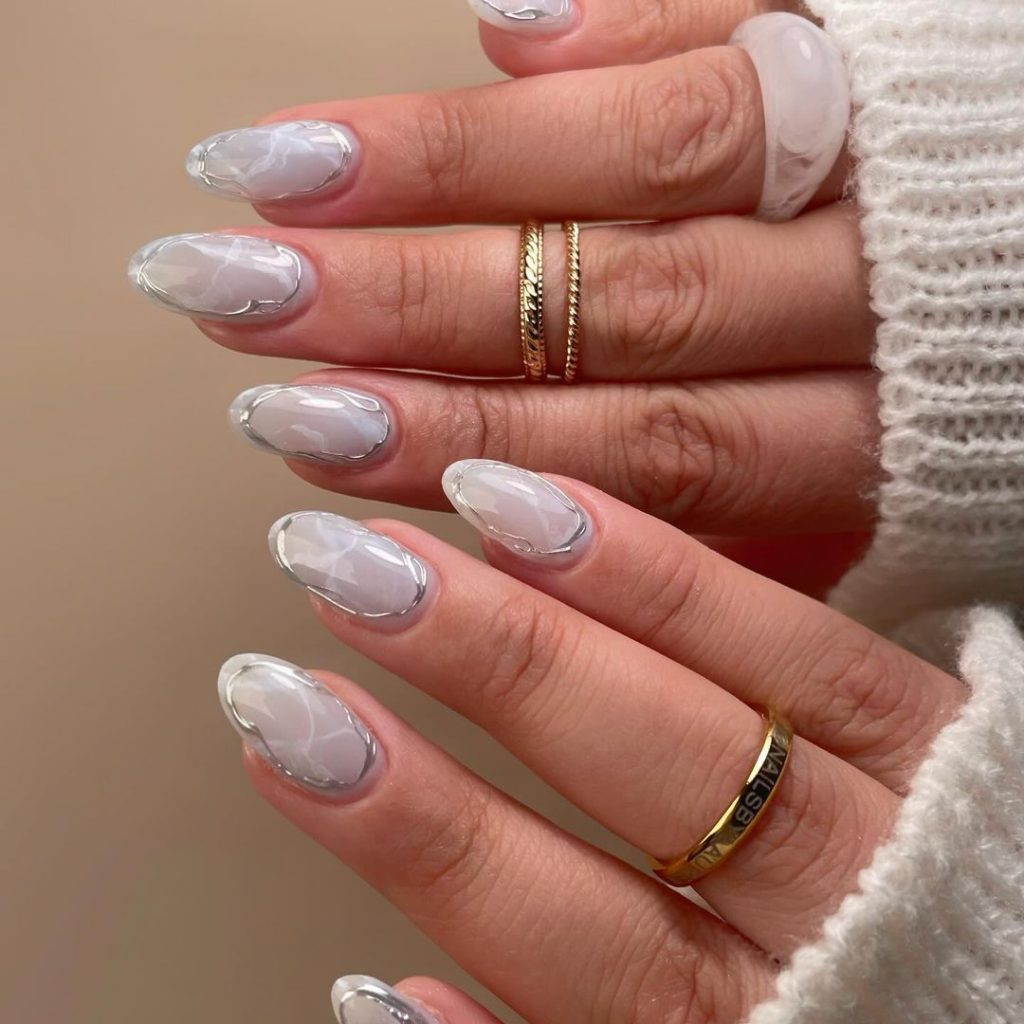
Cloudy White Marble on Almond Nails
This cloudy white marble design is the epitome of understated elegance. The almond-shaped nails feature a soft, milky white base with delicate marble veining, creating a clean and sophisticated look. This design is perfect for those who prefer a minimalist approach but still want a touch of artistry in their manicure. The translucent quality of the white polish adds an ethereal vibe, making these nails look both modern and timeless.
Consumables Needed
- Milky white base polish: OPI’s Funny Bunny
- White marble veining polish: Essie’s Blanc
- Fine detail brush
- Topcoat: Orly’s Glosser
Professional Recommendations
- Apply the milky white polish in thin layers to achieve a smooth, translucent effect
- Use the white veining polish sparingly for a subtle, cloud-like marble pattern
DIY Tutorial
- Begin with a base coat, followed by two coats of milky white polish
- Create delicate marble veins using a fine brush and white polish, focusing on a light, airy pattern
- Finish with a topcoat to add a soft, glossy finish that enhances the ethereal look
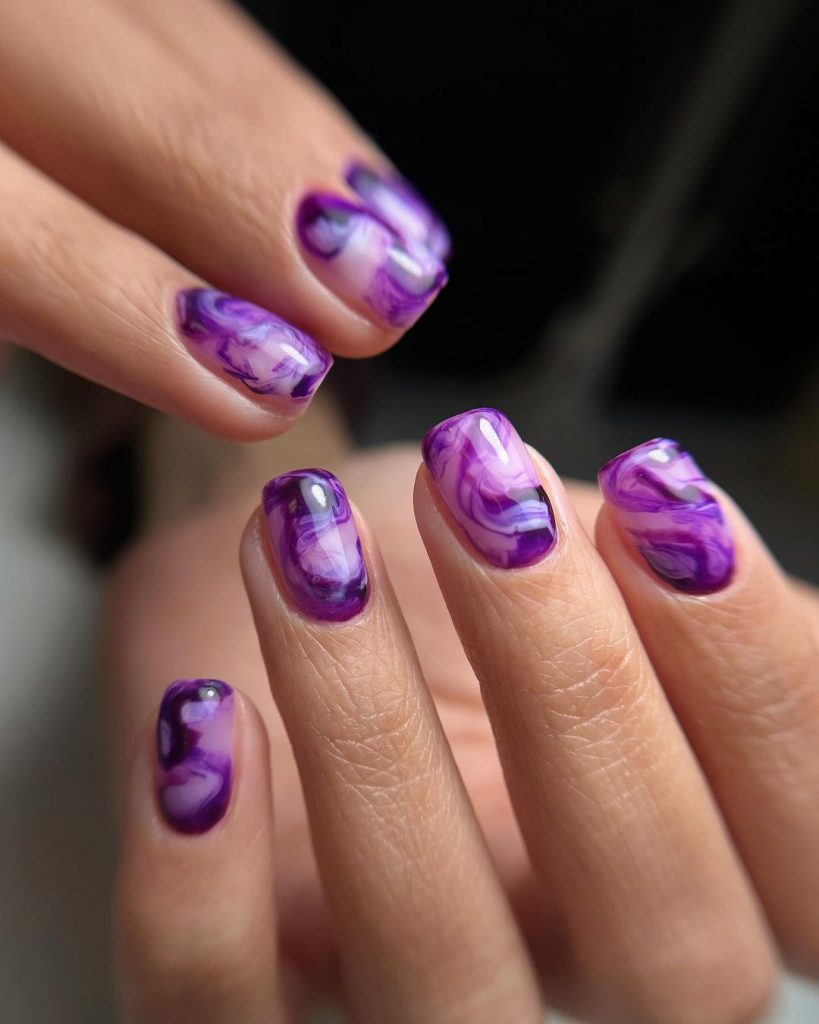
Vibrant Purple Marble on Short Oval Nails
For those who love a pop of color, this vibrant purple marble design is a must-try. The short oval-shaped nails feature a striking blend of deep and light purples, creating a dynamic marble effect that’s both playful and bold. This design is perfect for making a statement, whether you’re heading to a party or simply want your nails to stand out. The short length keeps the look balanced, ensuring it’s both chic and wearable.
Consumables Needed
- Light purple base polish: China Glaze’s Sweet Hook
- Deep purple marble veining polish: OPI’s Do You Lilac It?
- Fine detail brush
- Topcoat: Seche Vite Dry Fast Top Coat
Professional Recommendations
- Blend the purple shades while the polish is still wet to achieve a smooth, gradient marble effect
- Use a glossy topcoat to enhance the vibrancy and depth of the purple colors
DIY Tutorial
- Apply a base coat, followed by two coats of light purple polish
- While the polish is still wet, use a fine brush to create marble veins with deep purple polish, blending the colors seamlessly
- Finish with a topcoat to add a glossy shine and protect the design
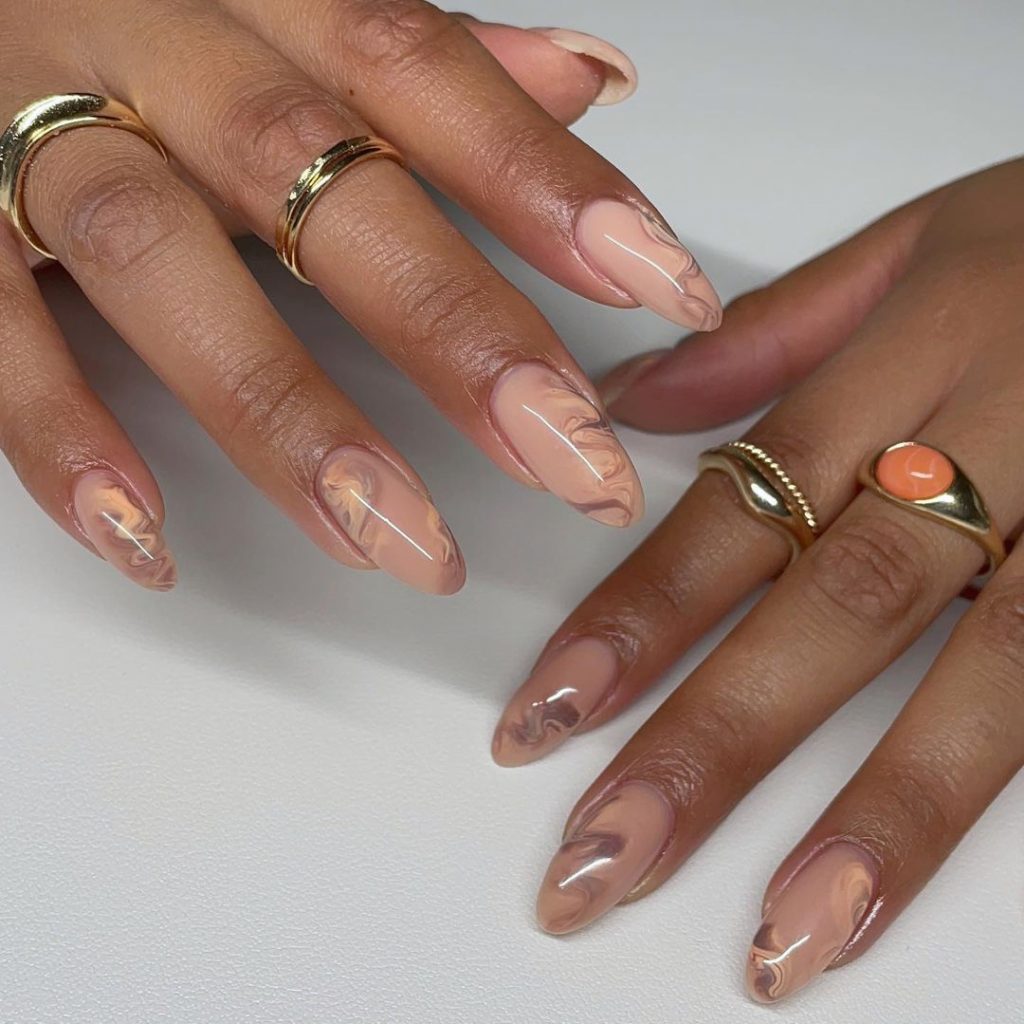
Nude and Brown Marble on Almond Nails
This nude and brown marble design is the perfect blend of subtlety and sophistication. The almond-shaped nails feature a soft nude base with delicate brown marble veining, creating a look that’s both elegant and understated. This design is ideal for those who prefer a natural, earthy palette but still want a touch of creativity in their manicure. The marble effect adds texture and depth, making these nails a stylish choice for any occasion.
Consumables Needed
- Nude base polish: Essie’s Ballet Slippers
- Brown marble veining polish: OPI’s Chocolate Moose
- Fine detail brush
- Topcoat: Orly’s Glosser
Professional Recommendations
- Keep the brown marble veins light and delicate for a natural, seamless look
- Apply a glossy topcoat to enhance the shine and depth of the nude base color
DIY Tutorial
- Start with a base coat, followed by two coats of nude polish
- Use a fine brush to create subtle brown marble veins, blending them gently into the nude base
- Finish with a topcoat to seal the design and add a glossy finish
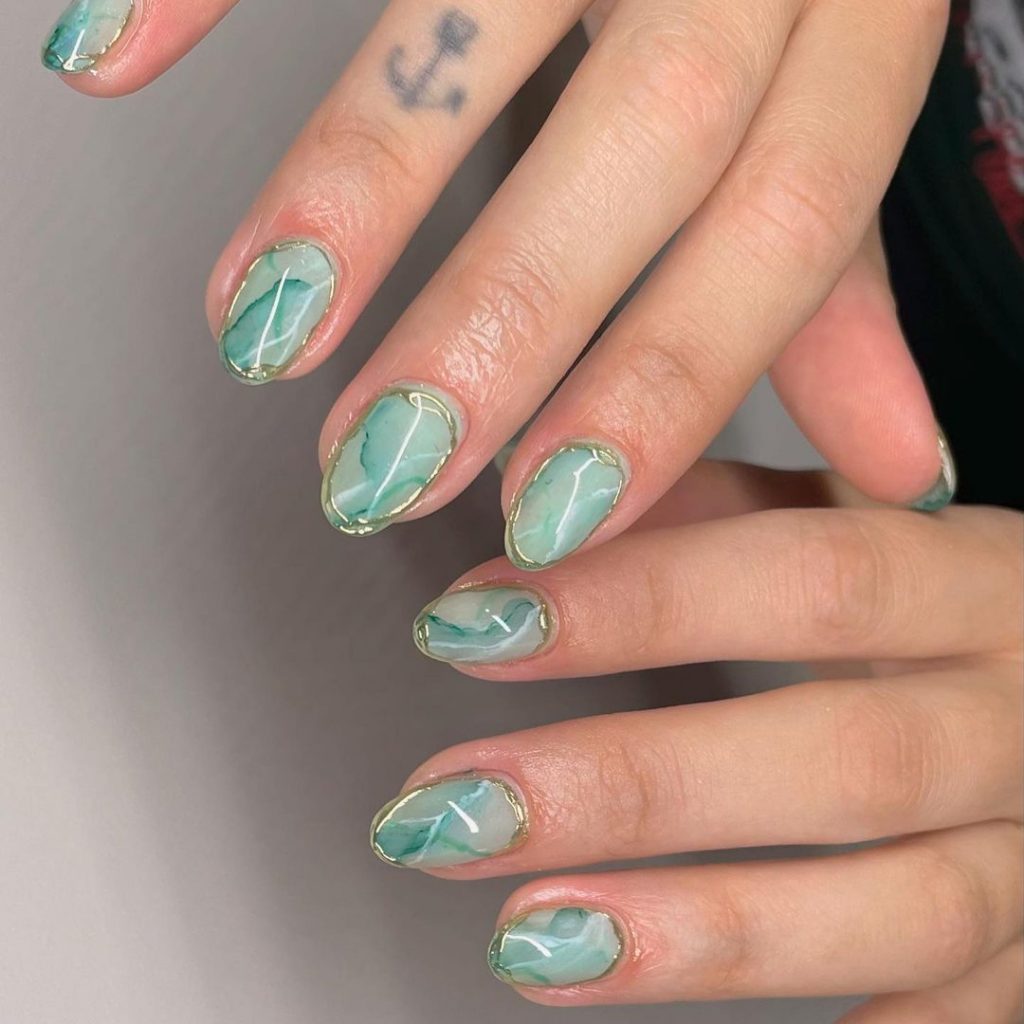
Mint Green Marble with Gold Accents on Short Nails
This mint green marble design is fresh, modern, and perfect for adding a pop of color to your fall look. The short, almond-shaped nails feature a soft mint green base with white marble veining and subtle gold accents. The combination of mint and gold creates a look that’s both chic and luxurious, ideal for those who want to embrace a playful yet sophisticated style. The short length makes this design practical and versatile for everyday wear.
Consumables Needed
- Mint green base polish: Essie’s Mint Candy Apple
- White marble veining polish: OPI’s Alpine Snow
- Gold foil: Born Pretty Gold Leaf Foil
- Fine detail brush
- Topcoat: Seche Vite Dry Fast Top Coat
Professional Recommendations
- Apply the gold foil accents sparingly to add a touch of luxury without overwhelming the design
- Use a high-shine topcoat to enhance the freshness of the mint green and the shine of the gold accents
DIY Tutorial
- Apply a base coat, followed by two coats of mint green polish
- Use a fine brush to create white marble veins, blending them naturally into the mint base
- Add small touches of gold foil for a luxurious accent
- Finish with a topcoat to seal the design and add a glossy finish
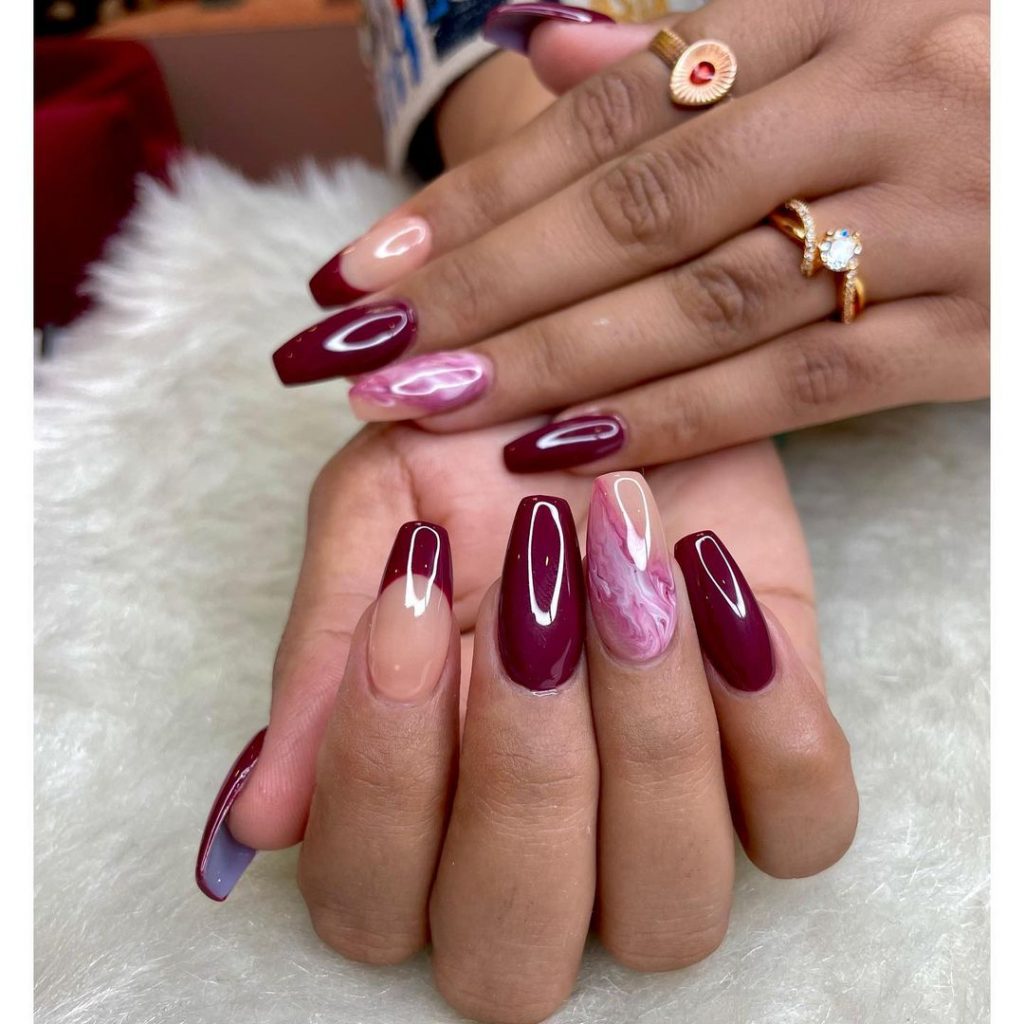
Burgundy and Pink Marble on Coffin Nails
This burgundy and pink marble design is a beautiful fusion of deep and soft tones, perfect for those who love a sophisticated yet playful look. The coffin-shaped nails showcase a rich burgundy base with subtle pink marble accents, creating a striking contrast that’s both elegant and eye-catching. The addition of a nude base on some nails adds a touch of modernity and balance to the design, making it ideal for both formal events and everyday wear.
Consumables Needed
- Burgundy base polish: Essie’s Bordeaux
- Pink marble veining polish: OPI’s Mod About You
- Nude base polish: Essie’s Topless & Barefoot
- Fine detail brush
- Topcoat: Seche Vite Dry Fast Top Coat
Professional Recommendations
- Blend the pink marble veins softly with the burgundy base to achieve a seamless transition between the colors
- Use a glossy topcoat to enhance the depth of the burgundy polish and add a high-shine finish
DIY Tutorial
- Begin with a base coat, followed by two coats of burgundy polish on selected nails and nude polish on others
- Use a fine brush to create pink marble veins over the burgundy and nude nails, blending the colors naturally
- Seal with a topcoat to protect the design and add a glossy finish
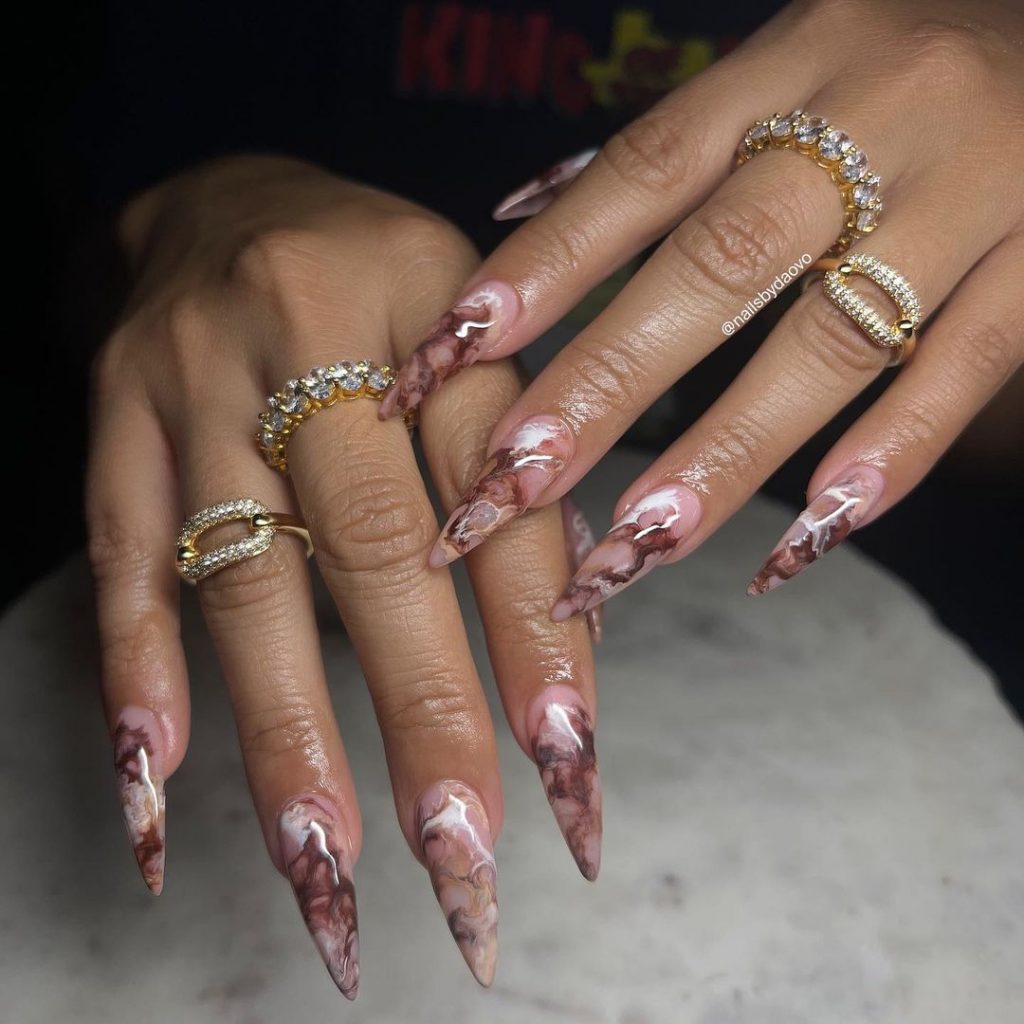
Earthy Brown Marble on Stiletto Nails
This earthy brown marble design is a perfect embodiment of natural elegance. The stiletto-shaped nails feature a mix of deep brown and white marble patterns, creating a design that’s both luxurious and earthy. The pointed shape of the nails adds a dramatic flair, making this look ideal for those who want to stand out. The combination of warm brown tones with delicate white veining gives these nails a sophisticated, organic feel.
Consumables Needed
- Brown base polish: OPI’s Chocolate Moose
- White marble veining polish: Essie’s Blanc
- Fine detail brush
- Topcoat: Orly’s Glosser
Professional Recommendations
- Apply the brown polish in thin layers to achieve a smooth base before adding the marble effect
- Blend the white veins lightly with the brown to create a natural stone look
DIY Tutorial
- Start with a base coat, followed by two coats of brown polish
- Use a fine brush to create white marble veins across the nails, blending them into the brown base for a natural effect
- Finish with a topcoat to seal the design and add a glossy shine
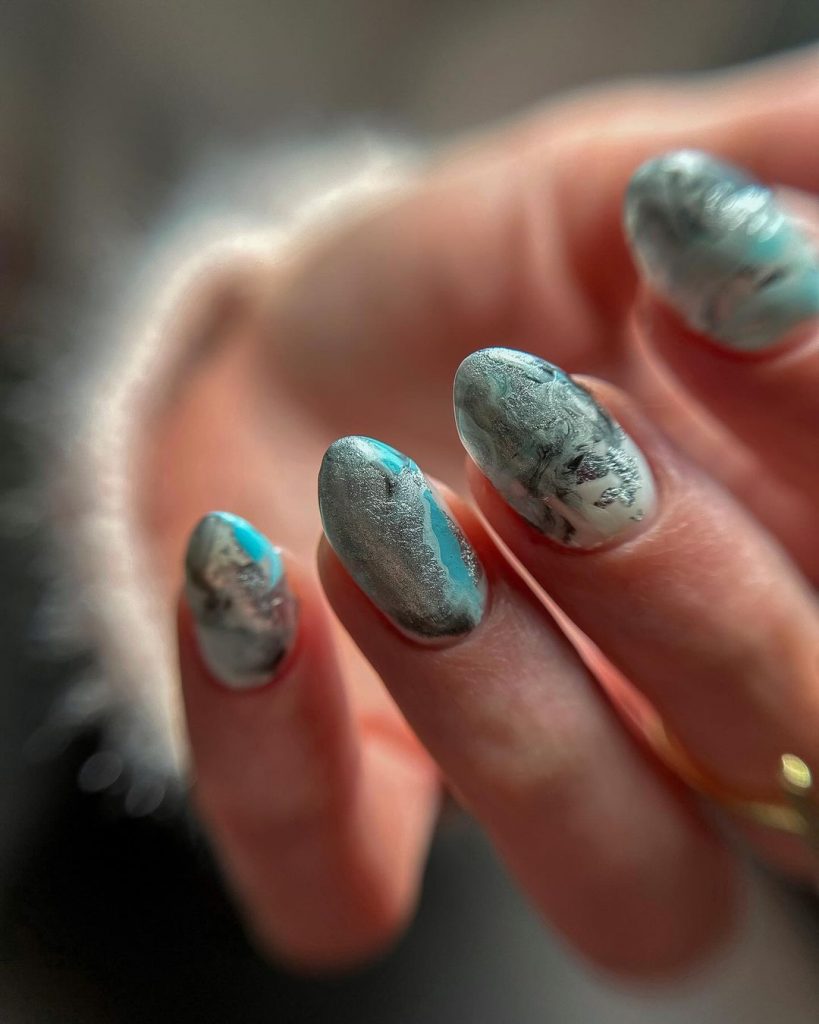
Teal and Silver Marble on Short Oval Nails
This teal and silver marble design offers a modern twist on the classic marble look. The short oval-shaped nails feature a soft teal base with silver accents and marble veining, creating a design that’s both chic and contemporary. The metallic silver adds a touch of luxury, making these nails perfect for a special occasion or when you want to add some sparkle to your everyday look. The cool tones of teal paired with the shine of silver make this design truly stand out.
Consumables Needed
- Teal base polish: China Glaze’s Too Yacht to Handle
- Silver marble veining polish: OPI’s Turn On the Northern Lights!
- Fine detail brush
- Topcoat: Seche Vite Dry Fast Top Coat
Professional Recommendations
- Apply the silver accents sparingly to avoid overwhelming the teal base, focusing on enhancing the marble effect
- Use a high-shine topcoat to bring out the vibrancy of the teal and the metallic finish of the silver
DIY Tutorial
- Apply a base coat, followed by two coats of teal polish
- Use a fine brush to create silver marble veins across the nails, blending them naturally into the teal base
- Finish with a topcoat to seal the design and add a glossy finish
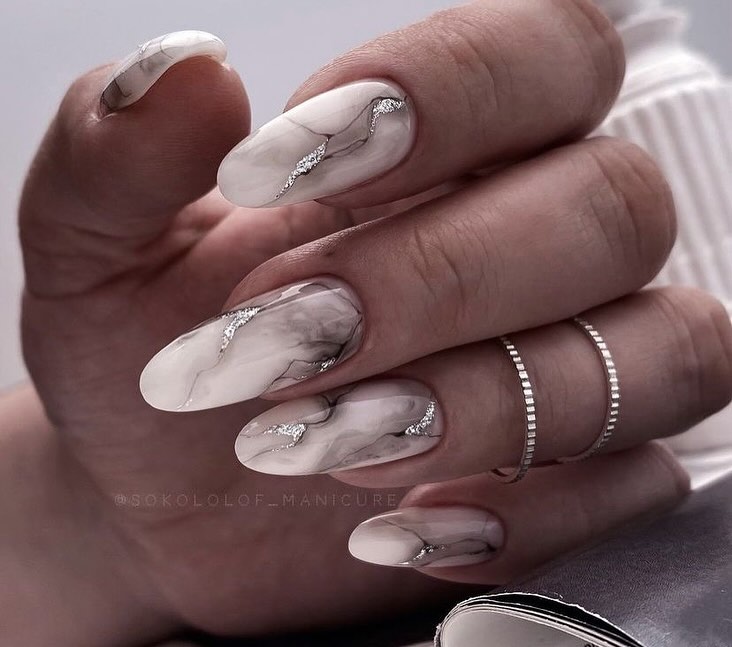
White and Silver Marble on Almond Nails
This white and silver marble design is the epitome of elegance and sophistication. The almond-shaped nails feature a clean white base with delicate silver marble veining, creating a luxurious and timeless look. The subtle use of silver adds a touch of glamour, making this design perfect for formal events or when you want to elevate your everyday style. The combination of white and silver gives these nails a refined, polished appearance.
Consumables Needed
- White base polish: OPI’s Alpine Snow
- Silver marble veining polish: Essie’s No Place Like Chrome
- Fine detail brush
- Topcoat: Orly’s Glosser
Professional Recommendations
- Use the silver polish sparingly to create delicate, refined veins that enhance the white base without overpowering it
- Apply a glossy topcoat to give the nails a smooth, polished finish
DIY Tutorial
- Start with a base coat, followed by two coats of white polish
- Use a fine brush to create silver marble veins across the nails, focusing on a delicate, refined pattern
- Seal with a topcoat to protect the design and add a glossy finish
Save Pin
