
Fall Tree Nail Art 26 Ideas: A Journey Through Autumn Inspired Designs
As the leaves change color and the air becomes crisp, there’s no better time to update your manicure to reflect the beauty of autumn. Fall tree nail art is a captivating way to bring the season’s charm to your fingertips. Whether you prefer simple designs or intricate patterns, there’s a perfect autumn-inspired manicure for everyone. In this article, we’ll explore various nail art ideas, providing detailed descriptions, professional opinions, and practical advice on how to recreate these stunning designs at home. Let’s dive into the world of fall tree nail art and discover how to make your nails an extension of the autumn landscape.
Autumn Leaves Design
The first design showcases a delicate and intricate pattern of autumn leaves on a nude base. This fall tree nail art captures the essence of the season with its earthy tones and detailed foliage. The black outlines enhance the natural shapes of the leaves, while the touches of yellow, green, and orange add a pop of color. This manicure is perfect for those who appreciate the subtle beauty of autumn and want to carry a piece of it with them.
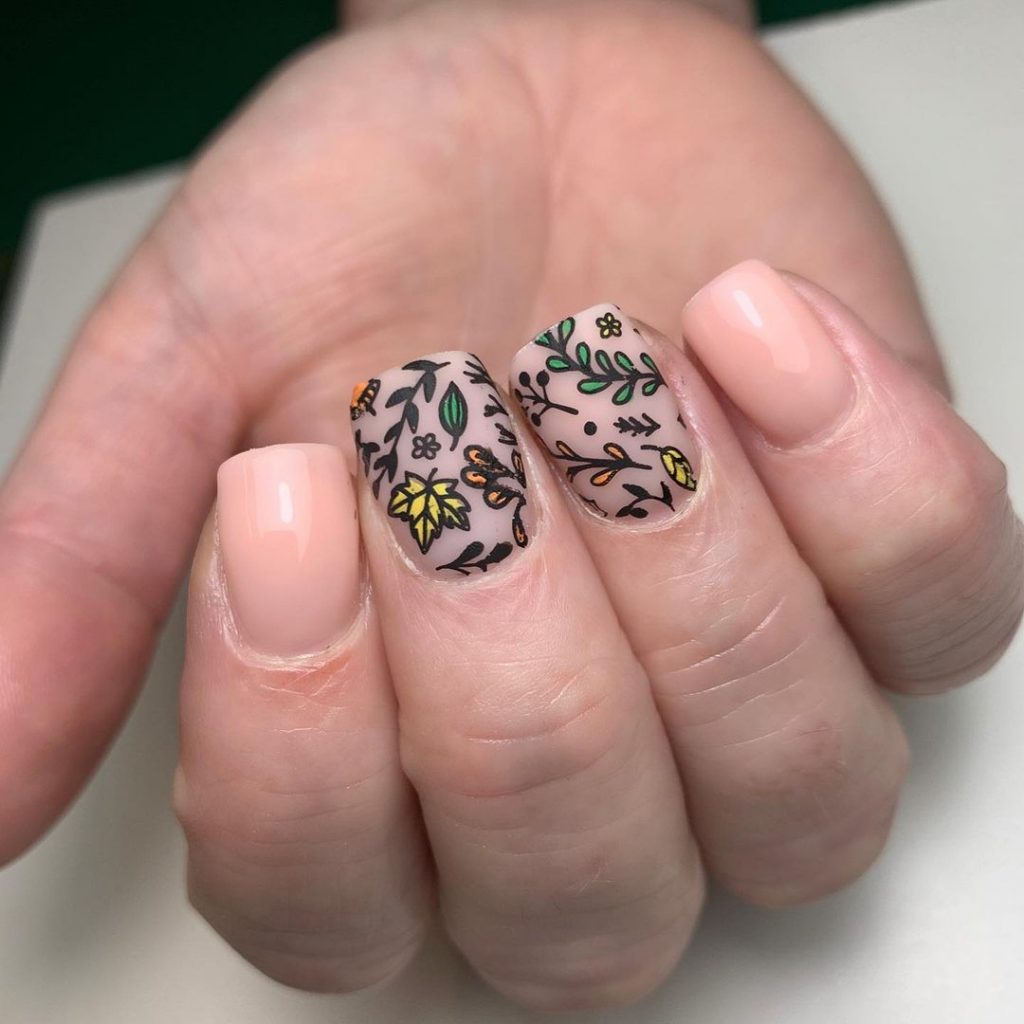
Consumables:
- Nude base polish (e.g., OPI Nail Lacquer in “Samoan Sand”)
- Black nail art pen (e.g., Sally Hansen I Heart Nail Art Pen)
- Yellow, green, and orange nail polishes for accents (e.g., Essie Nail Polish in “Yellow,” “Mojito Madness,” and “Meet Me At Sunset”)
- Top coat for sealing the design (e.g., Seche Vite Dry Fast Top Nail Coat)
DIY Instructions:
- Apply a nude base polish and let it dry completely.
- Use a black nail art pen to draw the outlines of leaves on each nail.
- Fill in the leaves with yellow, green, and orange polishes, using a fine brush for precision.
- Seal the design with a top coat to ensure longevity and shine.
Pine Forest Gradient
This design brings the serene beauty of a pine forest to your fingertips. Featuring a gradient of soft oranges and browns, the manicure depicts a tranquil sunset over a dense pine forest. The trees are skillfully painted in silhouette, creating a striking contrast against the warm background colors. This fall tree nail art design is perfect for those who love nature and want to reflect its beauty in their nail art.
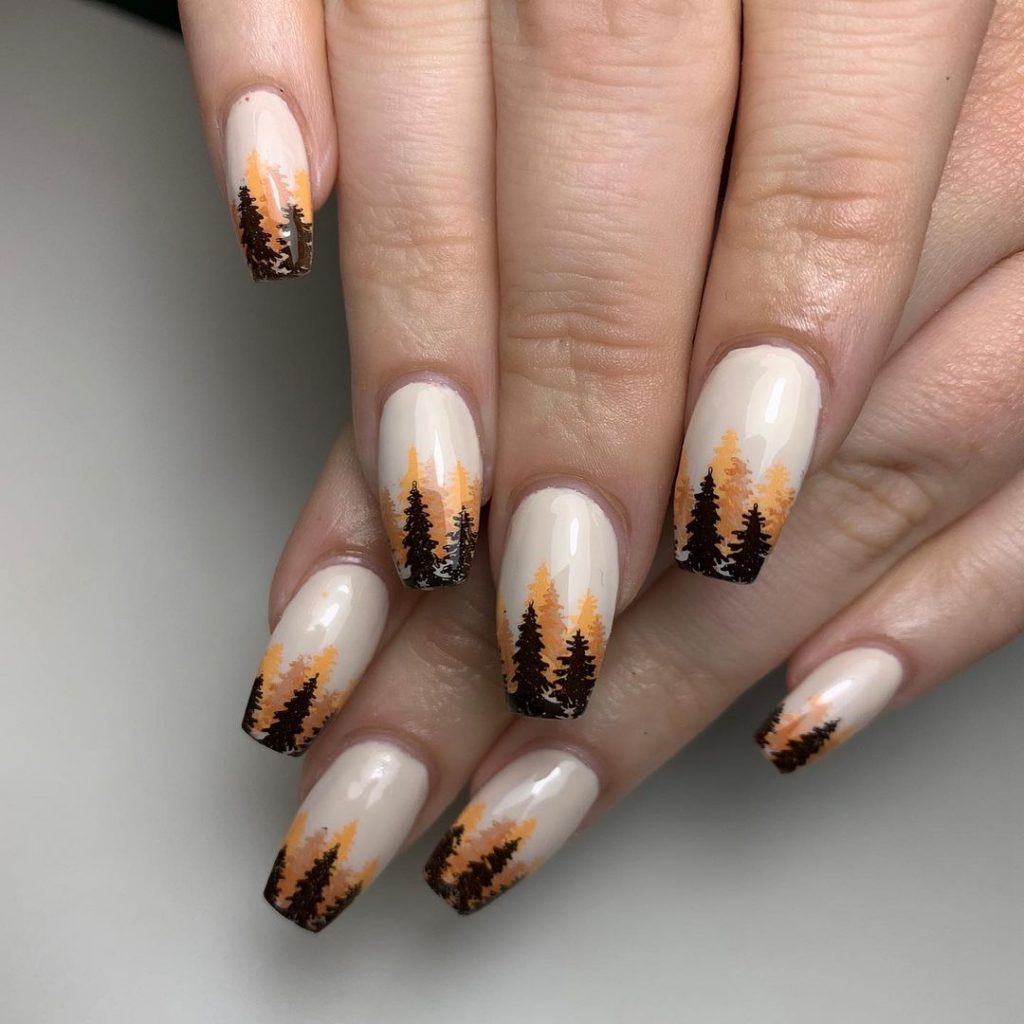
Consumables:
- Nude base polish (e.g., Essie Nail Polish in “Topless & Barefoot”)
- Gradient sponges for blending (e.g., Q-Tips Precision Tips)
- Orange and brown polishes for the gradient (e.g., Zoya Nail Polish in “Arizona” and “Louise”)
- Black nail polish for the tree silhouettes (e.g., OPI Nail Lacquer in “Black Onyx”)
- Top coat (e.g., Seche Vite Dry Fast Top Nail Coat)
DIY Instructions:
- Apply a nude base polish and let it dry completely.
- Use a sponge to create a gradient effect with orange and brown polishes. Dab gently to blend the colors seamlessly.
- With a fine brush, paint the tree silhouettes in black on each nail.
- Finish with a top coat to protect the design and add shine.
Green and Gold Accents
This elegant design features a combination of mint green and nude nails, accented with delicate black dots and gold leaves. The simplicity of the design is enhanced by the contrasting colors, making it a versatile option for both everyday wear and special occasions. This fall tree nail art design is ideal for those who prefer a more minimalist look with a touch of glamour.
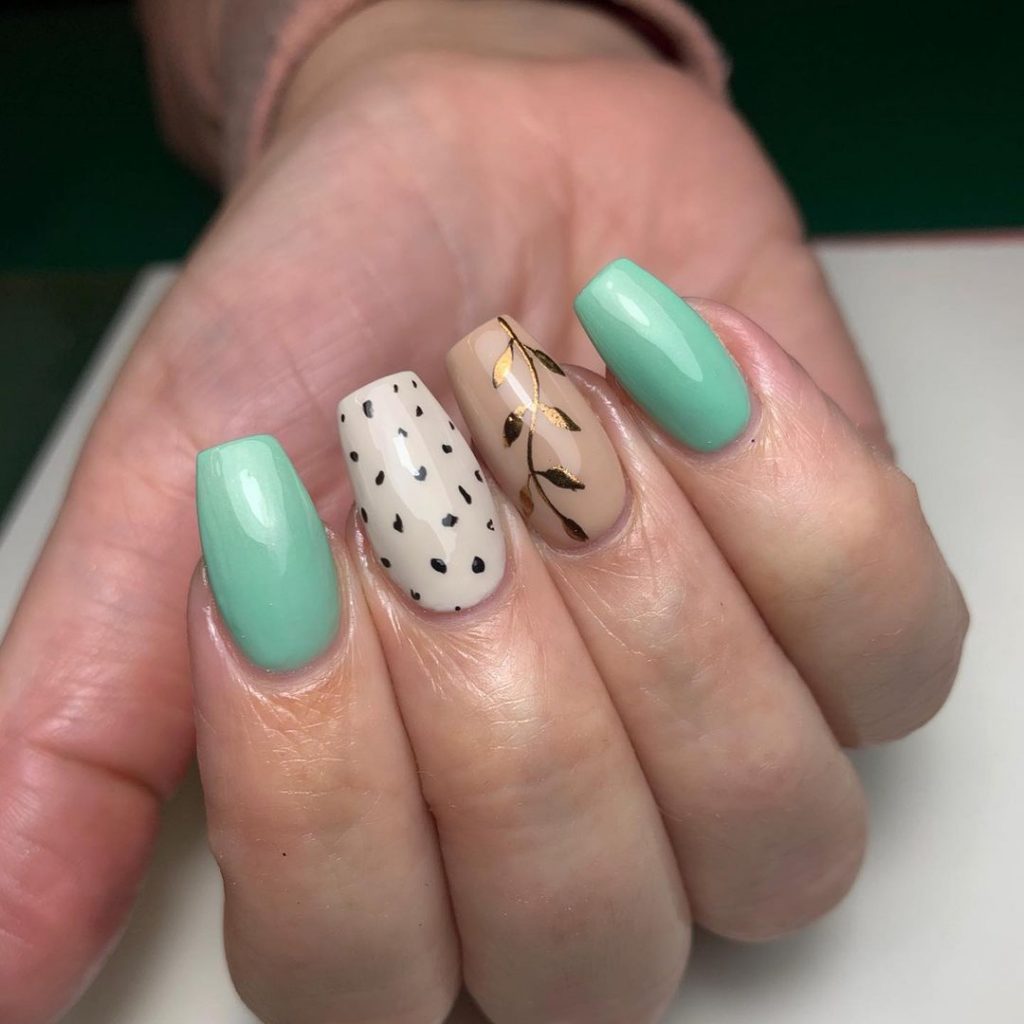
Consumables:
- Mint green polish (e.g., Essie Nail Polish in “Mint Candy Apple”)
- Nude base polish (e.g., OPI Nail Lacquer in “Bubble Bath”)
- Black nail art pen (e.g., Sally Hansen I Heart Nail Art Pen)
- Gold nail foil or polish for the leaf accents (e.g., OPI Chrome Effects in “Gold Digger”)
- Top coat (e.g., Seche Vite Dry Fast Top Nail Coat)
DIY Instructions:
- Apply mint green polish on two nails and nude base polish on the remaining nails.
- Use a black nail art pen to create small dots on one of the nude nails.
- Apply gold foil or use a fine brush to paint gold leaves on the other nude nail.
- Finish with a top coat to seal the design and add shine.
Abstract Autumn Vibes
This design captures the artistic essence of autumn with a mix of red, pink, and nude tones, adorned with abstract black and gold accents. The combination of shapes and colors creates a dynamic and sophisticated look, perfect for those who love bold and unique fall tree nail art.
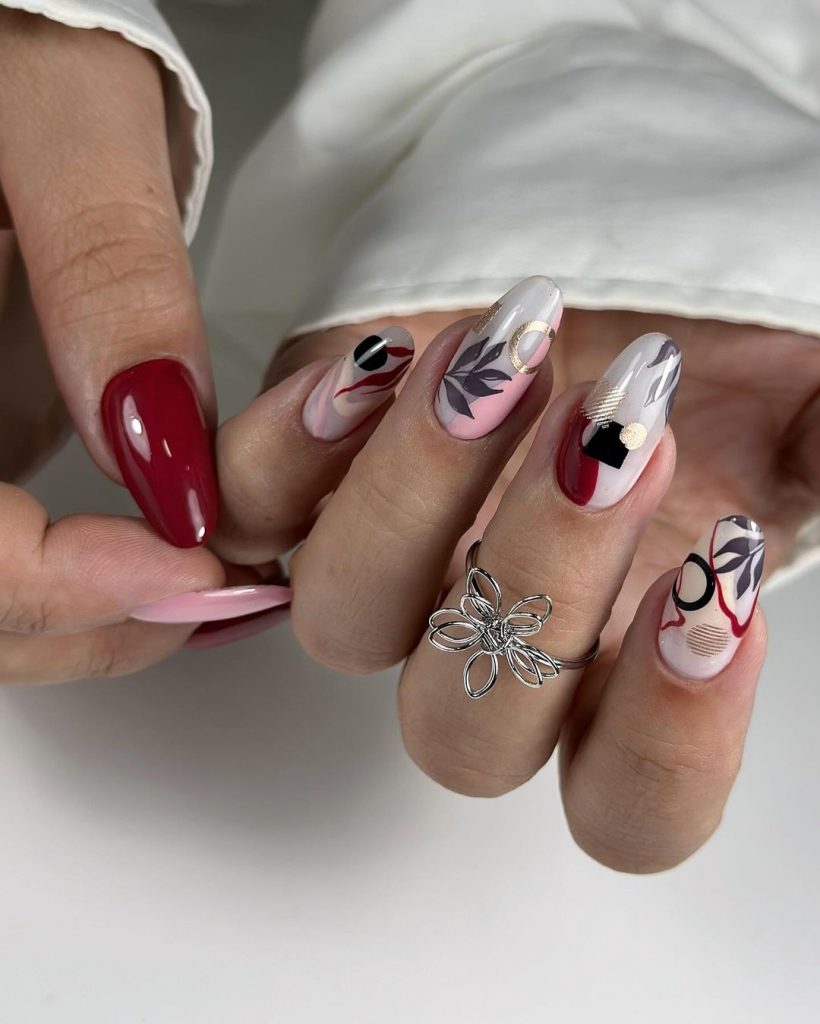
Consumables:
- Red polish (e.g., Essie Nail Polish in “Really Red”)
- Pink polish (e.g., OPI Nail Lacquer in “Mod About You”)
- Nude base polish (e.g., OPI Nail Lacquer in “Dulce de Leche”)
- Black and gold nail art pens or brushes (e.g., Sally Hansen I Heart Nail Art Pen)
- Top coat (e.g., Seche Vite Dry Fast Top Nail Coat)
DIY Instructions:
- Apply a base color of nude, red, and pink on different nails.
- Use black and gold nail art pens to create abstract shapes and lines on each nail.
- Seal the design with a top coat to ensure it lasts.
Autumn Love
The final design features a charming mix of white and red nails with autumn leaves and “Autumn Love” text. The crisp white background makes the colorful leaves stand out, creating a vibrant and cheerful fall tree nail art look. This design is perfect for celebrating the season with a touch of romance.

Consumables:
- White base polish (e.g., Essie Nail Polish in “Blanc”)
- Red polish (e.g., OPI Nail Lacquer in “Big Apple Red”)
- Nail art pens or brushes for the leaves and text (e.g., Sally Hansen I Heart Nail Art Pen)
- Top coat (e.g., Seche Vite Dry Fast Top Nail Coat)
DIY Instructions:
- Apply a white base polish on most nails and red polish on an accent nail.
- Use nail art pens to draw colorful leaves and the “Autumn Love” text on the white nails.
- Finish with a top coat to protect your design and add a glossy finish.
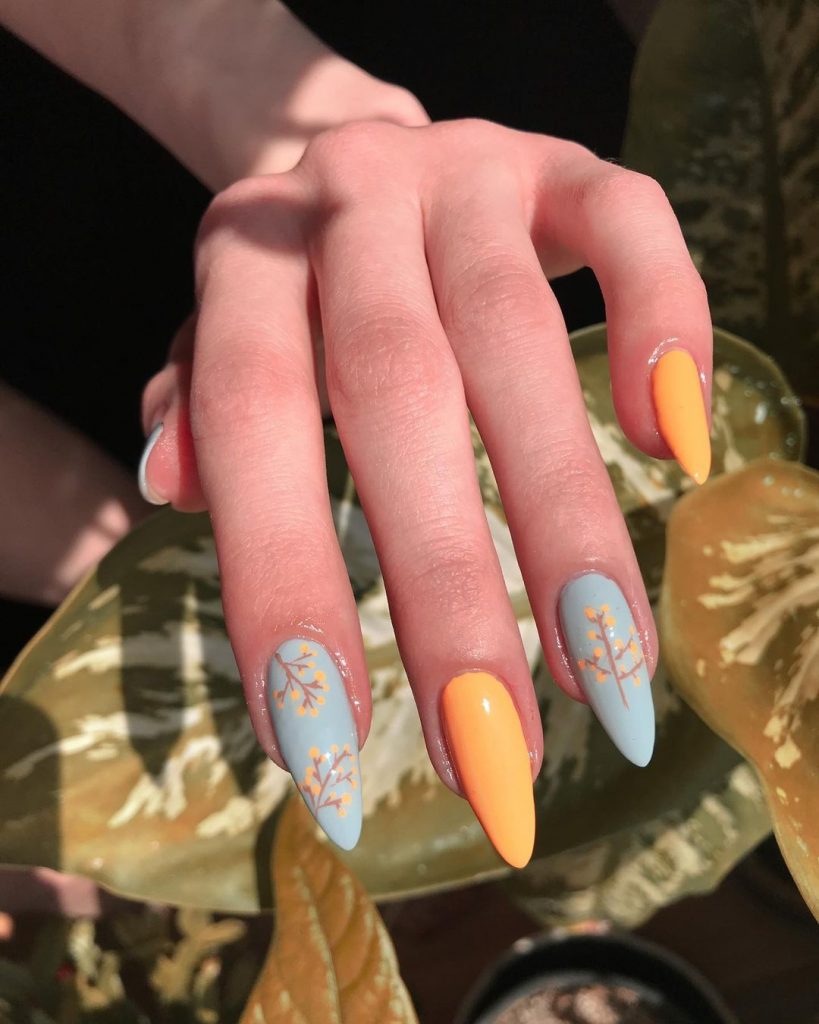
Silver Leaf Accents on Lavender
This design features a stunning lavender base adorned with intricate silver leaf patterns. The delicate leaves create an elegant and sophisticated look, perfect for any occasion. The subtle shimmer of the silver leaves against the pastel lavender adds a touch of glamour to this fall tree nail art. It’s a design that exudes grace and is sure to draw compliments.

Consumables:
- Lavender base polish (e.g., Essie Nail Polish in “Lilacism”)
- Silver nail art pen or foil (e.g., ArtClub Nail Art Pen in Silver)
- Top coat (e.g., Seche Vite Dry Fast Top Nail Coat)
DIY Instructions:
- Apply a lavender base polish and let it dry completely.
- Use a silver nail art pen or foil to draw or apply leaf patterns on each nail.
- Finish with a top coat to seal the design and add shine.
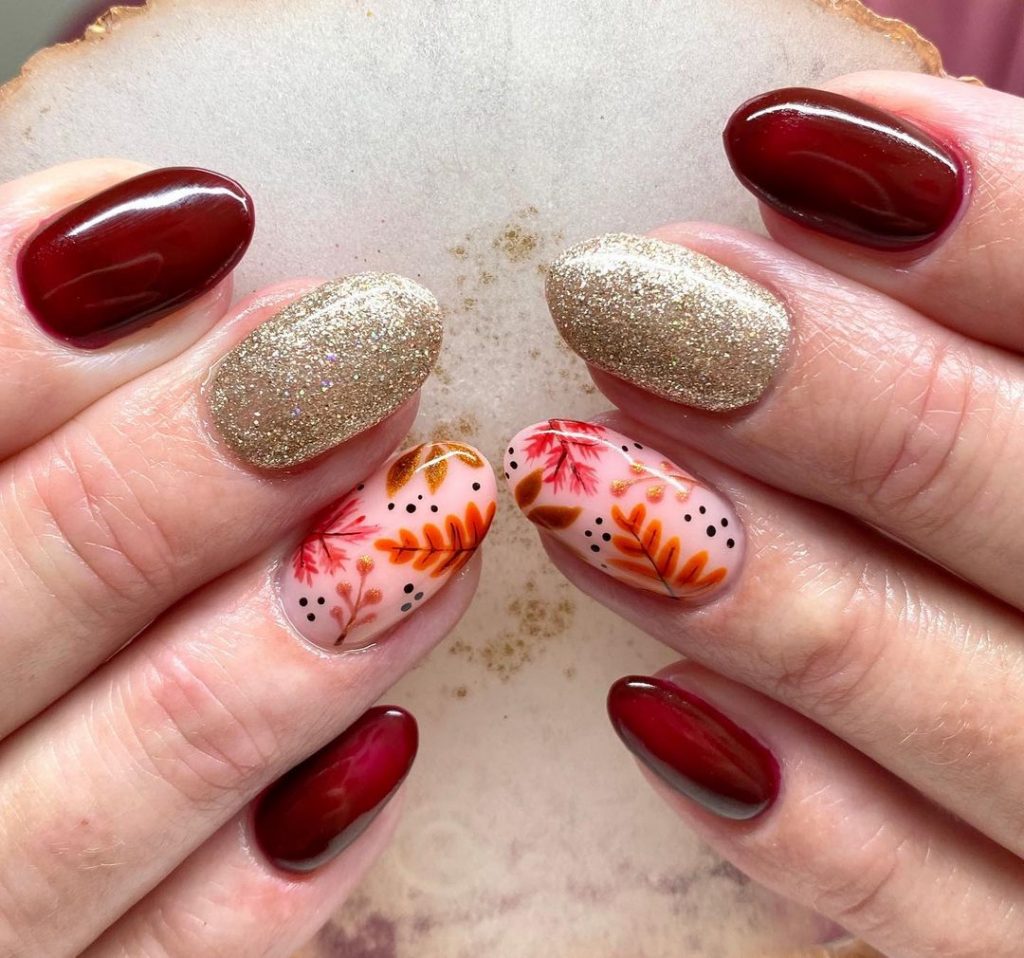
Autumn Glitter and Red
This bold design combines deep red nails with sparkling gold glitter and intricate autumn leaf patterns. The rich red is complemented by the glitzy gold, creating a luxurious look. The detailed autumn leaves add a seasonal touch, making this manicure a perfect choice for those who love a bit of sparkle in their fall tree nail art.
Consumables:
- Deep red polish (e.g., OPI Nail Lacquer in “Malaga Wine”)
- Gold glitter polish (e.g., China Glaze Nail Polish in “Golden Enchantment”)
- Orange and red polishes for leaf accents (e.g., Essie Nail Polish in “Playing Koi” and “Forever Yummy”)
- Black nail art pen (e.g., Sally Hansen I Heart Nail Art Pen)
- Top coat (e.g., Seche Vite Dry Fast Top Nail Coat)
DIY Instructions:
- Apply deep red polish on most nails and gold glitter on two accent nails.
- Use orange and red polishes to paint autumn leaves on the glitter nails.
- Add black details to the leaves using a nail art pen.
- Seal the design with a top coat to ensure longevity and shine.
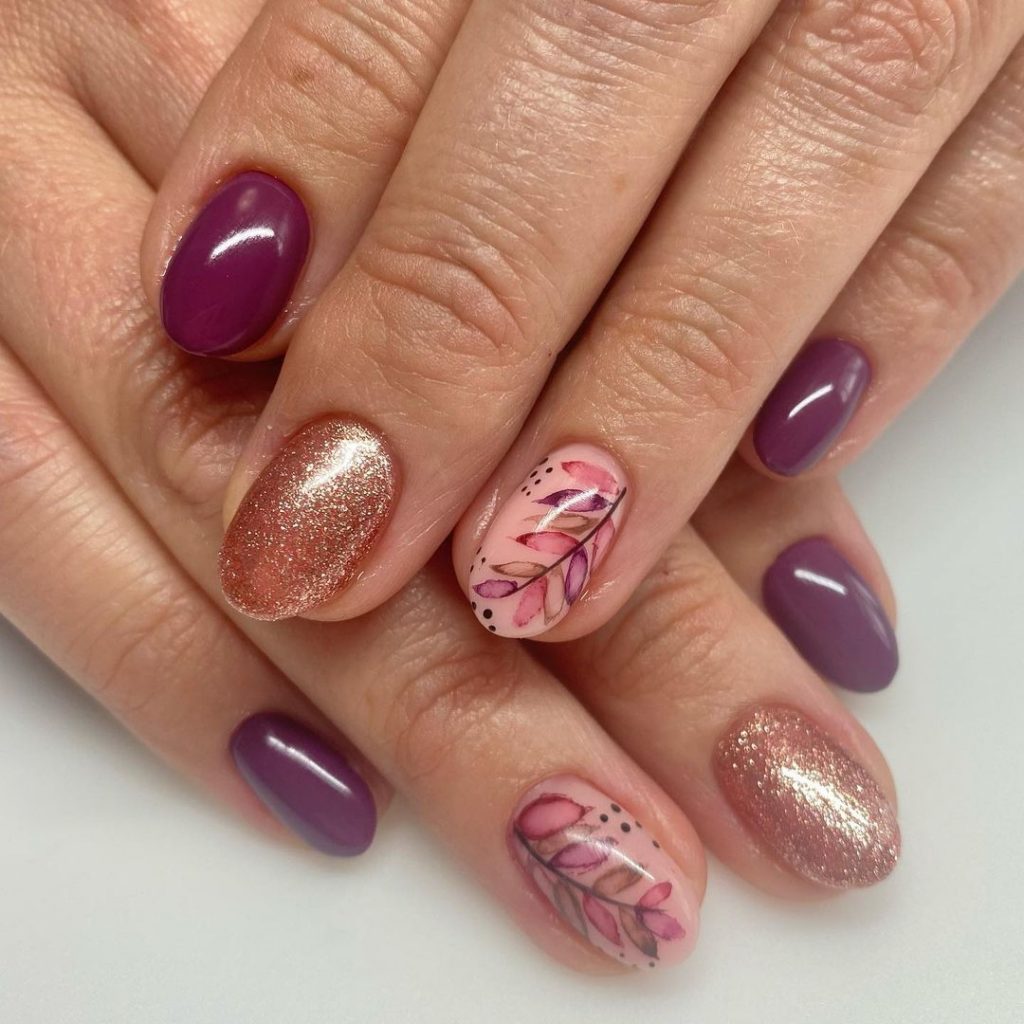
Purple and Gold Leaf Elegance
This design features a sophisticated combination of deep purple, gold glitter, and delicate pink and purple leaf patterns. The deep purple polish exudes elegance, while the gold glitter adds a touch of glamour. The leaf patterns bring an autumnal feel to this fall tree nail art.
Consumables:
- Deep purple polish (e.g., Essie Nail Polish in “Damsel in a Dress”)
- Gold glitter polish (e.g., OPI Nail Lacquer in “Glitzerland”)
- Pink and purple polishes for leaf accents (e.g., Essie Nail Polish in “Splash of Grenadine” and “Bahama Mama”)
- Black nail art pen (e.g., Sally Hansen I Heart Nail Art Pen)
- Top coat (e.g., Seche Vite Dry Fast Top Nail Coat)
DIY Instructions:
- Apply deep purple polish on most nails and gold glitter on two accent nails.
- Use pink and purple polishes to paint delicate leaf patterns on the accent nails.
- Add black details to the leaves using a nail art pen.
- Finish with a top coat to seal the design.
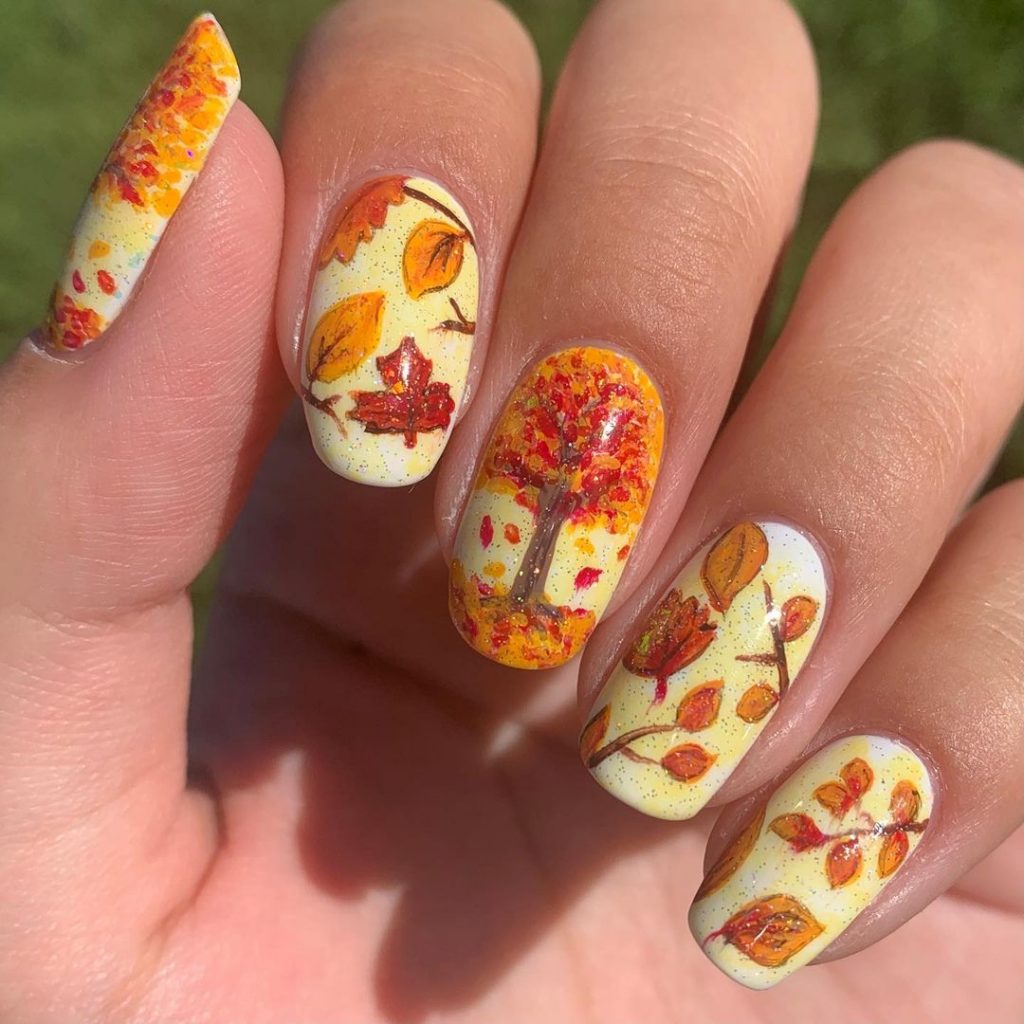
Vibrant Autumn Leaves
This vibrant design captures the full spectrum of autumn colors with detailed leaves in yellow, red, and orange. The creamy white base provides a perfect canvas for the colorful leaves, creating a cheerful and lively fall tree nail art look. This design is ideal for those who want to celebrate the season with bold and bright colors.
Consumables:
- Creamy white base polish (e.g., Essie Nail Polish in “Marshmallow”)
- Yellow, red, and orange polishes for the leaves (e.g., OPI Nail Lacquer in “Sun, Sea, and Sand in My Pants,” “Big Apple Red,” and “Meet Me at Sunset”)
- Fine brush for detailing (e.g., Winstonia Fine Line Brush)
- Top coat (e.g., Seche Vite Dry Fast Top Nail Coat)
DIY Instructions:
- Apply a creamy white base polish and let it dry completely.
- Use yellow, red, and orange polishes to paint detailed autumn leaves on each nail.
- Add finer details using a fine brush.
- Seal the design with a top coat to protect your artwork and add shine.
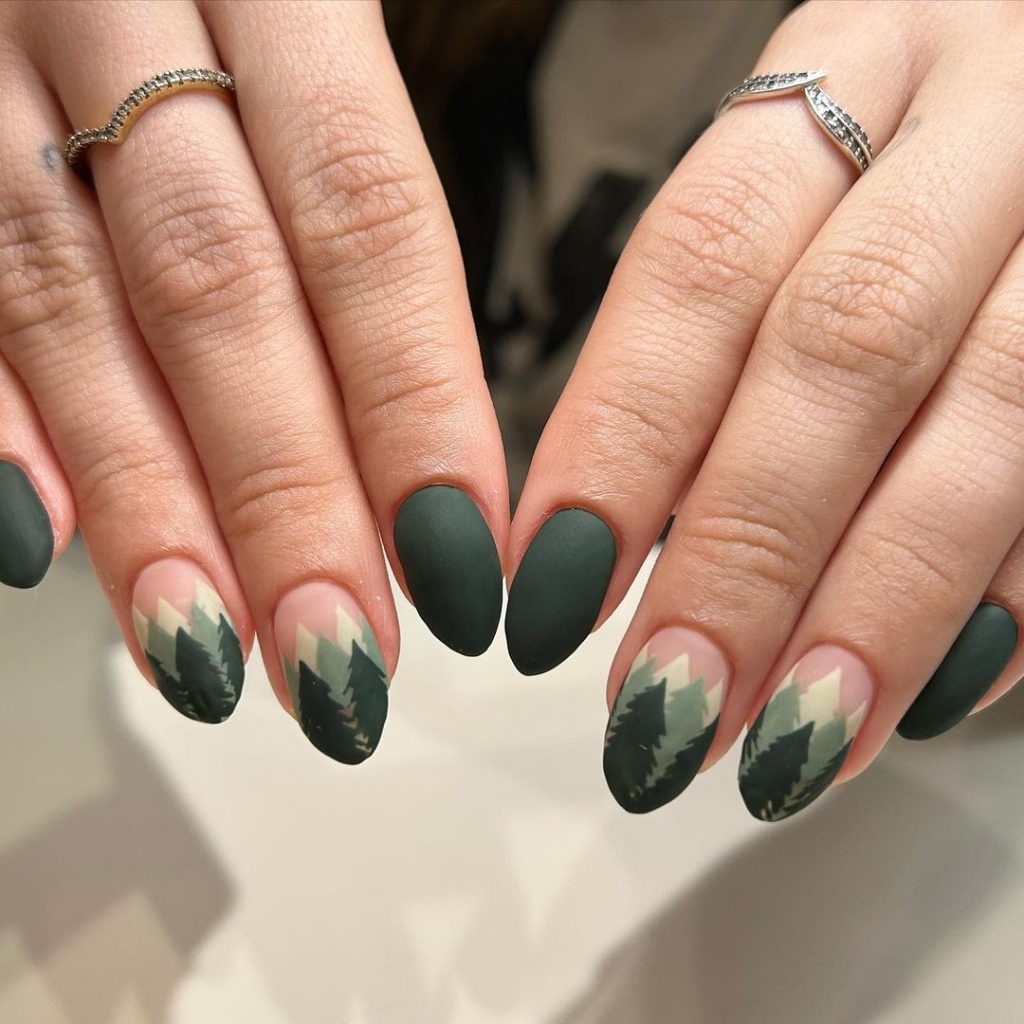
Matte Pine Tree Design
This sophisticated design features a matte finish with dark green pine tree silhouettes on a nude base. The contrast between the matte and glossy finishes adds depth to the design, making it perfect for those who appreciate understated elegance in their fall tree nail art.
Consumables:
- Nude base polish (e.g., OPI Nail Lacquer in “Samoan Sand”)
- Dark green matte polish (e.g., Essie Nail Polish in “Off Tropic” with a matte top coat)
- Fine brush for painting (e.g., Winstonia Fine Line Brush)
- Matte top coat (e.g., Essie Matte About You Top Coat)
DIY Instructions:
- Apply a nude base polish and let it dry completely.
- Use a fine brush and dark green matte polish to paint pine tree silhouettes on each nail.
- Apply a matte top coat to ensure the design has a matte finish and lasts longer.
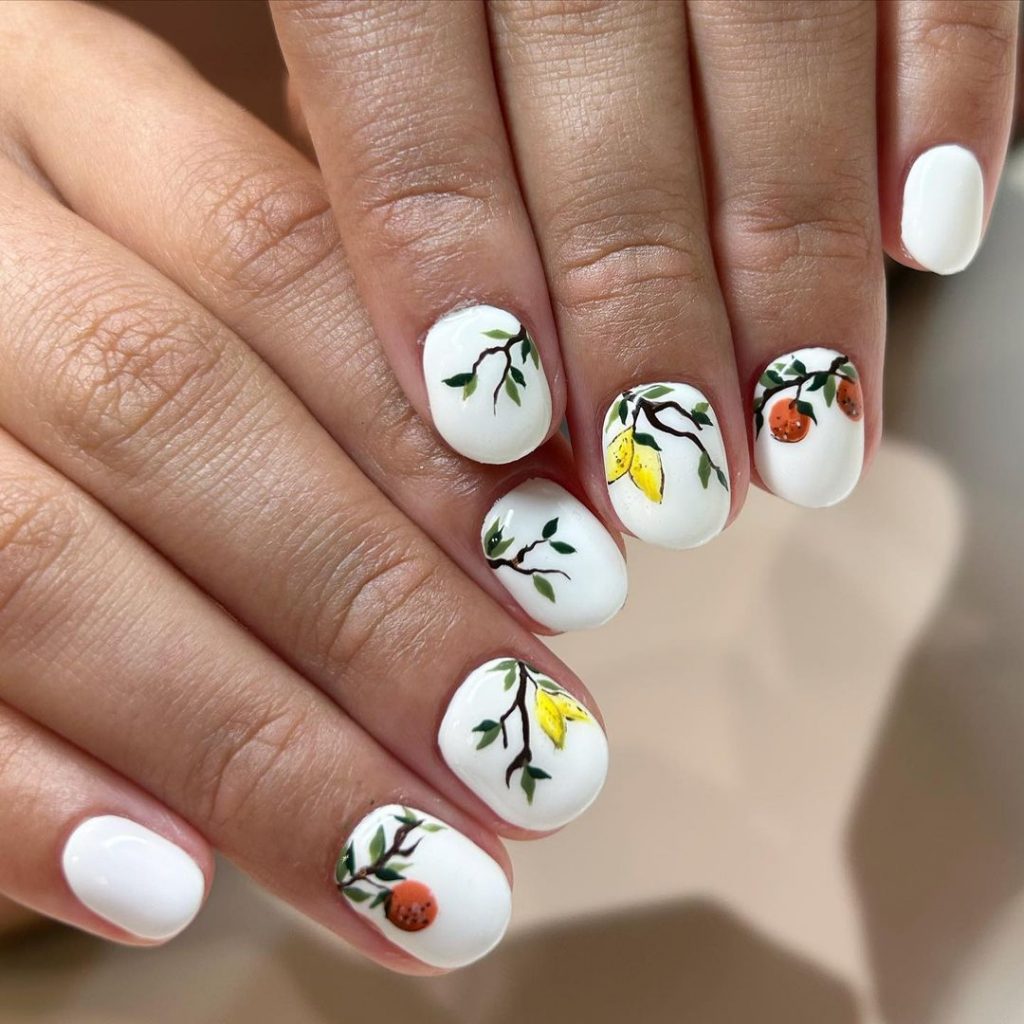
Citrus Tree Design
This fresh and vibrant design features small branches with leaves and citrus fruits on a bright white base. The detailed lemons and oranges create a playful and refreshing look, perfect for adding a pop of color to your autumn style. This fall tree nail art design is ideal for those who love a cheerful and lively manicure.
Consumables:
- White base polish (e.g., Essie Nail Polish in “Blanc”)
- Green polish for leaves (e.g., OPI Nail Lacquer in “Green Come True”)
- Yellow and orange polishes for fruits (e.g., Essie Nail Polish in “Hay There” and “Tangerine Tease”)
- Black nail art pen for branches (e.g., Sally Hansen I Heart Nail Art Pen)
- Top coat (e.g., Seche Vite Dry Fast Top Nail Coat)
DIY Instructions:
- Apply a white base polish and let it dry completely.
- Use a black nail art pen to draw small branches on each nail.
- Paint green leaves and add yellow and orange fruits using a fine brush.
- Seal the design with a top coat to protect your artwork and add shine.
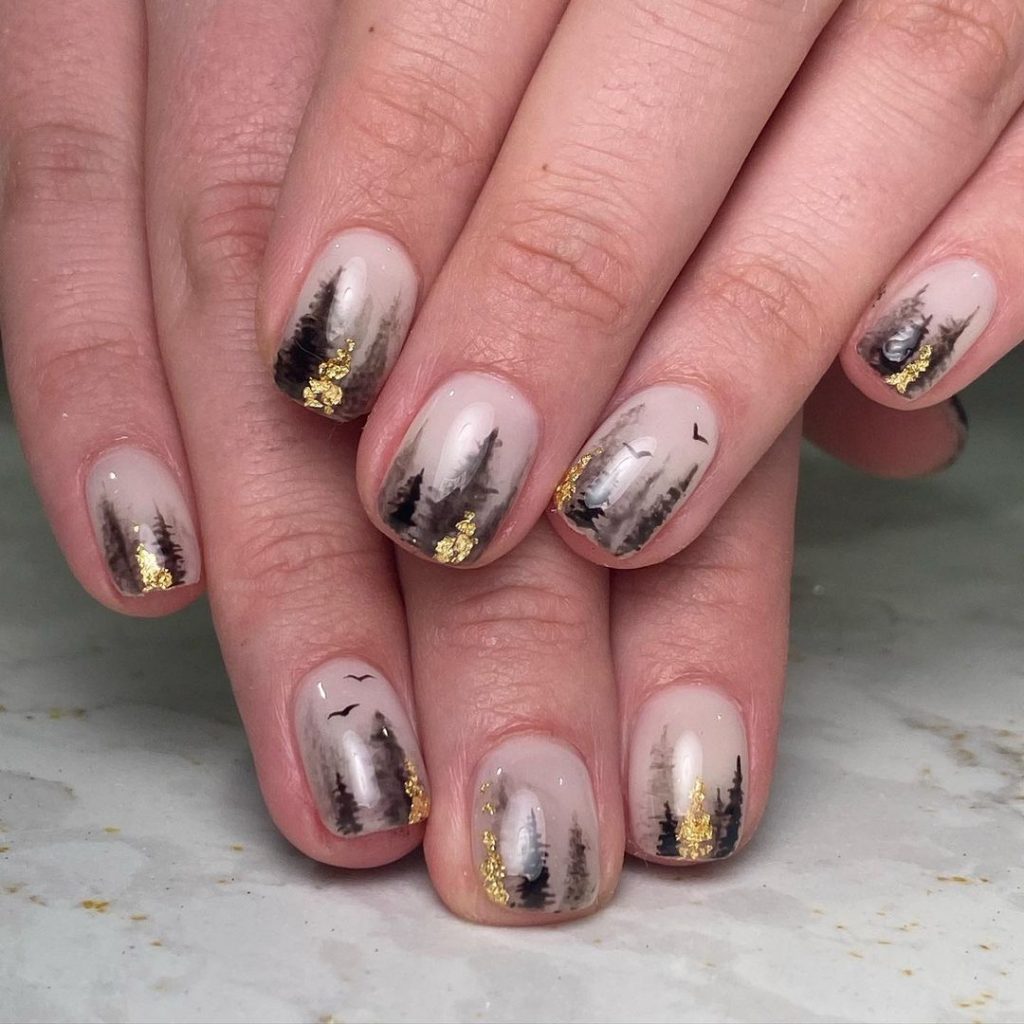
Misty Pine Forest
This design captures the mystique of a pine forest shrouded in mist, with dark trees emerging from a soft, muted background. The addition of gold foil accents brings a touch of luxury to this serene and sophisticated fall tree nail art look.
Consumables:
- Nude base polish (e.g., OPI Nail Lacquer in “Samoan Sand”)
- Dark green and brown polishes for trees (e.g., Essie Nail Polish in “Off Tropic” and “Partner in Crime”)
- Gold foil for accents (e.g., Nail Art Gold Foil Flakes)
- Fine brush for detailing (e.g., Winstonia Fine Line Brush)
- Top coat (e.g., Seche Vite Dry Fast Top Nail Coat)
DIY Instructions:
- Apply a nude base polish and let it dry completely.
- Use dark green and brown polishes with a fine brush to paint misty pine trees.
- Add gold foil accents to enhance the design.
- Finish with a top coat to seal the design and add shine.
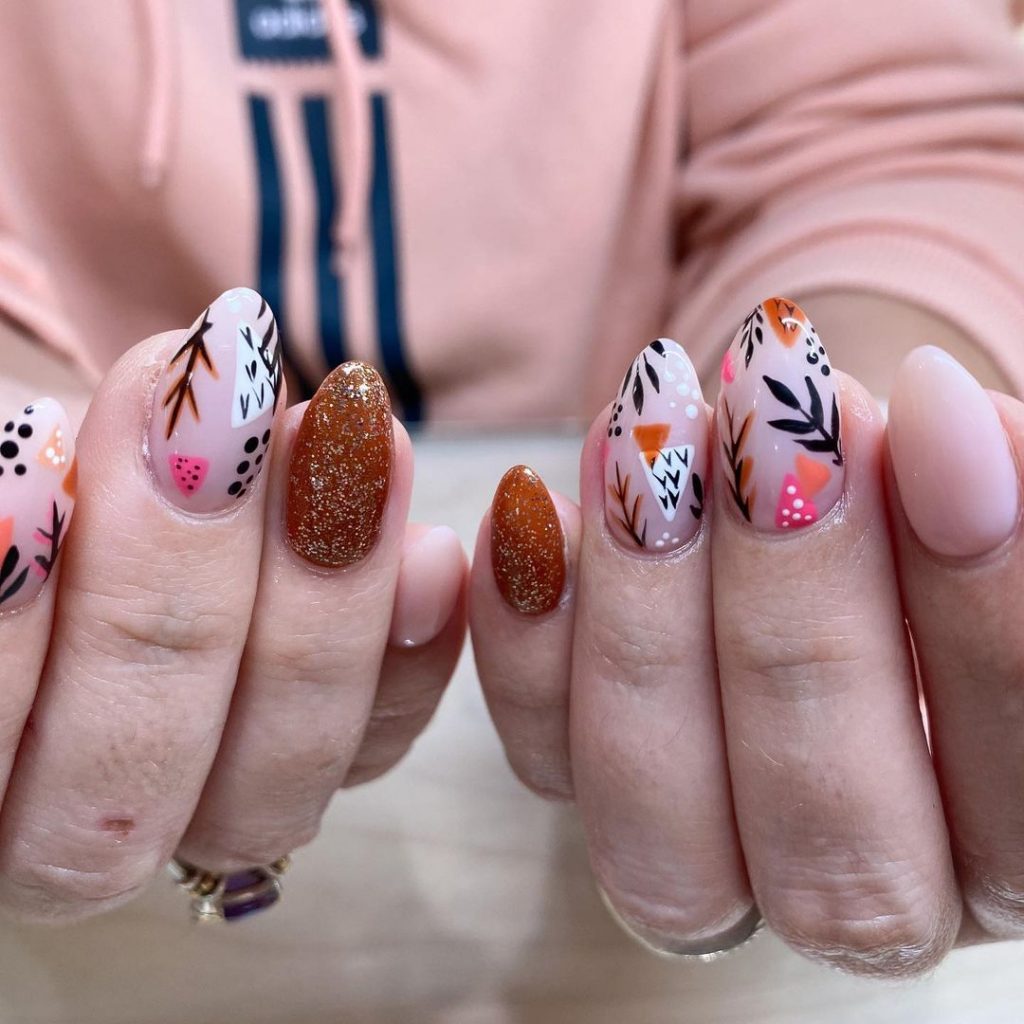
Autumn Abstract
This playful design features a mix of abstract autumn elements, including leaves, berries, and twigs, on a soft nude base. The combination of black, white, and vibrant fall colors creates a dynamic and artistic fall tree nail art look.
Consumables:
- Nude base polish (e.g., Essie Nail Polish in “Ballet Slippers”)
- Black, white, and various fall-colored polishes for accents (e.g., OPI Nail Lacquer in “Black Onyx,” “Alpine Snow,” “Pumpkin Spice,” and “Maple Leaf”)
- Gold glitter polish (e.g., China Glaze Nail Polish in “Golden Enchantment”)
- Top coat (e.g., Seche Vite Dry Fast Top Nail Coat)
DIY Instructions:
- Apply a nude base polish and let it dry completely.
- Use black and white polishes to create abstract shapes and outlines of leaves and berries.
- Fill in with fall-colored polishes and add gold glitter for a touch of sparkle.
- Seal the design with a top coat to ensure it lasts.
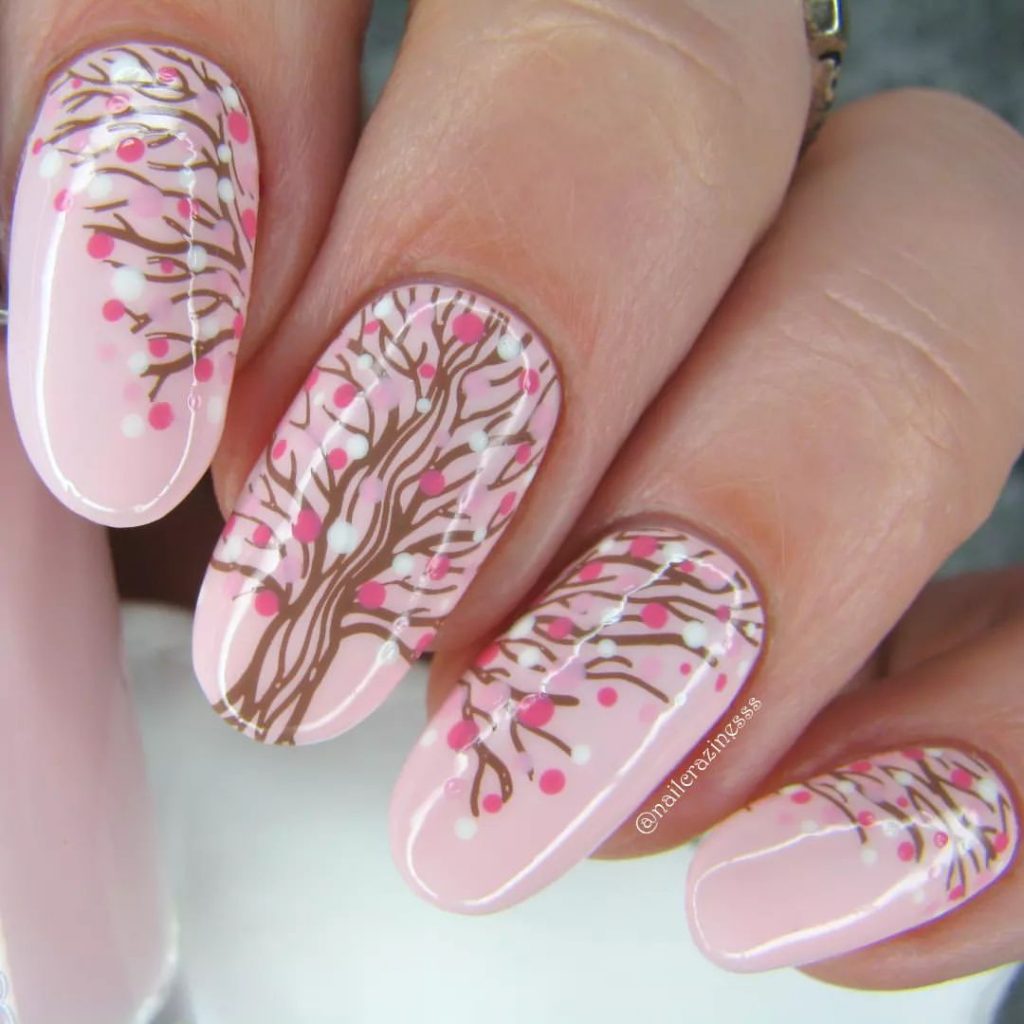
Cherry Blossom Delight
This elegant design features delicate cherry blossom branches on a soft pink base. The detailed flowers and branches create a serene and feminine look, perfect for a sophisticated fall tree nail art style.
Consumables:
- Pink base polish (e.g., Essie Nail Polish in “Fiji”)
- Brown polish for branches (e.g., OPI Nail Lacquer in “You Don’t Know Jacques!”)
- White and pink polishes for blossoms (e.g., Essie Nail Polish in “Blanc” and “Mod About You”)
- Fine brush for detailing (e.g., Winstonia Fine Line Brush)
- Top coat (e.g., Seche Vite Dry Fast Top Nail Coat)
DIY Instructions:
- Apply a pink base polish and let it dry completely.
- Use a fine brush and brown polish to paint delicate branches.
- Add white and pink blossoms to the branches using a fine brush.
- Finish with a top coat to seal the design and add shine.
Sunset Branches
This striking design features bold branches with berries against a sunset gradient of blue and orange. The contrasting colors create a dramatic and eye-catching fall tree nail art look, perfect for those who love a statement manicure.
Consumables:
- Blue and orange polishes for gradient (e.g., Essie Nail Polish in “Butler Please” and “Meet Me At Sunset”)
- Yellow polish for berries (e.g., OPI Nail Lacquer in “Sun, Sea, and Sand in My Pants”)
- Black nail art pen for branches (e.g., Sally Hansen I Heart Nail Art Pen)
- Gradient sponges for blending (e.g., Q-Tips Precision Tips)
- Top coat (e.g., Seche Vite Dry Fast Top Nail Coat)
DIY Instructions:
- Apply a gradient of blue and orange polishes using a sponge, blending the colors seamlessly.
- Use a black nail art pen to draw branches on the gradient nails.
- Add yellow berries to the branches using a fine brush.
- Seal the design with a top coat to ensure longevity and shine.
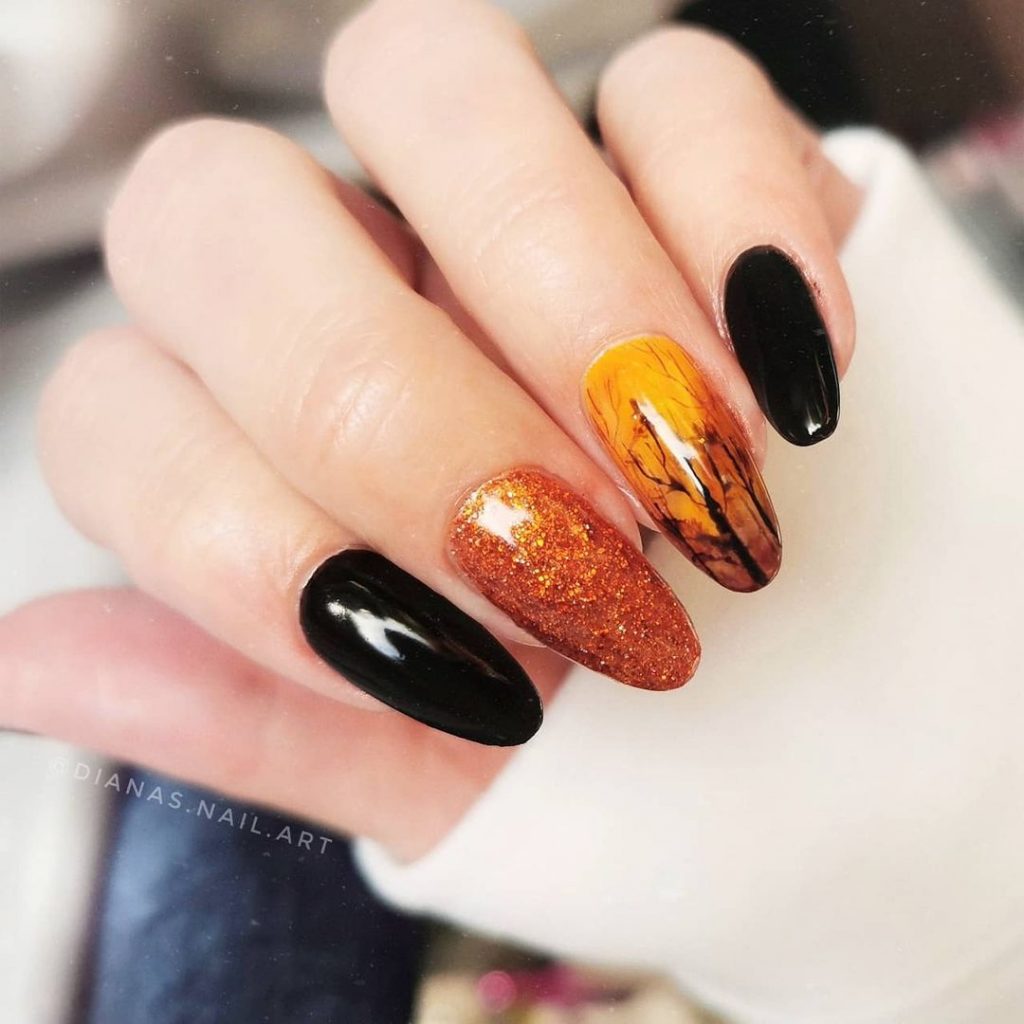
Bold Autumn Blend
This striking fall tree nail art combines bold black polish with a vibrant glittery orange and a sunset tree design. The combination of these colors captures the essence of autumn evenings, making it perfect for those who love dramatic and eye-catching nail designs.
Consumables:
- Black polish (e.g., OPI Nail Lacquer in “Black Onyx”)
- Orange glitter polish (e.g., China Glaze Nail Polish in “Orange You Hot?”)
- Yellow and orange gradient polishes (e.g., Essie Nail Polish in “Sunny Business” and “Meet Me at Sunset”)
- Black nail art pen for the tree design (e.g., Sally Hansen I Heart Nail Art Pen)
- Top coat (e.g., Seche Vite Dry Fast Top Nail Coat)
DIY Instructions:
- Apply black polish on most nails and let it dry.
- Create a gradient with yellow and orange polishes on one accent nail using a sponge.
- Apply orange glitter polish on another accent nail for extra sparkle.
- Draw a tree silhouette on the gradient nail using a black nail art pen.
- Seal the design with a top coat to ensure longevity and shine.
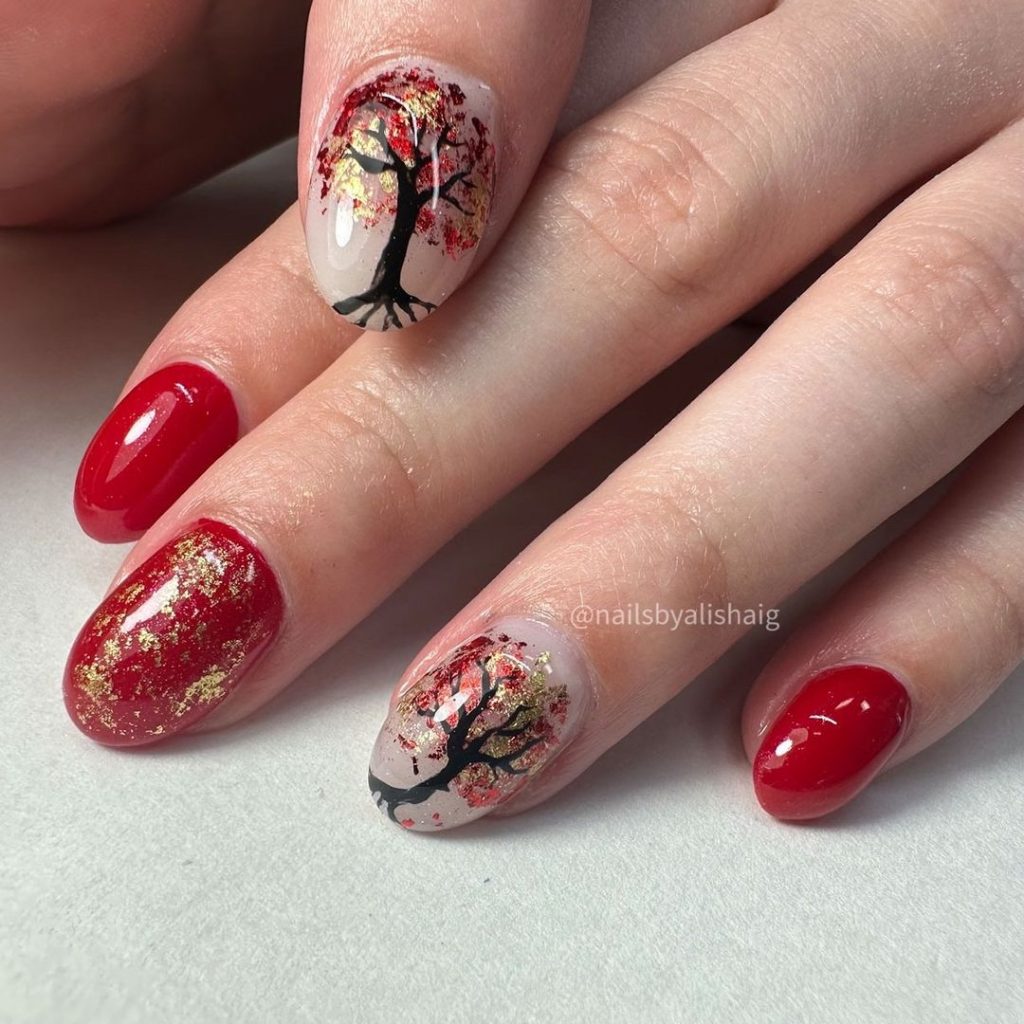
Festive Autumn Tree
This design features a delicate autumn tree with red and gold leaves set against a soft nude base. The surrounding nails are painted in vibrant red and adorned with gold foil, creating a luxurious and festive fall tree nail art look.
Consumables:
- Nude base polish (e.g., OPI Nail Lacquer in “Samoan Sand”)
- Red polish (e.g., Essie Nail Polish in “Really Red”)
- Gold foil for accents (e.g., Nail Art Gold Foil Flakes)
- Black nail art pen for the tree (e.g., Sally Hansen I Heart Nail Art Pen)
- Red and gold glitter polishes for the leaves (e.g., OPI Nail Lacquer in “Big Apple Red” and “Glitzerland”)
- Top coat (e.g., Seche Vite Dry Fast Top Nail Coat)
DIY Instructions:
- Apply a nude base polish on the accent nails and red polish on the others.
- Draw a tree silhouette with a black nail art pen on the nude nails.
- Add red and gold glitter leaves to the tree using a fine brush.
- Apply gold foil to the red nails for a festive touch.
- Finish with a top coat to seal the design.
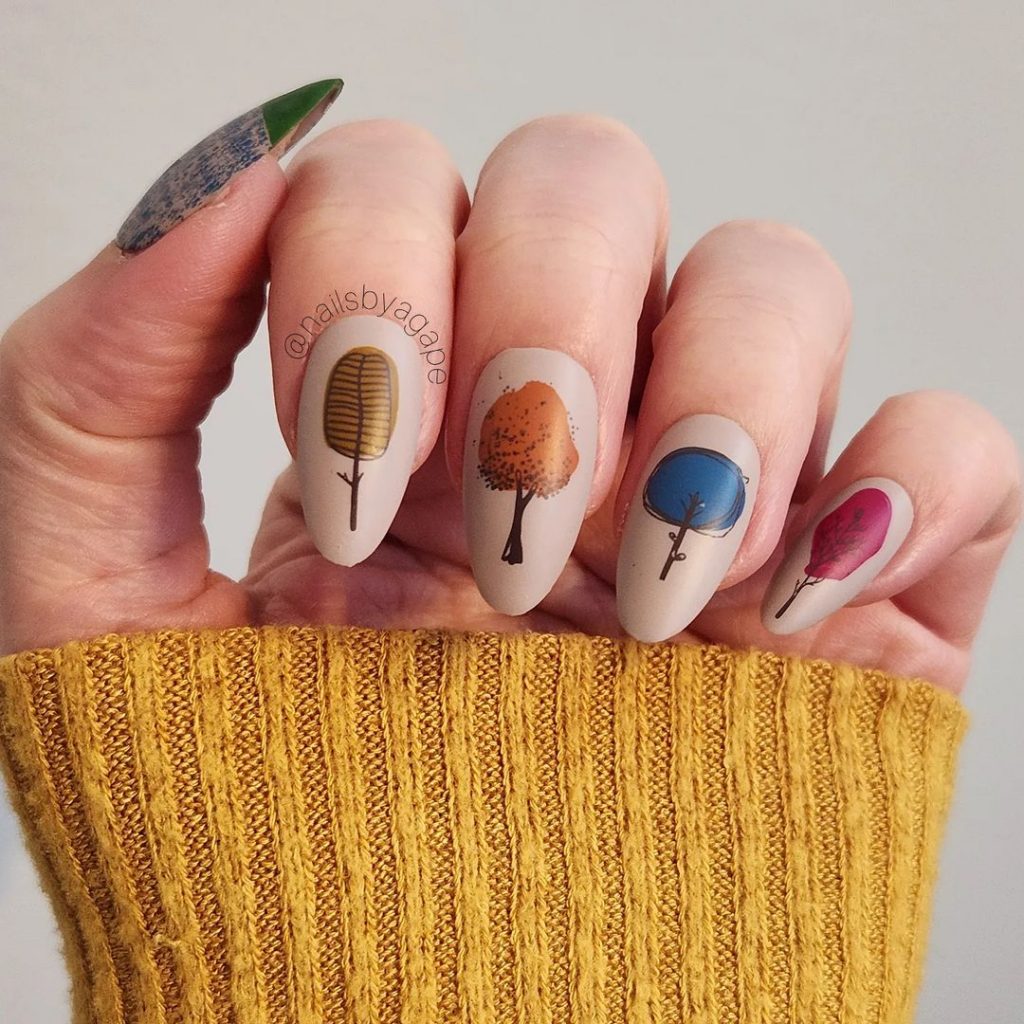
Whimsical Colorful Trees
This whimsical design features a series of colorful trees, each nail showcasing a different tree in vibrant shades of yellow, orange, blue, and pink. The soft matte nude background highlights the bright colors, creating a playful and artistic fall tree nail art look.
Consumables:
- Nude base polish (e.g., OPI Nail Lacquer in “Samoan Sand”)
- Yellow, orange, blue, and pink polishes for the trees (e.g., Essie Nail Polish in “Hay There,” “Meet Me at Sunset,” “Butler Please,” and “Splash of Grenadine”)
- Black nail art pen for the tree outlines (e.g., Sally Hansen I Heart Nail Art Pen)
- Matte top coat (e.g., Essie Matte About You Top Coat)
DIY Instructions:
- Apply a nude base polish and let it dry completely.
- Use a fine brush to paint trees in different colors on each nail.
- Outline the trees with a black nail art pen for definition.
- Seal the design with a matte top coat for a soft finish.
Serene Forest Edge
This serene design features a forest edge with pine trees against a blue gradient sky, creating a peaceful and calming effect. The combination of green and blue shades makes this fall tree nail art perfect for those who love nature-inspired designs.
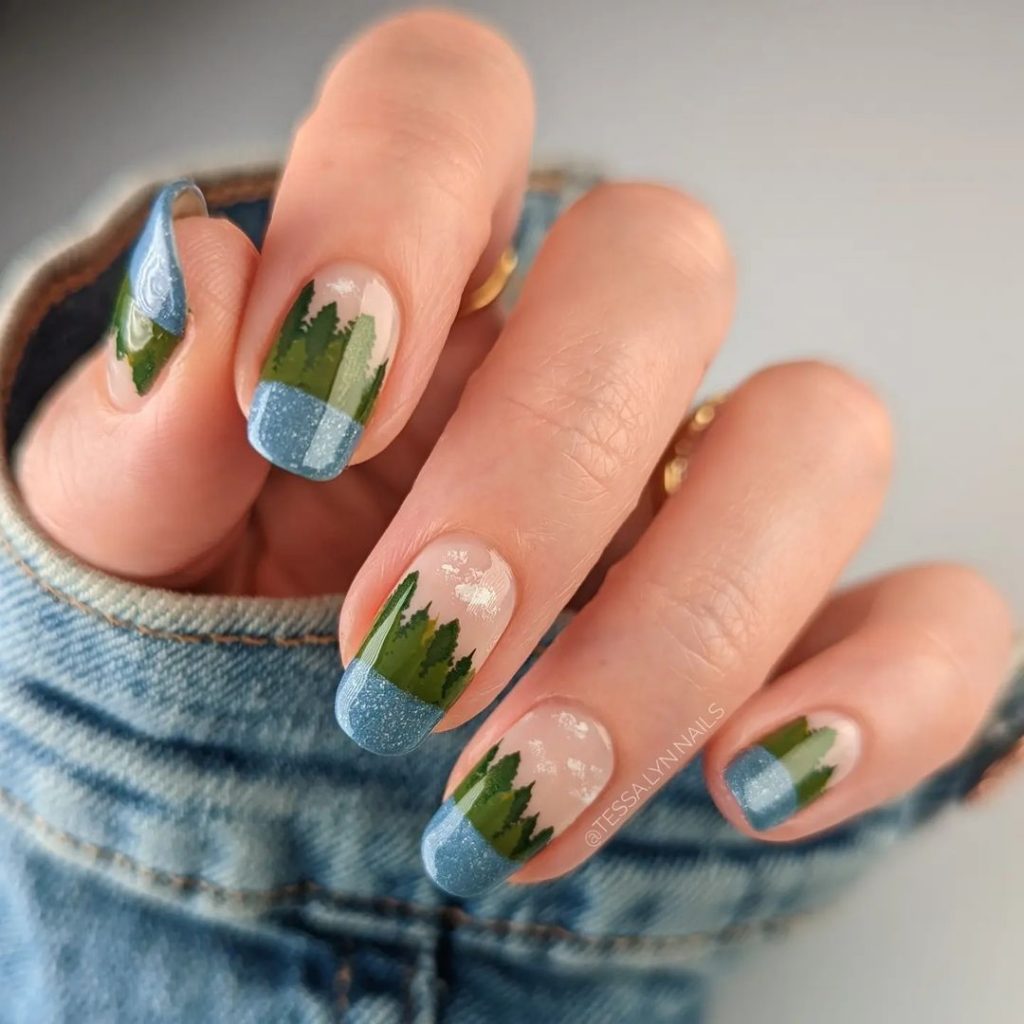
Consumables:
- Nude base polish (e.g., Essie Nail Polish in “Ballet Slippers”)
- Green polish for trees (e.g., OPI Nail Lacquer in “Green Come True”)
- Blue polish for the sky (e.g., Essie Nail Polish in “Butler Please”)
- White polish for clouds (e.g., Essie Nail Polish in “Blanc”)
- Gradient sponges for blending (e.g., Q-Tips Precision Tips)
- Fine brush for detailing (e.g., Winstonia Fine Line Brush)
- Top coat (e.g., Seche Vite Dry Fast Top Nail Coat)
DIY Instructions:
- Apply a nude base polish and let it dry completely.
- Use a sponge to create a blue gradient sky on the tips of each nail.
- Paint green pine trees at the base of the nails using a fine brush.
- Add white clouds to the sky for extra detail.
- Seal the design with a top coat to protect your artwork and add shine.
Silhouette Cat and Tree
This enchanting design features black silhouettes of trees and a cat against a soft matte pink background. The detailed silhouettes create a whimsical and mysterious fall tree nail art look, perfect for those who love unique and artistic designs.
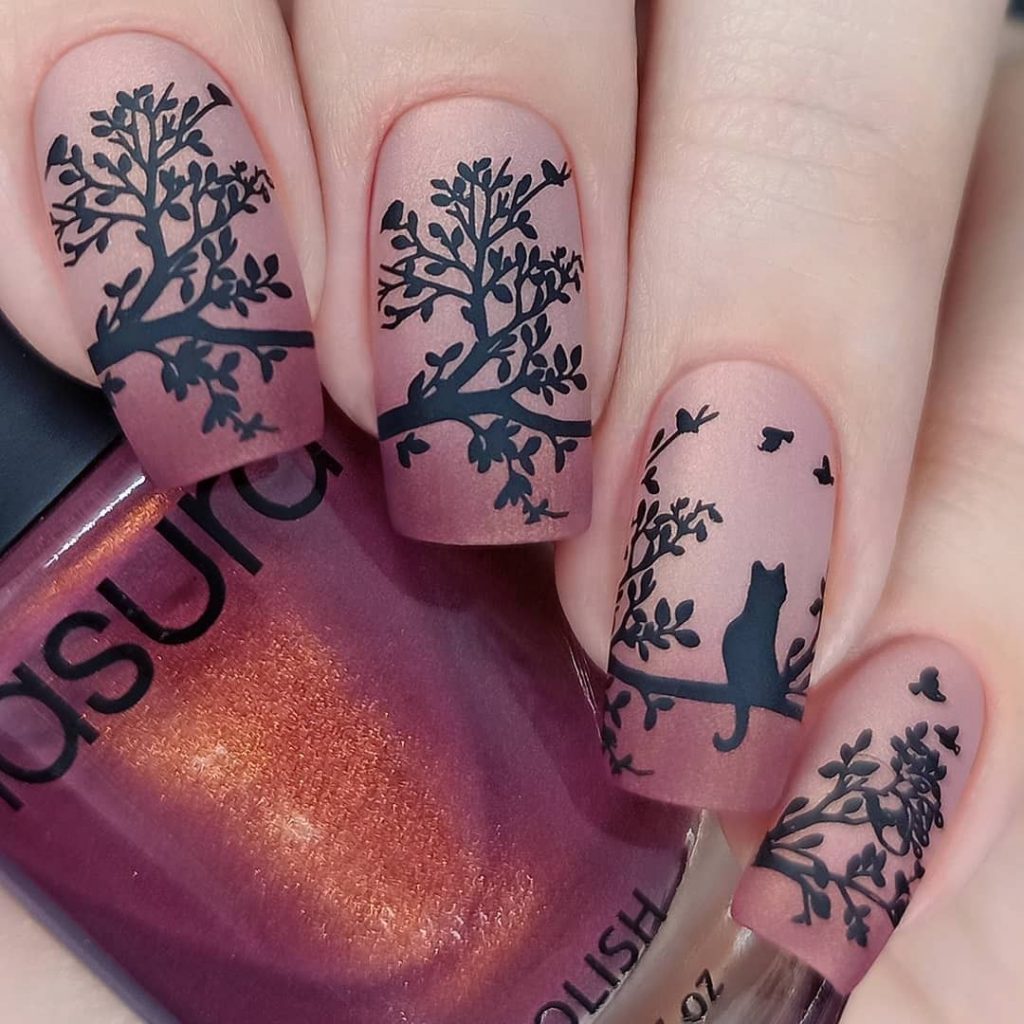
Consumables:
- Matte pink base polish (e.g., Essie Nail Polish in “Ladylike” with a matte top coat)
- Black nail art pen for the silhouettes (e.g., Sally Hansen I Heart Nail Art Pen)
- Top coat (e.g., Essie Matte About You Top Coat)
DIY Instructions:
- Apply a matte pink base polish and let it dry completely.
- Use a black nail art pen to draw silhouettes of trees and a cat on each nail.
- Finish with a matte top coat to seal the design and keep the matte finish.
Autumnal Tree with Red and Gold
This vibrant design features a bold red and orange color scheme with gold leaf accents, and a detailed autumn tree on the accent nail, making it perfect for the fall season.
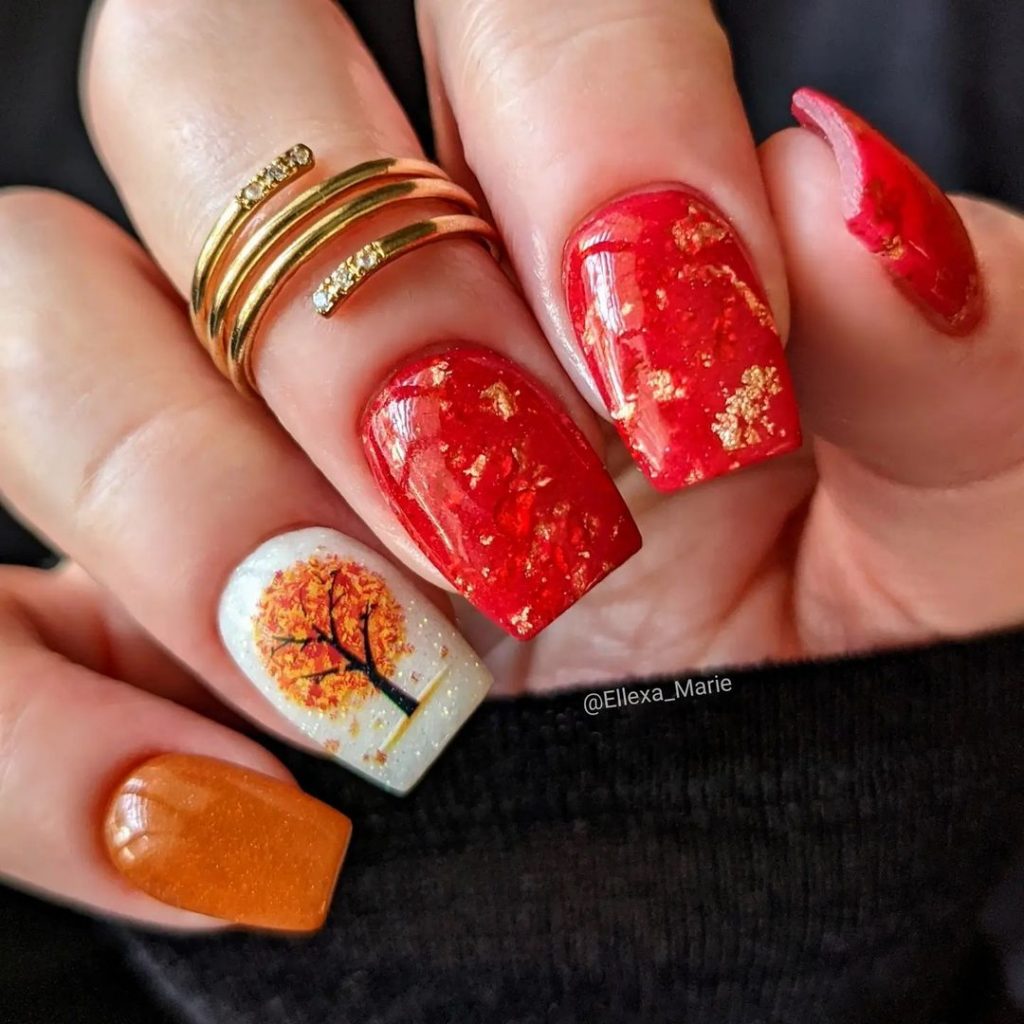
Consumables:
- Red polish (e.g., Essie Nail Polish in “Really Red”)
- Orange polish (e.g., OPI Nail Lacquer in “A Good Man-darin is Hard to Find”)
- Gold leaf or foil (e.g., Born Pretty Nail Art Foil)
- Nude polish for the accent nail (e.g., Essie Nail Polish in “Ballet Slippers”)
- Fine brush for detailing (e.g., Winstonia Fine Line Brush)
- Top coat (e.g., Seche Vite Dry Fast Top Nail Coat)
DIY Instructions:
- Apply red polish on all nails except the ring finger, and orange polish on the ring finger.
- Add gold leaf or foil accents to the red nails.
- Using a fine brush, paint an autumn tree on the accent nail with red and orange leaves.
- Seal the design with a top coat to protect your artwork and add shine.
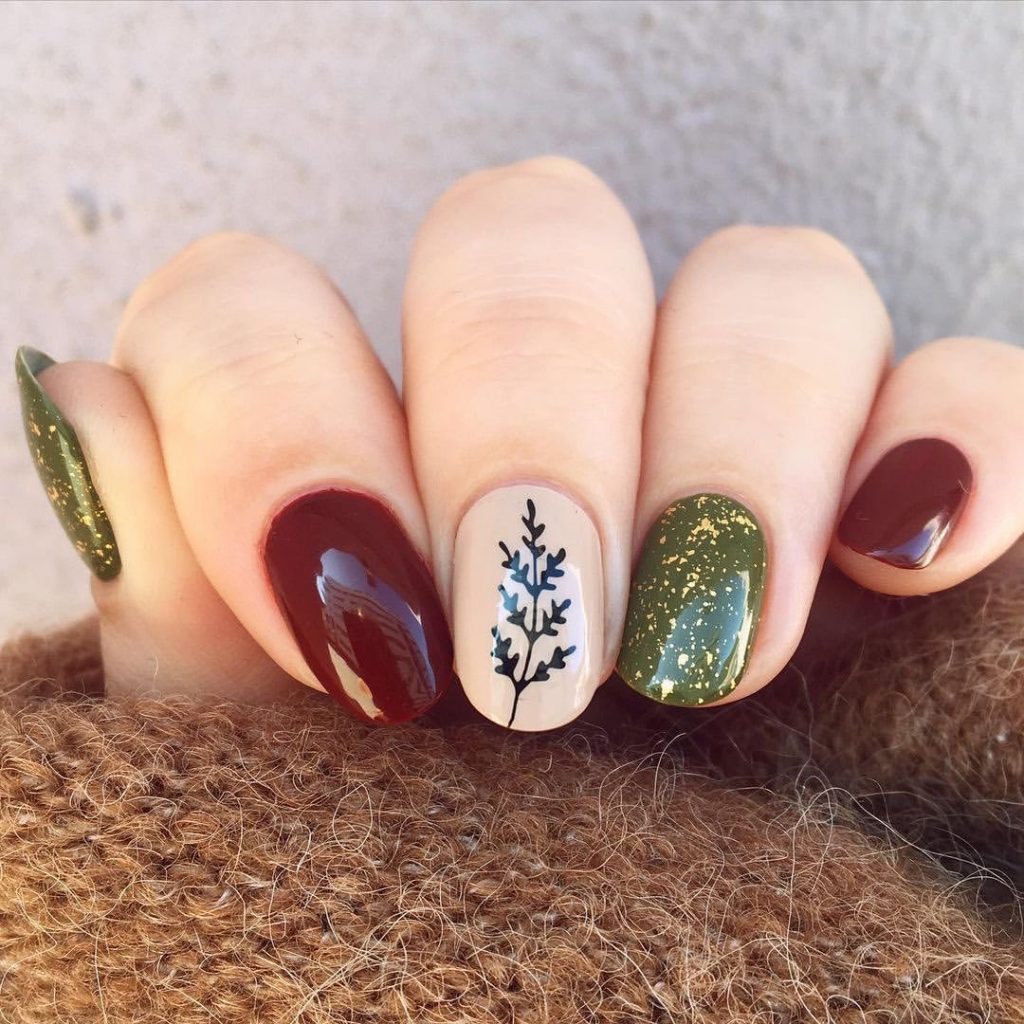
Forest and Leaf Accent
This design combines rich maroon and deep green polishes with gold glitter accents and a simple leaf motif, capturing the essence of the autumn forest.
Consumables:
- Maroon polish (e.g., OPI Nail Lacquer in “Malaga Wine”)
- Deep green polish (e.g., Essie Nail Polish in “Off Tropic”)
- Gold glitter polish (e.g., China Glaze Nail Lacquer in “Golden Enchantment”)
- Nude polish for the accent nail (e.g., Essie Nail Polish in “Ballet Slippers”)
- Fine brush for detailing (e.g., Winstonia Fine Line Brush)
- Top coat (e.g., Seche Vite Dry Fast Top Nail Coat)
DIY Instructions:
- Apply maroon polish on the thumb and pinky, and green polish on the index and middle fingers.
- Use nude polish for the accent nail and let it dry completely.
- Apply gold glitter polish on the green nails for extra sparkle.
- Using a fine brush, paint a simple leaf motif on the accent nail.
- Seal the design with a top coat to protect your artwork and add shine.
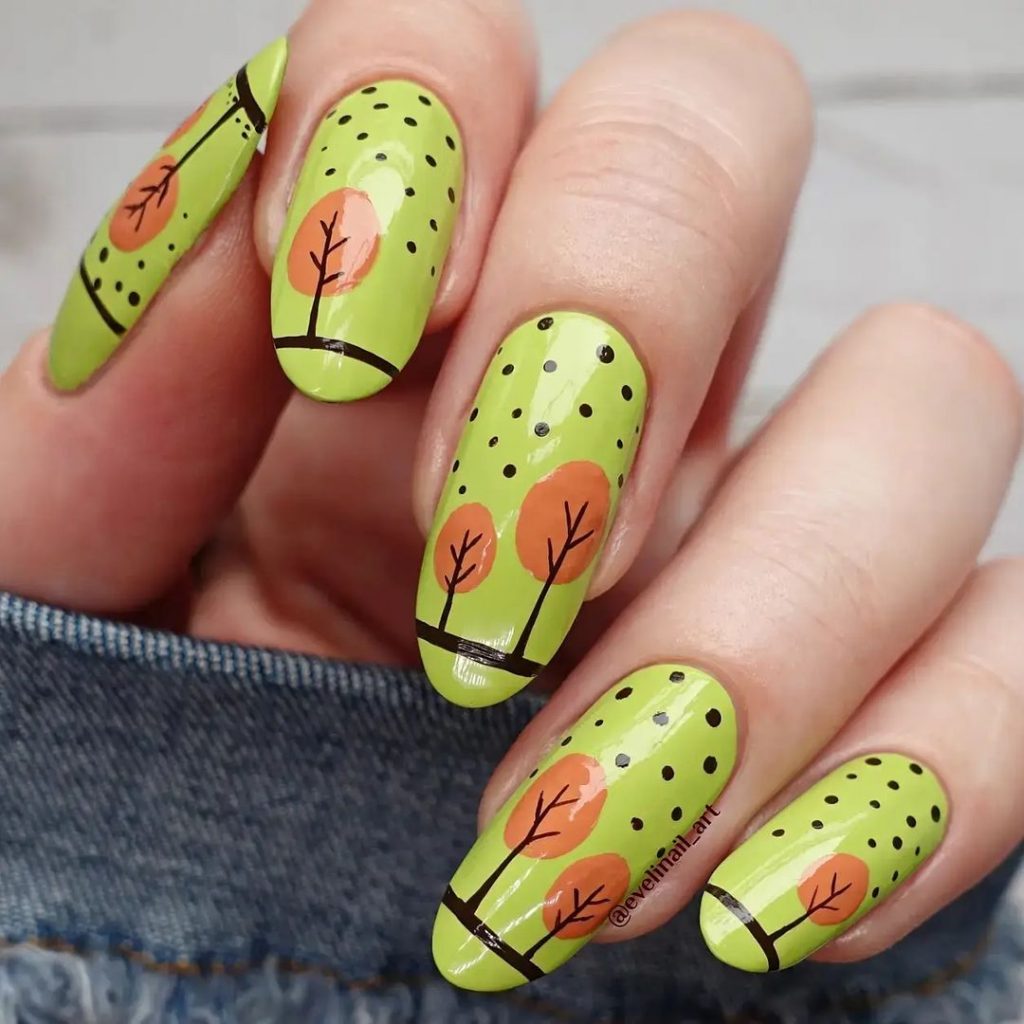
Polka Dot Trees
This playful design features green nails with cute orange and black polka dot trees, perfect for a fun and whimsical autumn look.
Consumables:
- Green polish (e.g., Essie Nail Polish in “Mojito Madness”)
- Orange polish for trees (e.g., OPI Nail Lacquer in “A Good Man-darin is Hard to Find”)
- Black polish for tree outlines and polka dots (e.g., OPI Nail Lacquer in “Black Onyx”)
- Dotting tool for polka dots (e.g., PUEEN Dotting Tools)
- Fine brush for detailing (e.g., Winstonia Fine Line Brush)
- Top coat (e.g., Seche Vite Dry Fast Top Nail Coat)
DIY Instructions:
- Apply green polish on all nails and let it dry completely.
- Using a dotting tool, add black polka dots on each nail.
- With a fine brush, paint orange trees and outline them with black polish.
- Seal the design with a top coat to protect your artwork and add shine.
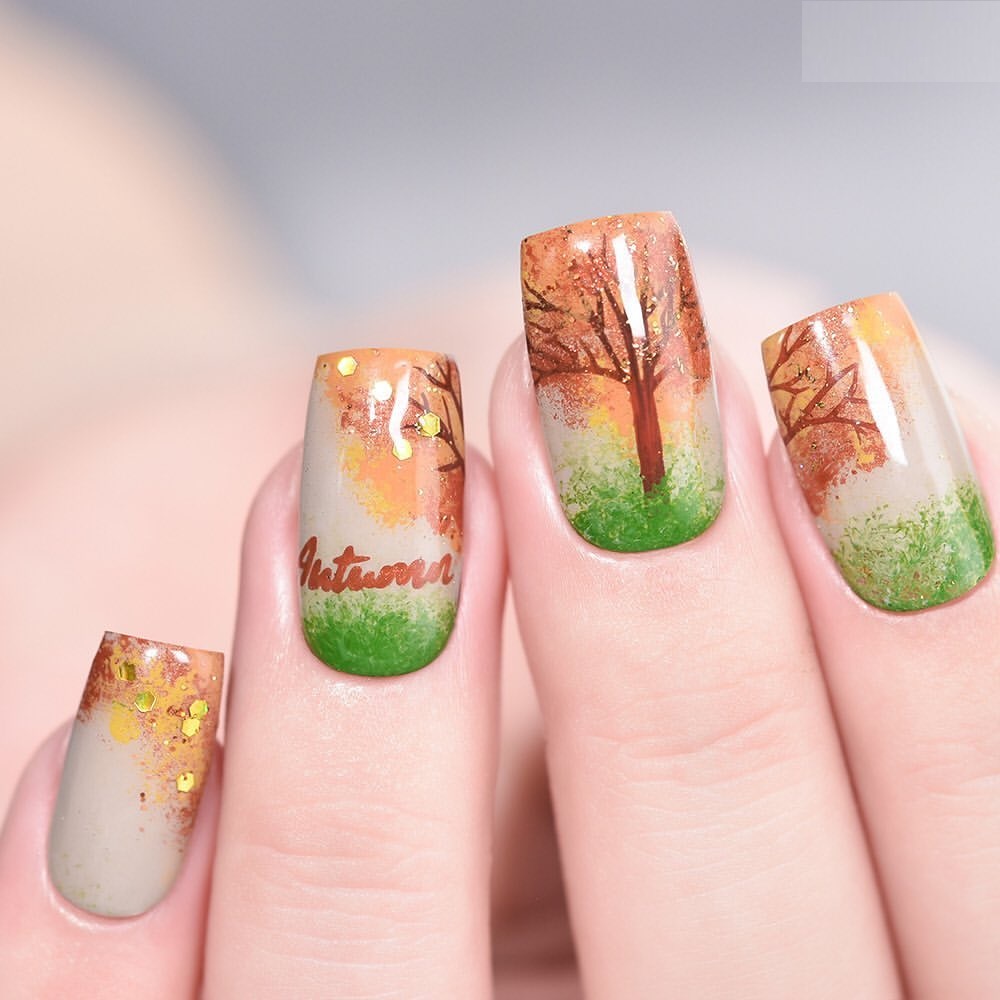
Autumn Forest Scene
This detailed design features a forest scene with trees and falling leaves in warm autumn colors, creating a picturesque and cozy fall nail art.
Consumables:
- Nude base polish (e.g., Essie Nail Polish in “Ballet Slippers”)
- Green, orange, and brown polishes for trees and leaves (e.g., Essie Nail Polish in “Going Incognito”, OPI Nail Lacquer in “A Good Man-darin is Hard to Find”, and OPI Nail Lacquer in “Squeaker of the House”)
- Fine brush for detailing (e.g., Winstonia Fine Line Brush)
- Top coat (e.g., Seche Vite Dry Fast Top Nail Coat)
DIY Instructions:
- Apply a nude base polish and let it dry completely.
- Using a fine brush, paint trees with green, orange, and brown polishes.
- Add falling leaves in various autumn colors for extra detail.
- Seal the design with a top coat to protect your artwork and add shine.
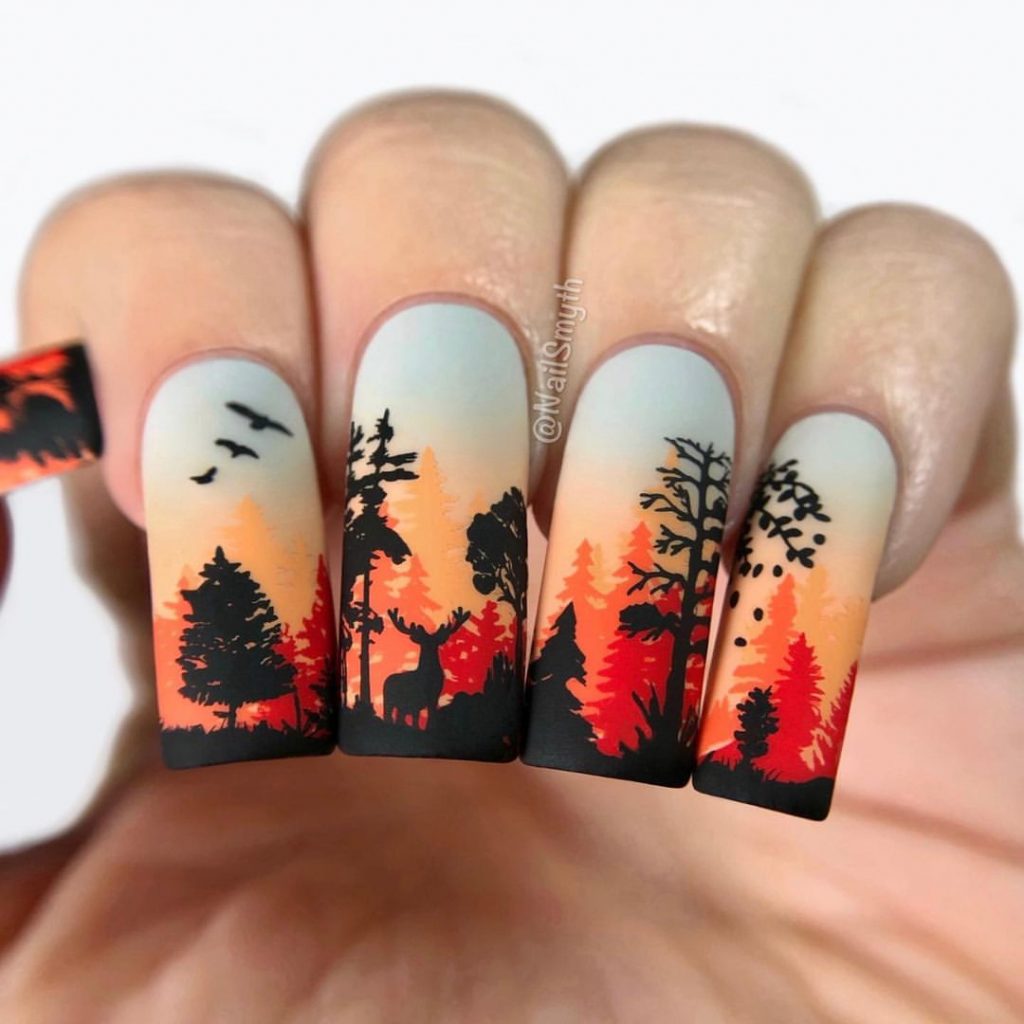
Sunset Forest Silhouette
This striking design features a sunset gradient background with black silhouette trees and animals, capturing the beauty of a forest at dusk.
Consumables:
- Gradient sponges for blending (e.g., Q-Tips Precision Tips)
- Blue, orange, and yellow polishes for the gradient (e.g., Essie Nail Polish in “Butler Please”, OPI Nail Lacquer in “Sun, Sea, and Sand in My Pants”, and Essie Nail Polish in “Tart Deco”)
- Black polish for silhouettes (e.g., OPI Nail Lacquer in “Black Onyx”)
- Fine brush for detailing (e.g., Winstonia Fine Line Brush)
- Top coat (e.g., Seche Vite Dry Fast Top Nail Coat)
DIY Instructions:
- Apply a nude base polish and let it dry completely.
- Create a sunset gradient on each nail using blue, orange, and yellow polishes with a sponge.
- Using a fine brush, paint black silhouette trees and animals on each nail.
- Seal the design with a top coat to protect your artwork and add shine.
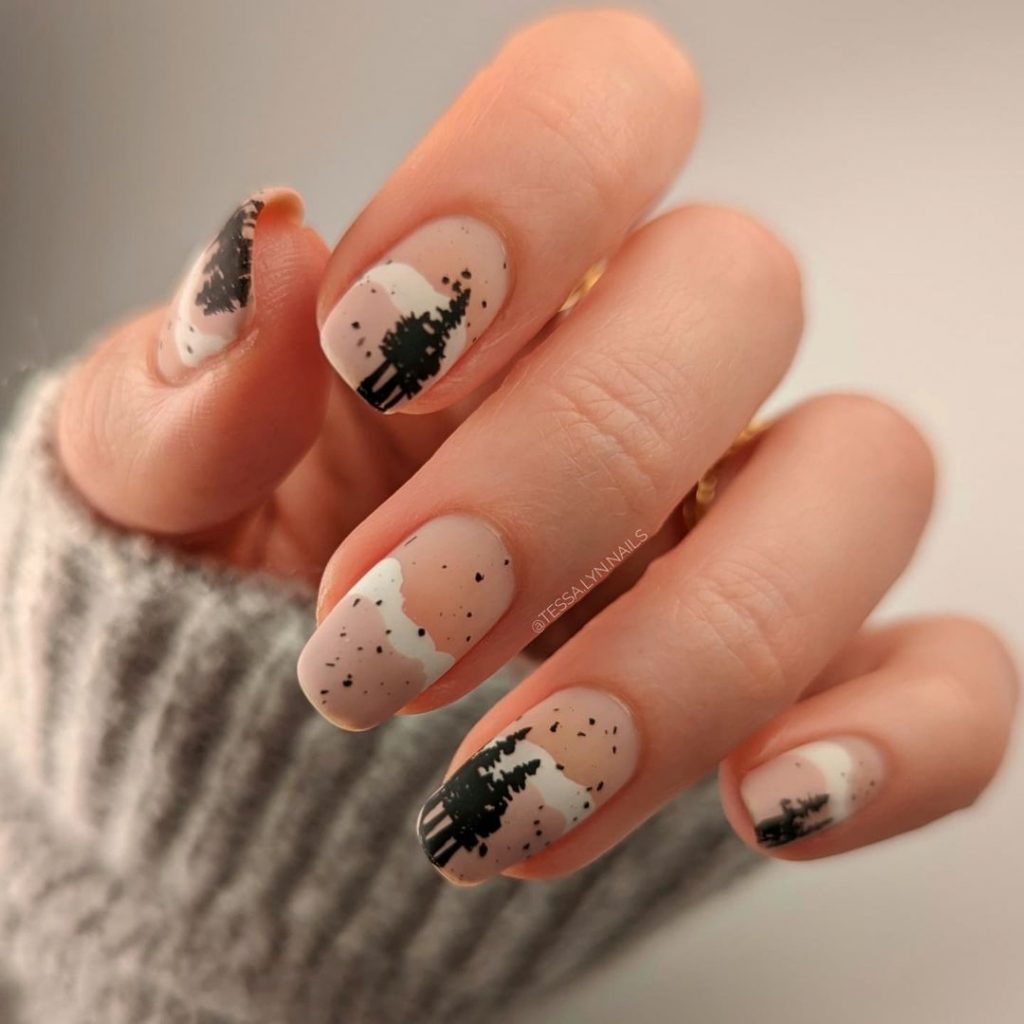
Evergreen Forest
This elegant design features a silhouette of an evergreen forest at dusk, with a soft gradient background and a matte finish, perfect for a sophisticated fall look.
Consumables:
- Gradient sponges for blending (e.g., Q-Tips Precision Tips)
- Blue and beige polishes for the gradient (e.g., Essie Nail Polish in “Butler Please” and Essie Nail Polish in “Sand Tropez”)
- Black polish for silhouettes (e.g., OPI Nail Lacquer in “Black Onyx”)
- Matte top coat (e.g., OPI Matte Top Coat)
- Fine brush for detailing (e.g., Winstonia Fine Line Brush)
DIY Instructions:
- Apply a nude base polish and let it dry completely.
- Create a soft gradient on each nail using blue and beige polishes with a sponge.
- Using a fine brush, paint black silhouette trees on each nail.
- Seal the design with a matte top coat to protect your artwork and add a sophisticated matte finish.
Save Pin